It's Official - my '51 OTCA project

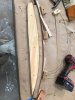
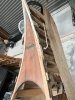
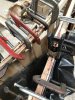
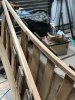
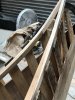
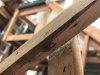
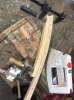
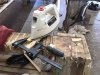
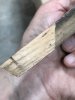
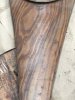
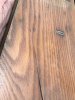
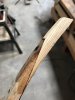
Successfully bent the two bow inwale tips, and cut the tips off with 10" cuts. Next to cut the bent pieces to match. Found that one inwale was slightly thicker than the other, requiring a slightly different angle to get the cuts to begin and end at the same distance from the tip.
 

Attachments

  • IMG_8324.JPG
    IMG_8324.JPG
    191.1 KB · Views: 360
  • IMG_8353.JPG
    IMG_8353.JPG
    209.4 KB · Views: 355
  • IMG_8356.JPG
    IMG_8356.JPG
    189.1 KB · Views: 335
Bow tip replacements fitted and ready for glue. Starting to see the light at the end of these tips! Tomorrow will glue these and start on the stern tips (not bent yet).
 

Attachments

  • IMG_8378.JPG
    IMG_8378.JPG
    158.9 KB · Views: 320
  • IMG_8379.JPG
    IMG_8379.JPG
    220.5 KB · Views: 341
Close enough for the gov't...
 

Attachments

  • IMG_8391.JPG
    IMG_8391.JPG
    203.3 KB · Views: 285
  • IMG_8392.JPG
    IMG_8392.JPG
    196.9 KB · Views: 300
  • IMG_8393.JPG
    IMG_8393.JPG
    160.2 KB · Views: 294
Thanks Dave! Just tapered those tips this afternoon. I need to unbend the new wood about 6" back from the tips, a bit too curved and feel pretty stiff to force. Rag with boiling water? How long to soak?
IMG_8411.JPG
 
How come the cant ribs are beveled at the top so they don't fit against the inwale? Some of them have little patches glued in to fill the void. Should I make patches for all of them? Or cut the inwales to match them?
IMG_8414.JPG
 
I sometimes use a heat gun to make small adjustments in bending.
I’ve also used a steam iron and a small form to add a little more or less bend but, haven’t tried it on inwales.
 

Attachments

  • 8D623388-08C8-4CBB-ABC4-654EA671AEEA.jpeg
    8D623388-08C8-4CBB-ABC4-654EA671AEEA.jpeg
    161.9 KB · Views: 296
  • 7494C28F-E99F-4AA7-AC77-95ABEA8C50A3.jpeg
    7494C28F-E99F-4AA7-AC77-95ABEA8C50A3.jpeg
    243.7 KB · Views: 294
Thanks Dave, will try something along those lines. For the cant ribs I may split the difference as I don't want to pull the rails out at all from where they were...
 
My build sheet doesn't specify deck material. I assumed they were something like spruce since they're very light, but a good look at the grain, and how hard the wood is, makes me think otherwise. It looks more like the ash (presumed) of the outer stems, 'though the ash I bought is quite white by comparison. First pic is side view of the tip of one of the decks where I planed a broken surface to repair. Last is an outer stem tip repair.
 

Attachments

  • IMG_8405.JPG
    IMG_8405.JPG
    133.7 KB · Views: 299
  • IMG_8406.JPG
    IMG_8406.JPG
    251.5 KB · Views: 291
  • IMG_8409.JPG
    IMG_8409.JPG
    230 KB · Views: 287
  • IMG_8412.JPG
    IMG_8412.JPG
    118.8 KB · Views: 289
Most likely ash. So, so many decks were. Old oxidized ash does not look like new ash. New is very light as you noted.
It won’t matter on your stem. It’s hidden.
 
Looks like ash to me; there can be a lot of color variation within a single board, let alone across multiple boards, that probably came from multiple trees, multiple species of ash... Your image #8406 looks like it was stained.

Staining new wood to try to match old wood is an art form. See Denis Kallery's recipe:

Using Minwax products:
2 parts Red Mahogany 225
2 parts Golden Oak 210B
1 part Special Walnut 224
1 part Sedona Red 222


Which was brought back up out of the archives in this thread: https://www.wcha.org/forums/index.php?threads/b-n-morris-question.15680/#post-79082
 
I use Minwax Golden Oak or English Chestnut to match new and old ribs, new and old gunwale tips, etc. On new ribs, it helps if you beat them with a wrench or chain.
Lots of folks now use dyes. I don’t have much experience with dyes.
 
Good point, as always, Dave; Denis was trying to match a very old stain... it took considerable experimentation. Matching the patina for other, un-stained parts will take more experimentation.
 
IMG_8419.JPG
Bent the stern inwale tips this morning. Feels like progress! Tomorrow I'll cut the scarfs and hopefully bend my outer bow stem, fingers crossed. I feel like once all four tips are done I'll be over the hump. Whether or not...:)

Cutting the non-square profile before bending has worked just fine. I tack the scrap from the angled cut back onto the piece and boil it along with the tip and bend them together. The tacks slip and end up at an angle, and this thin piece creates a square side to pull on while acting as a buffer that isolates the outer edge from tension. The curve of the forms is angled to match the surface of the wood being bent. Another strip of cold, dry wood on the outside is allowed to slip with some friction, and everyone seems to be happy...
 
Last edited:
Two tries at the outer stem so far, each split. I don't have wood with no grain run-out. Soaked the ash 5 days and boiled for 60-70 minutes, bent very nicely but while tucking in the wedges afterward noticed the split. Tips? I'm thinking of letting this sit for a day or two and, if the fit is fair, Opening up the split completely and glueing it back together with resorcinol (what I've been using for all my splicing). Thoughts?
IMG_8439.JPG
 

Attachments

  • D1116FC8-E6FC-4371-904D-CE24DBDE17F6.JPG
    D1116FC8-E6FC-4371-904D-CE24DBDE17F6.JPG
    138.2 KB · Views: 267
  • IMG_8433.JPG
    IMG_8433.JPG
    245.5 KB · Views: 250
Back
Top