Another Strickland UK

cwf

Curious about Wooden Canoes
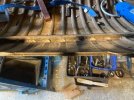
Hello, another new member, who's finally got enough time to get to grips with the bright ideas of his youth. My Strickland has been sitting in the garage for 35 years and seems fairly complete, the main problems
IMG_3668.JPG
IMG_3664.JPG


being a 6" hole, carefully fibreglassed, numerous cracked ribs and 2 large, rough bilge strakes. The canoe is 28 1/2" or 31" from the outwales and 14' 7" long.

So, I've spent some time scaping the inside. I then started on the hole and realised that, to remove the ribs I'd have to remove the inwale. Unfortunately that had been attached with mild steel screws and the heads had rusted. I finally found a small disc cutting wheel large enough (50mm) to cut the screw heads off from underneath, in the hope that I could then remove the inwale and expose the tops of the ribs. No luck, the screw shanks were rusted and were still holding the wood.

Then I made a hollow drill to clear the wood around the shanks, fairly hard steel required. One inwale came off fairly easily, the other needed more drilling. Most of the screws then had to be cut as they were too weak or too rusted in. I could now remove ribs and work out how much shiplap cedar was needed.

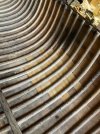
In the 3rd photo, I have marked with red tape where I think I should cut. I've come across one scarf joint, 45 degrees and positioned under a rib, so the three nails fastening the joint also go through the rib. Do you seasoned repairers feel I've allowed enough new material, spread out enough?

Also, there is a kelson and I'm fairly sure the ribs originally continued underneath. I was planning to replace just half the total length of rib, so I need to remove some of the old rib under the kelson (there is a further nail through rib and kelson). Is there an accepted method?
DSCF0889.JPG


Many thanks for any suggestions,

Charlie.
 
Welcome aboard!
Beautiful boat. In traditional boat building, plank butts should be separated by three plank or three frames. I'm not sure at all if that applies to glued scarfs. Certainly someone more experienced with canoes will chime in. Removing old fastenings can be very difficult. I've tried several methods and finally settled on drilling off the heads and pulling the shank out with needle nose pliers, but those were bronze screws. Good luck, keep us posted.
 
Hi Charlie,
That looks like a very nice boat with the wide inwales.
I would make sure you sort out the ribs before the planks so you can be sure to get them the shape they should be. On a similar job, I used easily available European oak for ribs (which continue under the keelson). I obviously haven't seen the boat, but I might think about keeping the stubs of ribs that poke out from the keelson and sistering up your new half ribs against them. You can sort of see what I mean here
https://canoeguybc.wordpress.com/tag/raised-batten/

This would mean you don't have a weak line where the new ribs meet the keelson..
I have a possible job coming up which will involve the same rib repairs so will follow this with interest.
Sam
 
Hello John, I was told that butts should be well separated, and also that scarphs should be a much lesser angle than the 45 degrees I've found here, so maybe cedar strip canoes are different.

and hello Sam. I've been talking to Mark Edwards at Richmond Bridge, west London, who has a huge boat-building experience and he says he replaces only half a rib. The weakness will be under the keelson, so probably lessened. Incidentally, I have a number of rock elm planks, a few of which have been shaped to 3/8th half-round. Mark said they would probably be very hard by now, 25 years after I bought them and they were quite old then. He suggested 2 days soaking followed by a few hours steaming before fitting and nailing. There will be less of a bend than in your (I presume) photos. I offered some of the planks to Mark but there are some spare, if you need. I'm in Hammersmith.

Thanks for the feedback both of you, Charlie.
 
Hello again and where did that 18 months go?

Getting a cottage rebuilt and rebuilding an old motorbike is part of the answer and discussing canoe repairs, always an attractive alternative. Anyhow, I cut 3/4 inch scarphs, which seemed enough.

The ever-helpful, ever-patient, ever-generous Mark Edwards supplied some cedar plank, thicknessed to 7mm (originals are 6mm). I made cardboard pieces as patterns for the missing strips, cut the cedar to shape, leaving a little over for finishing and a local friend, who did a wooden boat apprenticeship in the Blackwater estuary 60 years ago and who helps with keeping up the momentum, provided a rebate plane. I worried about putting some twist in the cedar, widthwise and lengthwise but, in the event, when I glued the scarphs with waterproof PVA, clamped each end starting at the top, the cedar took on much of the twist needed. The final scarph I glued one end, braced from the side and, partly from an interference fit and partly from a brace, the other end went in OK.

The ribs I cut near the keelson and drilled out to about 1/4", enough to locate the new rib, before filling in the strips.

For the steaming I went to a local builder's supplier and they kindly cut 3' of 4" i.d. plastic waste pipe, with a screw fit one end and a blank the other, drilled to 40mm and rubber grommet to fit. Into this went the output pipe of a Wickes steam wallpaper remover. What could go wrong?

At the suggestion of Mark Edwards, I soaked the new ribs (Rock Elm and maybe 40 years old) but I put four soaked and four unsoaked in to steam. We didn't notice any difference. After we worked out that the steamer was not working (3amp fuse had blown, 13amp needed) steam started and soon it was leaking steam and water generously. For anyone who hasn't done this before, it's a wet process, keep it outside. Steam needs to move through, so the screw end was dispensed with and a rag was used - it gets hot, gloves needed. And what went wrong? As the plastic pipe heated up, it became soft and partly collapsed, so had to be laid on the ground to stay straight.

20 minutes was enough for the first rib, tapped into shape and held with a G-clamp. I had square section nails, provided by Mark, 16 SWG, 1.63mm. I started drilling through the rib with a 1.2mm bit but the nail wouldn't go through, so I used a 1.6mm bit and that worked well. A problem was centering the new rib with the old holes. If there are no witness marks (new wood) it doesn't take much for rib and drill hole to get out of line, particularly if the new ribs have a bit of warp. Still, if it's not perfect, it shows a human being was involved. One rib broke but we were knackered after seven, with 20 nails per rib, so we'll do that one
IMG_3910.jpg
IMG_3911.jpg
IMG_4162.jpg
IMG_4268.jpg
IMG_4270.jpg
IMG_4276.jpg
later, followed by replacing the ten broken ribs each side.

I expect most of you can do this in your sleep but maybe it will encourage others to get stuck in and get afloat, one day.

Charlie.
 
I don't know anyone who can do it in their sleep! It takes thought and planning and experimenting, just as you have done. Your canoe is going to be great!
And as for the scarfs, I think 3 to 1 (18mm to 6mm) is about right in this situation. If this was an oak deck beam of a 50 foot cruiser, then the conventional wisdom of 6 to 1, or even 8 to 1, might apply. But this is cedar, and it is part of a complex adjacent structure supporting it (ribs and planks). Something else will fail before your scarfs.
 
We're getting the hang of replacing ribs (or half ribs, the originals were full-width). Six at a time now takes about two hours from starting the kettle, 30 mins steaming, fitting, drilling to completing 20 nails per rib. Clipping the nails, hammering them flat, cutting the top of the ribs, sanding, removing six more and drilling out half of the original to provide a key under the keelson probably takes another two hours. We'll have done about 30 ribs on this side and there'll be fewer on the other.

The ribs replaced have been obviously cracked but, when removing them, they have sometimes been found to be cracked in other places, not obviously visible. This side of the canoe seems to have been left with water in and the ribs have decayed and the strips discoloured more on this side. I think replacing the obviously cracked ribs will be enough for normal use, particularly since I'm mindful of the age of the thing (and my age). However, there is no keel fitted, just two rather utilitarian strakes, which I have removed. I think a keel would offer some small protection when dragging out or in shallow water. Has anyone done this?

Also, the new cedar strips are very obviously white against the aged wood. I have applied one coat of teak oil, which has helped. This made me wonder whether the whole canoe would benefit from a coat or two of oil, after 130 years. Any ideas? Would this affect the varnish coats? And finally, I'm going to try paint stripper rather than scraping the old varnish on the outside, any advice on that?

Many thanks, Charlie.
 

Attachments

  • IMG_4291.jpg
    IMG_4291.jpg
    69.8 KB · Views: 19
For stripper, I have had good luck with Citristrip. It is not real strong and may take a couple of applications, but it washes off with water. Easy to use.
 
Charlie, a great effort and you will love it when you stand back after it is done and feel very satisfied. I see the keelson. But I never saw one on a Strickland, nor the inner wale . More to learn I guess.
Dave
 
Back
Top