First restore - Bastien Huron

cap?

OK,
I was thinking to be able to extend the inwales all the way to the stem including a slight tapering from the widest part of the deck. I don't like the looks of the existing cutout.
The outwales and inwales are total toast. I have all of 3 feet of outwale left to use as a template. The inwales are completely gone in a few places. I have one new ash inwale clamped under the old one waiting for it to firm up and the other soaking.

I wasn't planning on attaching an ash cap over an ash inwale but I guess it's either that or an ugly butt cutout.

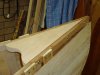
I just wanted to get rid of the existing cutout and end up something like this with the stem mortised under the inwales.

deck.jpg
 
The only reason they used the cap, aside from tradition, is to cover the deck/gunnel joint. That and they never trimmed down the planking, its cut flush with the top of the ribs. This forces the outwale to be set so that it is above the inwale.

You can easily get the look that you're after by trimming down the planking and then setting your outwales flush with the tops of the ribs. This also allows you access to your seat and thwart bolts!

I've rebuilt Hurons to reconfigure the deck/gunnel arrangement, and I've rebuilt them as original, so you can do it if you like. You're in it this far anyway, and you've nothing to lose.

By the way, I usually find it easier to do the stem after the gunnel repair/replacement. Its easier to deal with the geometry.

A few tips for canvassing:

-use STST staples, not only is it faster, but they go into the hardwood stems so much better than the small tacks
-trim the canvas to 3-4" from the gunnel
-pull the canvas just tight enough, not over tight as it will shrink over time.
-fasten each end, leaving the middle till last, this allows you to even out the bunching that often occurs there.
-put a few staples along the last two ribs at each end, this holds the canvas from pulling back from the stem area.
-when you fasten the stem areas, pull the canvas straight in line with the canoe, avoid any up or down pull as it throws it all out of line. Fasten the canvas along the stem from the middle first, then work up (down?) to the bottom of the canoe being careful not to pull it out of line. Then work to the stem tip.
-I usually add a bead of glue along the stem to bed the overlapping canvas. This hold the lap nice and flush. I often lay some packing tape over to lay it down really flat.
-don't worry too much about any small puckers, wiping the canvas down with a soaking wet rag and letting it dry out pulls the canvas nice and smooth. I have started doing this as a matter of course, just to pre-shrink the canvas.

Good luck.
 
keep it for your knockabout.Remember this is a learning curve.Everything applies to accumulated knowledge.
Copy the deck and don't forget that the edges against the inwales may be tapered inward,if not in this boat then definitly remember that it could be so.
Twist can be reduced somewhat if you replank or refasten at the stems but unless it bothers you don't let it stop the process.
Be glad it dont have 15 smashed ribs.
Carry on.
John
 
thanks again

thanks again for all the ideas and help.
Hope I didn't sound too depressed as I'm not, just a bit frustrated over my lack of knowledge and what this canoe probably looked like originally. It's all good learning curve though.

Good info on canvasing - hope I get to that point some day :)

I like the idea of trimming down the planks somewhat instead of a cap. I don't have any table equipment so making a couple of thin 14' long caps would be really difficult for me.
So I'm going to try for full length inwales with the stems tenoned underneath. My only thought is that it might flare the bow somewhat more than I want or looks acceptable. I can always cut them back to square butted cutouts if it doesn't work. Yep, scarfing the stems AFTER the inwales could have good.

cheers Ted
 
A few of the originals were built with the inwales going full length, but not many.

If you're unsure of how to make it all fit together, try it out with scrap. Make a mock up of what you're trying to build. It will provide you with the confidence, and a plan, to succeed.
 
Decks be darned!

I took a bunch of measurements, markers and string to find the exact center-line length of the canoe. It was pretty good until I got to the decks. The bow deck was about 3 inches off center, was not symmetrical left to right and had 4 different side angles. I'm guessing that those gunnel caps hid a lot of slop.

So I said to heck with using the existing rotted deck was a template, hacksawed off the old screws and turfed it. As soon as I removed the old deck, my new stem and inwales all lined up beautifully.

Yes, I'll have some putzing around to put inwales to stem but the lines are now all good. After that, it's use a piece of spruce to build a temporary new deck before I start cutting up the real thing (a very nice piece of cherry).

Thanks for all the support and help,
Cheers Ted
 
Here's a picture of the deck-stem intersection of the canoe I am just about finished building. The inwales extend right to the front. Note the stem doesn't come right up to the top surface. If you zoom on the photo, you'll see that there is a notch cut in the underside of the inwale that the stem fits into. It was cut with a dozuki (thin kerf Japanese pull saw) for a direct fit.
 

Attachments

  • goshawk deck (Medium).JPG
    goshawk deck (Medium).JPG
    65.4 KB · Views: 619
If you have the lumber,build a form or temporary outwale around the sheer to keep your re-aligned stems nice and civilized.Then you can bend your new inwales into the boat and adjust for length at the same time. I leave extra length while I hand saw and trim each end allowing as good to a perfect fit as possible while avoiding trimming too short on my nice 18 ft inwale. Then i jam my deck in and check for hardspots in the curve. It's nice if you have an extra pair of non bossy hands to hold one end of the stick.
Good luck,
John
 
oil and preserver

The inside is now varnish free (or at least a varnish free as it's going to get).

I am now ready for the coating of 75/25 boiled linseed and clear wood preservative.
Is this something just for the outside - to be covered by canvas - or both inside and outside the canoe? Wouldn't the oil stop the varnish from adhering?
As the varnish is tung oil based, should I be using it instead of boiled linseed?
Is one good coat of oil enough or is more better?
Are all boiled linseed oils basically the same stuff?

thanks again,
Ted
 
Use one coat of tong oil for the interior and boiled linseed oil on the exterior. Apply the clear wood preservative to the canvas after it is installed. Use a respirator. With the canoe upside down the solution will soak downward so stop the application about 3" from the inwale. I use a 4" foam roller. This preservative protects the wood and canvas. It will also shrink the canvas over night. Apply the canvas filler to get rid of the preservative stench. On the Hurons when you instal the canvas you will need to mark the canvas at each rib location on the exterior with a felt pen because the planking extends to the top of each rib. This will tell you where each rib is located when you tack or staple the canvas in place.
 
plank gapping

Hey, the inside ribs and planks are now sanded, the new inwales and stems in place. It's actually starting to look like a canoe.
Question?
There is anything between 5/32 and1/4 of an inch between the sides of the planks. This seems like a whole lot.
So what gives? Should I remove all the planks (they could probably use to be re-tacked anyway) and lay them right alongside each other or should there be some gap to allow for swelling when they get wet? If a gap, how much and how much is too much?

Thanks again
ted
 
That's pretty much normal for a Huron. I've restored a few and they have varying degrees of gap between the planks. My first, a 14 1/2 footer, had even bigger gaps than you have. The one I'm working on now is pretty good. Most less than a 1/4.

Here's a photo for reference.

I just noticed, in the photo, a brush hair stuck in the varnish...better take care of that! Won't look good for my reputation that kind of shoddy work.
 

Attachments

  • IMGP5050.jpg
    IMGP5050.jpg
    185.8 KB · Views: 540
time to clinch

Thanks Scott,
As it's no sweat on the gap, it's time to start clinching some 600 new and old tacks.

I'm not sure what I'll use to age the new planks to look like the originals. I wonder if a tea wash would work as I'm always drinking a cup when working on the canoe anyway. :)

Dave, thanks for the difference between linseed and tung oil - I just checked out the price of tung oil.

ted
 
tea?

I have heard of tea being used to color the new wood to match the old. One guy I spoke with says it's the best way and he's been building/restoring a long time.
 
Don't worry about the planking gaps, they are all that way. The Hurons were built with green lumber that shrank as it cured. Reversible door/bath mats work great on the w/c canoe interior when in use. Do not use mats that have a backing. The mats helps to prevent any foreign objects like sand from going between the planks and protects the varnish. If you do get sand between the planks it will migrate between the canvas and planking on the road trip home. If this happens tap the canvas exterior with a hammer on the spots. This will drive the sand grain into the planking thus eliminating the unsightly problem.
Get a variety of Flecto Varathane gel stains or something simular. Their Honey Oak should be a close match. Remember that after it is applied the stain will darken slightly in a few days. I've tried coffee and tea with poor results.
 
Last edited:
clinching

I'm back at it after a long winter hiatus as I have to work outside.
I have almost finished replacing broken/missing/rotted planks. But I just
noticed that some, maybe 30, of my tacking wasn't all that good.
An example below.
So, is a flat rather than correctly clinched tack a structural problem or just a cosmetic issue? In short, pull out and replace them all or leave them alone and get back to sanding?
bad-clinch.jpg

thanks again,
Ted
 
Is it bent over at all?

That one looks like it isn't bent over at all. I guess you'd have to decide how fussy you want to be. I make sure they are all tight inside and out. No bumps or lumps. If they are bent over at 90 degrees instead of curled neatly, I guess I'd just make sure they are not protruding and leave em be.

If it's sticking straight in just shove it back with the clinching iron and clinch it.
 
Thanks Dave,
so if the tack slightly visible but nicely rounded back into the rib, it's a keeper.
If it is like my above photo, it's junk to be replaced.

Time to think about building a better backing plate.
ted
 
Hi

I'd just put my clinching iron on it, shove it back out and clinch it over. It's better to not have any bent over but if I had one, I wouldn't worry too much about it. I have a standard clinching iron, but I also started out with an auto body clinching iron from the local auto store. Cheap and works just fine.
 
cracked rib

I thought I had a partial hairline crack in one rib that could be left alone.
But the way it sucked in my 50/50 sealing varnish coat shows that it's fairly serious. And of course it's in an obvious spot and a hole where a keel screw goes.

My plan is to do a backing plate.
Route/chisel out a piece 5"x1.24" (ribs are almost 2" wide and planks 3")

My question is how deep and what kind of wood for the plate?
Would a piece of left-over planking be OK or should I be using hardwood to a good depth? Just wood and epoxy or something else needed like a small piece of fiberglass? I don't know whether the finished rib repair should have any flex to it.

thanks for the ongoing help,
Ted
 
Back
Top