Build thread: 13' Esprit solo canoe

Douglas Ingram

Red River Canoe & Paddle
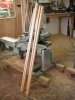
Not a single vote to the contrary, so here is the build thread for the 13' Esprit solo canoe. And just for Andre, it could easily be considered the Elan...

A little bit of history first.

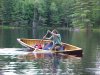
I designed the Elan before the Esprit. The Esprit was to be the smaller, more nimble, version. I had developed this canoe out of the Elan and much scale model carving. I was originally going to build this as a stripper canoe to test the design, then thought "Do I believe in myself or not?" So I went straight to building the wood/canvas mold. This was in 1999. The first canoe off of the mold went to Mark Molina, a noted Freestyle canoeist and teacher. He first used it during the second, and last,Manitoba Freestyle Symposium held at Manitoba Pioneer Camp.

Politics, work, and general lack of enthusiasm and support lead me to not want to do the work to run a 3rd Symposium. So, that was that.

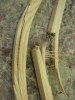
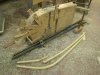
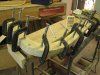
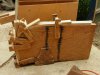
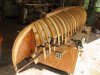
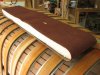
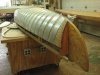
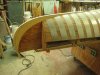
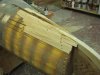
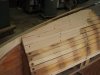
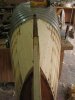
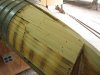
Anyway, a couple of shots of that first canoe to open this up.
 

Attachments

  • BECKY2.jpg
    BECKY2.jpg
    65.8 KB · Views: 638
  • esprit forward thrust.jpg
    esprit forward thrust.jpg
    45.4 KB · Views: 532
  • esprit cross post endview.jpg
    esprit cross post endview.jpg
    60.8 KB · Views: 525
  • Esprit with tall paddler.jpg
    Esprit with tall paddler.jpg
    50.3 KB · Views: 524
So, what makes a solo canoe a Freestyle canoe? Nothing, really. Just that it is sized and shaped to allow the paddler to execute all of the paddling maneuvers that he/she expect to do. Any canoe can be used, but some just respond better.

Better can mean faster, but it can also mean more precise and predictable. Some paddlers want a really "Hot" boat, while some prefer that the canoe not be so "Hot"; they don't want the canoe to do everything so easily that skill is irrelevant. A fine balance must be struck.

The Esprit started out as my effort to design and build a really "Hot" boat. At the time I thought that this is what was wanted by Freestyle paddlers. I feel that I overshot the mark, so this, my second build of that canoe, is intended to get the design closer to the actual intentions of the design.

A few statistics:
Length overall: 13'
Width: 28:
Center depth: 13"
Rocker: depends upon where you measure it, but about 2" and a bit. It WAS 3"

What am I doing differently? Mostly changing the stem profile and the hull shaping that is required to keep it fair. I am also using thicker ribs, 5/16" instead of 1/4". The thicker ribs keep their bent shape better than the thin ones. The thin ribs resulted in a the hull rounding more than intended when it came off of the mold. This made the already narrow canoe feel even more tender and made the already highly rockered canoe more rockered.

Here is the mold prior to the re-working.
 

Attachments

  • May 17, 2010 003.jpg
    May 17, 2010 003.jpg
    45.3 KB · Views: 461
I decided to use the same profile that I use for the Red Fox. This makes building so much easier.

Step one was to determine the additions to the mold stem profile and then prepare a couple of plywood pieces to add on.
 

Attachments

  • May 17, 2010 005.jpg
    May 17, 2010 005.jpg
    49.4 KB · Views: 433
  • May 17, 2010 006.jpg
    May 17, 2010 006.jpg
    47.8 KB · Views: 458
Now I have to build up the mold sheathing. I figured that the easiest way was to glue on a series of 1/2" thick Pine strips. So I removed the metal strips and started at it.
 

Attachments

  • May 17, 2010 018.jpg
    May 17, 2010 018.jpg
    52.5 KB · Views: 460
I used an electric plane to get the bulk shaping done, then went at it with a block plane. Then sanded, oiled, and put the metal back on.
 

Attachments

  • May 17, 2010 019.jpg
    May 17, 2010 019.jpg
    45.7 KB · Views: 436
  • May 17, 2010 021.jpg
    May 17, 2010 021.jpg
    37.4 KB · Views: 427
  • May 17, 2010 022.jpg
    May 17, 2010 022.jpg
    43.2 KB · Views: 450
  • May 17, 2010 023.jpg
    May 17, 2010 023.jpg
    40.5 KB · Views: 444
  • May 17, 2010 025.jpg
    May 17, 2010 025.jpg
    61.8 KB · Views: 404
This thread is great. Thanks...I had no idea that you could do that with a canoe form. Do you usually carve a small model before building a form for an untried design?
Tom
 
Off to a good start.

But, please define "hot" and "not hot". What exactly does that mean?

I tend to think in terms of: how does it carry a load, how does it handle waves, how much effort does it take to keep it moving, etc.

Also, what load rating would you put on you solo designs? and would that rating differ for different intended uses?

Dan
 
A "Hot" Freestyle canoe is one that responds to the maneuvers executed by teh paddler in a very immediate way. It also sends people swimming... been there, done that, plenty of times. A "Not Hot" Freestyle canoe is one that responds slowly, thus requiring larger amounts of energy to execute the sharp turns & spins that freestylers do. You can do these maneuvers in a Grumman, but it doesn't snap like a real freestyle boat does. You also don't swim as often.

Great thread, Doug!
 
Thanks Paul,

Sounds like a "hot" design would be a a bit twichy and unstable, I better stay out of canoes like that. :)

Dan
 
I'm restricted from most video sites but have had some exposure to free style.

Or maybe more accurately, Canadian style, Sue Plankus has generously given our MN group a few lessons in it, she learned and paddled with Omer Stringer, and is a certified instructer.

It's amazing what she can do with a paddle.

For me, the kneeling just killed my knees and legs, I could only do it for 15-20 minutes at a time, I'm way too "large" for that kind of thing. :)

Dan
 
Thanks everyone, for the participation. I will be trying to answer all questions,but you'll have to forgive me if I miss some.

I will carve a scale model if I am trying to visualize a certain concept. Its much faster and easier! With a model I can leave it around the shop and the house, pick it up, study it, imagine it in use...

When I feel that I understand what I am after I will draw it out (lofting) full scale. There are computer programs that can do this now, but I prefer to draw it full size on paper, just like the good ole days, because you can get a better sense of the shapes.

Paul answered the question quite well of "What makes a Hot canoe?" Another issue of a "hot" canoe is that it can make even good paddlers look jittery in the canoe, and the canoe bobbles, and that is not considered good form.

Solo canoes are available in a variety of sizes and theses should be thought of as scaled to the paddler rather than one size is "better" another. A larger paddler should be paddling a larger solo canoe, while a smaller paddler would paddle a smaller canoe.

A canoe used for Freestyle is expected to perform somewhat differently that a tripping solo canoe.

The paddler is generally centered, using either a seat, kneeling thwart, or sometimes a saddle. The paddler uses all four quadrants of the canoe: fore, aft, onside, and offside. Thus the canoe needs to be narrow enough to get the paddle into the water properly in each of those quadrants.

The canoe is regularly heeled over to enhance turning. Thus the canoe must have an easy and predictable motion as the paddler heels it over. It must also have a feeling of "locking" at the gunnel. You don't want it to feel like its going to throw you.

An consideration of heeling the canoe is how round to make the bottom? Round cross sections makes the canoe easier to heel than a flat bottomed, hard chined cross section. However, a round bottomed canoe rolls like a log: the whole thing just rolls. The intention of heeling the canoe for turning is to lift the ends. I assume that everyone has seen a log rolling in the water, as it rolls the ends DO NOT lift. For the ends to lift the canoe needs some width in the middle.

As if this didn't make things complicated enough, Freestyle paddlers move around in the canoes, quite a lot. An often used technique is the forward kneeing thrust. You can see how this looks in the photos in my opening post. Basically, the paddler puts one foot far forward and shifts their body weight forward,too. A skilled paddler will develop the balance to heel the canoe to the gunnel at the same time.

A successful canoe design for Freestyle will strike the right balance in order to accomplish all these goals.

Style paddling is quite a different animal, and it is the root of Freestyle. It is also how I first learned to paddle a canoe solo.
 
Stem bending.

Sometimes it goes well, sometimes not so well.

That is why you prepare extra stock and always have a "Plan B"

On with the story.

I have best success with local Ash, which is Green Ash. I had a stock of Ash with which I had some very good success. It was so good that I did not need to use elaborate techniques to get it bent. Alas, that stock is gone. The Ash that I have right now is more erratic in its success rate and I think that I need to up my methods.

The pictures should tell the story. Prepare the stock, wet it to up the moisture content, steam it, bend it, try again.

The second attempt worked well, the first, as you can see, not so well.

I did also have a "Plan B" and made a set of laminated stems, just in case!
 

Attachments

  • April 08, 2010 013.jpg
    April 08, 2010 013.jpg
    68 KB · Views: 398
  • April 08, 2010 012.jpg
    April 08, 2010 012.jpg
    62.4 KB · Views: 435
  • April 08, 2010 010.jpg
    April 08, 2010 010.jpg
    61.2 KB · Views: 407
  • April 08, 2010 009.jpg
    April 08, 2010 009.jpg
    52.7 KB · Views: 416
  • April 08, 2010 006.jpg
    April 08, 2010 006.jpg
    60.5 KB · Views: 405
New successful stem, and "Plan B": making the mold, and glued up.

I like to get the stems bent well in advance of when I need them, this allows the wood to set and keep the bend stable.
 

Attachments

  • April 08, 2010 014.jpg
    April 08, 2010 014.jpg
    60.1 KB · Views: 406
  • April 08, 2010 015.jpg
    April 08, 2010 015.jpg
    58.6 KB · Views: 416
  • April 08, 2010 016.jpg
    April 08, 2010 016.jpg
    47.7 KB · Views: 416
While I was waiting for the stems to set, I was making paddles.

Quite a few, apparently, but that's another story for another time.
 

Attachments

  • May 6, 2010 031.jpg
    May 6, 2010 031.jpg
    57 KB · Views: 411
  • April 08, 2010 013.jpg
    April 08, 2010 013.jpg
    23.3 KB · Views: 407
  • April 08, 2010 009.jpg
    April 08, 2010 009.jpg
    46.4 KB · Views: 421
This particular canoe is having Walnut trim.

I was lucky, while I was at my supplier picking up my order, I happened to see a lift of long walnut, and asked about it. "Oh, you'll be lucky to find anything good in there, its all been picked over". With nothing to loose but some time, I asked to see it. I looked through a lot of boards but managed to find ONE board long and straight enough, and with defects in places that I thought that I would work around.

I bought it, and after some head-scratching about exactly where to make my cuts, I managed to get two inner gunnels and two outer gunnels.

Here they are after milling, getting their back sides varnished in advance of building. The long pieces to the left are for another job.
 

Attachments

  • May 6, 2010 001.jpg
    May 6, 2010 001.jpg
    53.9 KB · Views: 406
The ribs are stem bent on in the usual fashion. There is a strongback over the spine of the mold, and each rib is wedged against it. This ensures that the ribs set uniformly to the shape of the mold.

I don't hammer the bronze rings in tight just yet. I leave the heads a little proud of the ribs face, just in case I need to pull the nails and adjust the rib for position, in the rush of bending sometimes they are not spaced "just right". Or to pull it tighter, as the rib dries sometimes it loosens too much.

Also, the last three ribs at each end are just clamped on as they need some shaping where the attach to the gunnel, which I'll describe later.

The photo on the left is post-fairing, the one on the right is pre-fairing.
 

Attachments

  • May 17, 2010 033.jpg
    May 17, 2010 033.jpg
    53.3 KB · Views: 433
  • May 17, 2010 026.jpg
    May 17, 2010 026.jpg
    54.1 KB · Views: 399
Last edited:
After trying many different sanding blocks for fairing the ribs, I have found this to be a most excellent solution. It is a 36 grit sanding belt, a 6 X 48 I believe, with a carve Styrofoam core and is 6" wide by 24"ong. Everything else was too short, too slow, or too fragile. Wear gloves with this one!
 

Attachments

  • May 17, 2010 035.jpg
    May 17, 2010 035.jpg
    49.8 KB · Views: 390
I build in mostly in the Chestnut/Peterborough tradition, and this means that I use the same mortise and tenon joint for the stem/deck junction.

Prior to bending the ribs, I leave some of the stem shaping till the fairing stage. That would be the bottom and the transition of the stem to the pre-beveled vertical part. You can see this in post #18 above.

A real advantage the mold having a stem station is that the stem is held plumb and exactly in its final position, as are the inner gunnels. This makes it very easy to mark and cut the mortise and tenon. Once the hull is off of the mold everything lines up for the stems to be perfectly plumb.


That's all for tonight folks, time to go to bed.
 

Attachments

  • May 17, 2010 034.jpg
    May 17, 2010 034.jpg
    41.8 KB · Views: 411
Last edited:
Back
Top