Restoration details for 1953 Old Town Square Stern (row boat)

Two more images of the boat project as of this morning.
 

Attachments

  • IMG_6301.jpeg
    IMG_6301.jpeg
    165.2 KB · Views: 52
  • IMG_6300.jpeg
    IMG_6300.jpeg
    241.3 KB · Views: 51
Last edited:
Matt, I am impressed with your dedication. I have quit for the winter, and there you are steaming in the snow!

I am going to use a Dacron-like polyester fabric from Aeroligt. I used this fabric I on a canoe I re-covered last year and am pleased with the result.

I am considering this for my project, so I would like to hear more about your experience. I assume we are talking about the 8.4 oz with Dacron fabric offered by Geodesic Aerolite?
 
I think the epoxy will make the wood more stable and impact resistant. In general I stick to the methods used to build unless they failed prematurely, so I would use varnish or oil and canvas. Dacron would make a lighter boat if that's important.
Nice work so far, keep us posted.
 
Worth,
I am fortunate that I have a large part of my garage to work on boats in the winter. That is how I maintain my sanity when I can’t be out on the water.
Yes, I used the 8.4 oz fabric from Geodesic Aerolite on my canoe, but because of the 72” width of fabric needed for my rowboat, I will be using the 3.7 fabric for that project. The 3.7 oz is 73” wide versus 68” for the 8.4 oz. I spoke with Larry at GA and, although it is not listed on their price sheet, he still has 90 yards of the 3.7 oz material that he keeps for wood/canvas projects. He recommends 3.7 over 8.4 for replacing canvas. As I explain below, in my mind, the jury is still out on that issue.
I had asked Larry about the fact that I was getting some bubbles or puckers on my canoe. That is when he recommended using the lighter fabric. Since that conversation, I went back and set my hot air gun at 560 degrees and used it on the bow section of the canoe, moving the gun very slowly across the fabric. The bubbles disappeared. The fabric on the bow section is still looking good. I’ll send you an update in another month or so.
I know that there has been a lot of discussion on the Forum about using polyester fabric versus canvas. Most of the conversations took place over a decade ago. I would be interested in hearing from others who have tried the Dacron-type fabric to get their thoughts.
Best regards, Matt
 
Matt, the fabric on your canoe looks great. That is very encouraging for someone like me who is considering it.
Thanks for sharing!
 
Good afternoon. See attached details on the underseat tool drawer. There should be 2 cleats fastened to the port side (looking forward) under the rear seat, The width between dictates the width of the drawer. The dimensions might vary from the attached drawing based on my square stern. hopefully the pictures will help explain the drawing! For the latch, there is usually a "mortise" carved into the bottom of the seat that captures it. Your project is looking great!
 

Attachments

  • 20240225_132419.jpg
    20240225_132419.jpg
    200.6 KB · Views: 40
  • 20240226_123413.jpg
    20240226_123413.jpg
    279.1 KB · Views: 38
  • s.jpeg
    s.jpeg
    64.9 KB · Views: 39
Bruce, Thanks very much for the pictures and sketch of the box. This is tremendously helpful.

Regarding the covering for the rowboat, I’ve decided to go with canvas and have already purchased it from Northwoods Canoe. The rowboat is going to experience more knocking around than my canoes, so I thought I should go with what seems to be a more durable product.

I am very open to ideas on building a jig to stretch the canvas. I watched Rollin Thurlow’s video from WoodenBoat’s Mastering Skills series and found it very much on target to what I will be doing. (He spends some time at the end of the last video explaining how he stretches canvas on a rowboat.) However, I would prefer not to build such an elaborate system in my garage. I’m thinking that I should be able to use one of my boat trailers, using the trailer winch in place of a come-along once I get boat mounted on the canvas envelope. I would then place about 300 pounds of pellet bags in the boat to seat it into the canvas. Any thoughts on this on any other canvas methods others have tried?
 
This how I canvas a square stern. Have done about a dozen with very good success. See pictures attached.
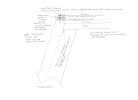
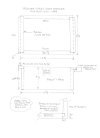
1. refer to the attached sketch , in the end the transom will have 2 layers of canvas with bedding compound in between.
2. Important to varnish the transom first, especially the perimeter, but I do the perimeter and the outboard (back side) as well, makes cleaning off any errant bedding compound easier. Bedding compound (I use traditional Dolfinite) should not be applied to raw wood because the wood soaks up the liquid portion causing the bedding compound to dry out with an eventual leak, The varnish prevents this keeping the bedding compound soft and "flexible" lasting for years.
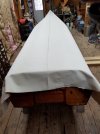
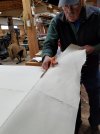
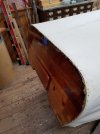
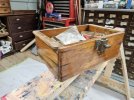
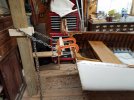
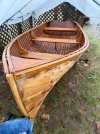
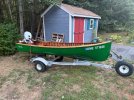
3. With the boat upside down, lay the canvas out over the hull (see first picture)
-Mark the center line the entire length of the canvas. This is important because depending on the hull, the canvas (72" in most Old Towns) will just barely cover so need to keep it straight on the boat
-mark the center line on the rear of the transom on a piece of tape
-make sure there is enough canvas hanging over the transom that when the canvas is held against the side of the boat it goes beyond the transom at the sheer (a couple inches is plenty)
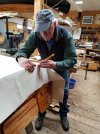
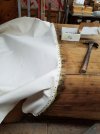
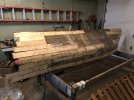
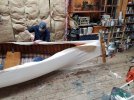
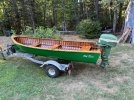
4. Picture 2. Mark the outside edge of the transom with a pencil. This is critical to get right. Be sure to hold the canvas tight to the sides when marking
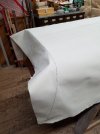
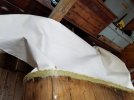
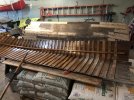
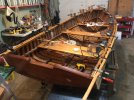
5 Picture 3. Trim the canvas to the pencil line. Transfer the center line to the underside of the canvas (an inch or so is enough) at the transom, this is extremely important for step 7. Starting at the bow, fold the canvas back beyond the transom. The canvas is now upside down, off the boat and extending back from the transom. The trimmed edge facing the transom.
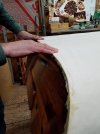
6. Picture 4. Apply bedding compound (liberally) to only the perimeter of the transom outside the rabett (none on the planking)
7. Picture 5. Tack on the canvas to the transom. Align the center lines. Starting at the center, place the edge of the trimmed canvas at the edge of the rabett, covering the bedding compound. Nail at the center line with a single nail or tack. I have used 5/8" ring nails, escutcheon pins with good success. Working outward from the center making sure the trimmed edge stays in line with the edge of the rabett. nail the canvas every inch to 1 1/4 inch all around the transom and at 1/4" from back edge. Make sure the canvas stays flat on the transom edge. May need nails closer together at the turn of the bilge. It will look like this will never work because the canvas takes on this weird shape, but trust me!
8. Picture 6. Apply second layer of bedding compound on the canvas just nailed on about the same width/depth as before
9. Picture 7. Flip the canvas forward to its original position. Don't pull too hard yet. This creates a fold at the transom. Pull gently or enough until the fold is flush with the back edge of the transom (start at the center and work outward). Proceed with caution, if pull past flush it almost impossible to reset the fold. Press down on the canvas to "flatten out" the bedding compound inside the canvas, pull a little more if necessary to keep the fold flush. Once you are happy.....starting at the center nail as before about 1 to 1 1/4 inches apart 1/4 inch from the back all around the transom. Now ready to finish the canvasing.
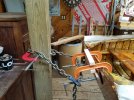
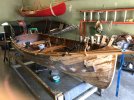
10. Temporarily clamp the canvas to the sheer with spring clamps in several places. Flip the boat to the upright position. Secure the transom end to something solid. See Picture 9. I use a couple C-clamps (with pads to protect the transom) and chain it to a post. Note the block of wood between the clamps to keep the clamps from twisting. Attach canvas clamp to the canvas at the bow like doing a canoe. Stretch the canvas using a come along likewise attached to something solid. It takes quite a bit of force to get the canvas to conform to the shape of a square stern, don't be scared! Keep stretching until the canvas curls over the entire length of the sheer, otherwise it is not tight enough. Tack off the canvas as with a canoe Picture 10, finish the bow like a canoe. I have found the weight of the boat is usually sufficient to keep the canvas tight, although some extra weight or a post to the ceiling wouldn't hurt.

Hope this helps. Questions? Give me a shout.
Bruce Larson
 

Attachments

  • transom detail.jpeg
    transom detail.jpeg
    53.5 KB · Views: 48
  • picture 1.jpg
    picture 1.jpg
    165.9 KB · Views: 44
  • Picture 2.jpg
    Picture 2.jpg
    247.1 KB · Views: 40
  • Picture 2A.jpg
    Picture 2A.jpg
    165.1 KB · Views: 39
  • Picture 3.jpg
    Picture 3.jpg
    170.8 KB · Views: 36
  • Picture 4.jpg
    Picture 4.jpg
    241.5 KB · Views: 39
  • Picture 5.jpg
    Picture 5.jpg
    149.5 KB · Views: 38
  • Picture 6.jpg
    Picture 6.jpg
    138.3 KB · Views: 37
  • Picture 7.jpg
    Picture 7.jpg
    143.5 KB · Views: 35
  • Picture 8.jpg
    Picture 8.jpg
    151 KB · Views: 43
Thanks Bruce that is very informative! Love the way you stretched the canvas, much like my set up with c clamps and chain anchored to my building
I noticed you're another good old "lefty" who uses scissors in your right hand. They never did make left handed scissors for us growing up, ha.
Cheers Gary
 
If ever there was an informative technique post that should be "tagged" or given a "sticky", this is it. This is an excellent overview.
 
Bruce, I agree with Gary. This is excellent resource information. I had a bit of a setback this week: when re-attaching the planking to the bow stem, I broke the stem. So I am now doing what I should have done in the first place, bending a new ash stem and scarfing it to the section that has the ID number. My boat is still in two halves so the challenge is going to be putting it back together exactly as it should be. It sounds like it would be a simple task, but for me at least, it requires a great deal of thought, especially since I have replaced much of the planking, several of the ribs, the keelson, deck, the gunwales, the transom and now the stem. Fortunately, I saved all of the parts I replaced and took lots of photos of the boat’s construction before I dismantled it.
 
Back
Top