ash ribs rebound

Joe,
I prepare my own shellac with glitters and alcool for artists. Can’t be easier. It is very useful for preparing wood, usually as a hardener, before finishing with wax or varnish.
You can buy some glitters from most cabinetmaking suppliers like Laverdure in Paris. I think I bought my last lot of glitters at Colorare in Tours, but they don’t offer them on their website. Pretty sure they have some in their shop though !
Have fun ! Étienne
Hello Etienne,

could you tell me what is the proportions of shellac and alcohol do you use please ? thanks !
 
Lot's of good information here:


Hello,
Sorry I missed your posts, too much commitments ! Also sorry for my poor english, I was meaning « flakes » indeed ! Here is my experience :
For preparing wood before varnishing, I mix 250 g of shellac in 1 litre of denatured alcohol. I first top the flakes with alcohol and wait for about an hour or two (precise timing doesn’t matter so much here). The flakes increase in volume. Then I thin this thick material with the remaining quantity of alcohol and leave it rest for a night (next to my stove). I usually thin this with a slight amount of alcohol before application. For shellac varnishing, the mix I prepare is about the same, but I filter it.
I suppose you would prefer a thicker mix for the bottom of your hull, but I have no experience in this particular application.
I would just add that I prefer slightly heat the mix in a bain-marie, but just with hot water, no boiling water of course ! I do not heat the shellac as much I heat my varnish before application for example.
It is also important to use first quality alcohol. I have a predilection for artists alcohol, the likes you use for preparing inks (with shellac !). This mix remains very cheap anyway.
Hope this helps you !
Etienne
 
Thanks Étienne,

I mixed 100g of shellac for 1/2l of alcohol.
I used a 95% alcohol, but not the first quality... Will see. It's a 93,65% of ethanol .

I painted the two coats of the top of the hull, before start to apply the shellac.

Anybody knows if I can apply the shellac on the paint to varnish it ? Or I have to use a special varnish, or I can let the paint without any product ? (It's a paint for iron, a most resistant paint)

The first coat image :
PXL_20230704_155819791.jpg
 
Joe,

I may be able to help you here, but please tell me which components are mixed in the paint you used.

Etienne
 
Good morning Guys !

that's it, I shellacked my bottom hull ! I'm just a bit skeptical about the final result ... after 4 coats of filler, and 8 coats of shellac (360g of flakes), the texture of the canvas is still noticeable. I'm unable to achieve a smooth finish. Well, it's not a racing boat, but....

PXL_20230708_080003222.jpg
PXL_20230708_080017353.jpg
 
Joe,
Stating the obvious, your canvas is not properly filled. We had a previous discussion about the filler you used after you described using varnish as a filler. You later clarified that you also use silica. What is apparent here is that whatever filler you used did not load up the canvas to allow a smooth filled surface.
Filler that is commonly used contains (and not all are the same) boiled linseed oil, mineral spirits, enamel paint, Japan drier, 300 grit silica and spar varnish. This is blended to make a very thick paintable mix that gets applied to the canvas and worked in to fill the open weave. Once applied, it is first smoothed by hand and then later sanded to make a smooth finished base for paint and (if used) shellac.
Generally, the shellac is applied only below the waterline. Paint is visible above the waterline.
For comparison I have attached a picture of a filled canvas that is curing.
Also a picture (If I can find one) of the bottom of a shellacked Traveler getting some much needed Ambroid touch-up.
1688819037819.png


1688819935214.png
 
Joe,
Stating the obvious, your canvas is not properly filled. We had a previous discussion about the filler you used after you described using varnish as a filler. You later clarified that you also use silica. What is apparent here is that whatever filler you used did not load up the canvas to allow a smooth filled surface.
Filler that is commonly used contains (and not all are the same) boiled linseed oil, mineral spirits, enamel paint, Japan drier, 300 grit silica and spar varnish. This is blended to make a very thick paintable mix that gets applied to the canvas and worked in to fill the open weave. Once applied, it is first smoothed by hand and then later sanded to make a smooth finished base for paint and (if used) shellac.
Generally, the shellac is applied only below the waterline. Paint is visible above the waterline.
For comparison I have attached a picture of a filled canvas that is curing.
Also a picture (If I can find one) of the bottom of a shellacked Traveler getting some much needed Ambroid touch-up.
I give up... I don't have the budget or the patience to remove and replace a new canvas... :(

Pasteljoe, Paddle it!! It's a canoe, not a piano- Dan Miller.
Gil
I think it's excatly that's what I should to do...
 
I give up... I don't have the budget or the patience to remove and replace a new canvas... :(


I think it's excatly that's what I should to do...
You asked why and now you know.
In your shoes I would be taking it our for a paddle to see if it's watertight. Use it until it needs a fresh canvas. Use a more traditional filler recipe next time. With any kind of luck, that will be many years from now.
Post pictures of it in the water.
 
Years ago, I told one of my best customers that I was no longer doing "museum quality" restorations-as if I ever did!! I still try to do the best that I can, but being just over one birthday from an octagenarian, my restorations are not as good as they once were. Enclosed are some pix of an 18' guide that will get at least one more coat of paint. I usually wet sand and paint until I can't stand any more.

Canoes are/were made to be used. Canoes were a poor man's yacht. Probably at least half of the restorations that I have done in over 35 years, never saw the water more than once.
 

Attachments

  • 102_0265.JPG
    102_0265.JPG
    74.3 KB · Views: 67
  • 102_0267.JPG
    102_0267.JPG
    131.9 KB · Views: 71
  • 102_0266.JPG
    102_0266.JPG
    97.4 KB · Views: 62
Gil, that looks plenty good enough and better than most folks can achieve even with lots of extra effort.
Dave...done done that...Retacked a few spots on that one. Those torpedo stems threw me a curve.
 
Years ago, I told one of my best customers that I was no longer doing "museum quality" restorations-as if I ever did!! I still try to do the best that I can, but being just over one birthday from an octagenarian, my restorations are not as good as they once were. Enclosed are some pix of an 18' guide that will get at least one more coat of paint. I usually wet sand and paint until I can't stand any more.

Canoes are/were made to be used. Canoes were a poor man's yacht. Probably at least half of the restorations that I have done in over 35 years, never saw the water more than once.
Gil, you are the voice of wisdom.

JOE,
You have the best counseling right there and Mike needs to get that pucker out....the one below the tacks.
Dave
yes, I followed all the great advices, and I started to mount the outwales to finish it. All the imperfections will give the charm of my canoe.
I have the same thing below the tacks at one part of the canoe, in worst. Because I forgot to pull the canvas in one side, and I realized that after cutting the canvas... :rolleyes: 
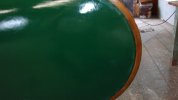
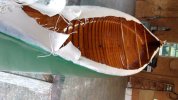
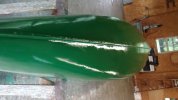
It just appears like dirty job, but it will float anyway... :)

My first post will show you the final result, in the water !
 
That's it, first time on water in duo. It is perfect, stable and glides well. No water leaks.
I just have to learn and practice paddle techniques.

I big thanks to all of you for your help and advices !

If I hadn't come here, I wouldn't have thought about using shellac on the bottom of the hull...

Have a good day !
PXL_20230712_105354678.jpg


IMG_5712.JPG
 
Back
Top