Worth Gretter
LOVES Wooden Canoes
My belated thanks to Greg Nolan for posting the video of Larry LaLonde with Geodesic Aerolight's new 8.4 ounce Dacron! I would not have known about this fabric otherwise.
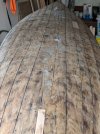
I had a lot of hesitation about using Dacron since I was not sure I could get my hull smooth enough, but I gave it a shot and I'm glad. I smoothed the hull as much as seemed reasonable, varnished the hull, taped off the areas where Heat n Bond tape would go, then waxed it. Here are my notes for the Dacron.
I just got done putting Dacron on my canoe. I used the heavy duty 8.4 oz fabric from Geodesic Airolite Boats, and followed the instructions provided by the WCHA Chesapeake Chapter for their demonstration at the 2017 Assembly. Those instructions are based on the ones provided by GA Boats on their website, http://gaboats.com/tutorials/recanvas.html.
My experience turned up quite a few differences with the written instructions, and I think these are mostly due to the new, heavier Dacron. But some are just clarifications.
First, the instructions say to buy fabric equalling your length along the gunwale, plus half a yard. This is enough to protect against under measuring, but you will need more if stem doublers are planned. I tried to cut the doublers from my scraps but they did not have enough bias to stretch around the curve of the stem. Fortunately I had 1 extra yard and could cut doublers at a full 45 degree bias, and these worked fine. So a better estimate is the length along the gunwale plus one full yard.
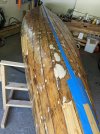
The amount of Heat n Bond recommended is also too low. Three times the length of the canoe is short by a good bit. You need glue strips for both gunwales, the keel line, and four strips for each stem in order to make and attach the fabric overlap. If you add stem doublers (see below) that needs one more strip of glue tape per stem, plus glue sheet. I used close to 100 feet of glue tape for an 18 foot canoe, and most of a pack of glue sheet.
By far the biggest issue with the instructions is heat. The instructions urge caution to avoid melting the Dacron but this heavier fabric is very hard to heat. I bought a thermometer from Aircraft Spruce and calibrated my brand new 1500W iron at the various recommended settings. The iron maxed out at 410 F which was perfect since the instructions say Dacron starts to melt at 425 F, and that gave me a margin of safety. I tried various settings but on lower heat any part of the process took forever. I eventually just used the max setting for everything, only varying the time spent in place. Even for tacking heat tape in place, I stayed on max, used the tip of the iron, and held it only for a second.
As I went around the hull attaching the fabric at the gunwale area, I was impressed by how fast I could shrink out the large puckers. But it took a lot longer to go all around the gunwales a second time to be sure the glue bond was tight, and longer yet to shrink the fabric because any puckers left were very small at this point and for some reason that made them hard to shrink. Looking back, though, I think the big puckers were easy because they were clear of the wood so they took the heat directly. The little puckers were flat on the wood, and the wood took the heat.
With canvas, I get the impression that it is important to fix the proud tacks but minor depressions will simply be bridged over as the canvas is stretched. Supposedly, that is true with Dacron too, but I filled all of mine and I'm glad I did. It seemed to me that Dacron could sag over a hole, putting it out of direct contact with the iron and thus not receiving enough heat to shrink.
The instructions also call for the use of pinking shears, especially for the doublers. For me, pinking shears worked great everywhere EXCEPT the doublers! Since the doublers are cut at a 45 degree bias, a cut with straight scissors would leave no loose ends. A sample cut I made was nice and clean, but unfortunately I had already cut the doublers with pinking shears and installed them. As a result they have ragged edges but I will just have to live with that.
More on stem doublers: I didn't need masking tape, and it didn't stick to the Dacron anyway. The instructions say “cut patterns from sheet stock” but that needs elaboration. Heat n Bond makes glue tape in 3/8, 5/8, and 7/8 widths and also glue sheets 17 inches by 1 yard, and this is the sheet stock that is referenced. I used it and it worked well. For the tape, I would use 7/8 inch if you can get it, or at least 5/8, for adequate holding.
My process for the doublers (after they are stretched and attached along the front of the stem per the instructions):
Cut off a quarter of the Heat n Bond sheet, which gives you a section 9 by 17 inches to work with.
Cut pieces 9 inches long by about 2 inches wide, curved as needed to match the shape of the stem.
Slide each cut piece up under the edge of the doubler, which of course is already glued down the center of the stem with glue tape, and “tack” in place with tip of iron, in two or three spots close to centerline.
After the sheet is tacked in place, use thin scissors to cut the outer edge of the glue sheet even with the doubler edge. The doubler should be held down close to the hull surface for this, to cut the glue sheet right where the edge of the fabric will ultimately be.
Gently lift the doubler and peel off the glue sheet paper.
After all the glue sheets are in place on one side of the doubler (and paper removed!) use the iron to heat bond the glue all along this side of the doubler.
Then repeat the process for the other side of the doubler, and then the other stem.
You definitely want to get all the pieces of glue sheet tacked in place, trimmed, and paper removed before heat bonding any part, because a bonded section will make it impossible to fold back the next section to remove the paper.
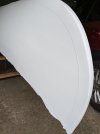
I chose Kilz2 as my fabric filler and it was pretty forgiving. Even though it dried fairly fast and didn't keep a “wet edge” for long, that didn't seem to be an issue, with most streaks seeming to level out by themselves as it dried. Supposedly it can be re-coated in half an hour, but instead I waited a day for sanding, which I did with a Scotch-brite scrubber. It was very fast to sand off any imperfections and get a level surface. However, two coats didn't fill the fabric weave completely and I had to do a third. My 18 foot canoe needed 1-1/8 quart for the first coat, 1/2 for the second, and 1/4 for the third. I used a 3 or 4 inch wide roller with a 3/8 nap. I wish I had done a fourth coat of Kilz2 since I can still see a hint of fabric weave in places after two coats of Epifanes yacht enamel.
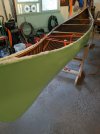
I am very impressed with the strength of this fabric! I was a real bear just cutting off the edge of the Dacron where the outwale would go. With a few coats of paint it was incredibly strong and hard to cut.
Seats next!
I had a lot of hesitation about using Dacron since I was not sure I could get my hull smooth enough, but I gave it a shot and I'm glad. I smoothed the hull as much as seemed reasonable, varnished the hull, taped off the areas where Heat n Bond tape would go, then waxed it. Here are my notes for the Dacron.
I just got done putting Dacron on my canoe. I used the heavy duty 8.4 oz fabric from Geodesic Airolite Boats, and followed the instructions provided by the WCHA Chesapeake Chapter for their demonstration at the 2017 Assembly. Those instructions are based on the ones provided by GA Boats on their website, http://gaboats.com/tutorials/recanvas.html.
My experience turned up quite a few differences with the written instructions, and I think these are mostly due to the new, heavier Dacron. But some are just clarifications.
First, the instructions say to buy fabric equalling your length along the gunwale, plus half a yard. This is enough to protect against under measuring, but you will need more if stem doublers are planned. I tried to cut the doublers from my scraps but they did not have enough bias to stretch around the curve of the stem. Fortunately I had 1 extra yard and could cut doublers at a full 45 degree bias, and these worked fine. So a better estimate is the length along the gunwale plus one full yard.
The amount of Heat n Bond recommended is also too low. Three times the length of the canoe is short by a good bit. You need glue strips for both gunwales, the keel line, and four strips for each stem in order to make and attach the fabric overlap. If you add stem doublers (see below) that needs one more strip of glue tape per stem, plus glue sheet. I used close to 100 feet of glue tape for an 18 foot canoe, and most of a pack of glue sheet.
By far the biggest issue with the instructions is heat. The instructions urge caution to avoid melting the Dacron but this heavier fabric is very hard to heat. I bought a thermometer from Aircraft Spruce and calibrated my brand new 1500W iron at the various recommended settings. The iron maxed out at 410 F which was perfect since the instructions say Dacron starts to melt at 425 F, and that gave me a margin of safety. I tried various settings but on lower heat any part of the process took forever. I eventually just used the max setting for everything, only varying the time spent in place. Even for tacking heat tape in place, I stayed on max, used the tip of the iron, and held it only for a second.
As I went around the hull attaching the fabric at the gunwale area, I was impressed by how fast I could shrink out the large puckers. But it took a lot longer to go all around the gunwales a second time to be sure the glue bond was tight, and longer yet to shrink the fabric because any puckers left were very small at this point and for some reason that made them hard to shrink. Looking back, though, I think the big puckers were easy because they were clear of the wood so they took the heat directly. The little puckers were flat on the wood, and the wood took the heat.
With canvas, I get the impression that it is important to fix the proud tacks but minor depressions will simply be bridged over as the canvas is stretched. Supposedly, that is true with Dacron too, but I filled all of mine and I'm glad I did. It seemed to me that Dacron could sag over a hole, putting it out of direct contact with the iron and thus not receiving enough heat to shrink.
The instructions also call for the use of pinking shears, especially for the doublers. For me, pinking shears worked great everywhere EXCEPT the doublers! Since the doublers are cut at a 45 degree bias, a cut with straight scissors would leave no loose ends. A sample cut I made was nice and clean, but unfortunately I had already cut the doublers with pinking shears and installed them. As a result they have ragged edges but I will just have to live with that.
More on stem doublers: I didn't need masking tape, and it didn't stick to the Dacron anyway. The instructions say “cut patterns from sheet stock” but that needs elaboration. Heat n Bond makes glue tape in 3/8, 5/8, and 7/8 widths and also glue sheets 17 inches by 1 yard, and this is the sheet stock that is referenced. I used it and it worked well. For the tape, I would use 7/8 inch if you can get it, or at least 5/8, for adequate holding.
My process for the doublers (after they are stretched and attached along the front of the stem per the instructions):
Cut off a quarter of the Heat n Bond sheet, which gives you a section 9 by 17 inches to work with.
Cut pieces 9 inches long by about 2 inches wide, curved as needed to match the shape of the stem.
Slide each cut piece up under the edge of the doubler, which of course is already glued down the center of the stem with glue tape, and “tack” in place with tip of iron, in two or three spots close to centerline.
After the sheet is tacked in place, use thin scissors to cut the outer edge of the glue sheet even with the doubler edge. The doubler should be held down close to the hull surface for this, to cut the glue sheet right where the edge of the fabric will ultimately be.
Gently lift the doubler and peel off the glue sheet paper.
After all the glue sheets are in place on one side of the doubler (and paper removed!) use the iron to heat bond the glue all along this side of the doubler.
Then repeat the process for the other side of the doubler, and then the other stem.
You definitely want to get all the pieces of glue sheet tacked in place, trimmed, and paper removed before heat bonding any part, because a bonded section will make it impossible to fold back the next section to remove the paper.
I chose Kilz2 as my fabric filler and it was pretty forgiving. Even though it dried fairly fast and didn't keep a “wet edge” for long, that didn't seem to be an issue, with most streaks seeming to level out by themselves as it dried. Supposedly it can be re-coated in half an hour, but instead I waited a day for sanding, which I did with a Scotch-brite scrubber. It was very fast to sand off any imperfections and get a level surface. However, two coats didn't fill the fabric weave completely and I had to do a third. My 18 foot canoe needed 1-1/8 quart for the first coat, 1/2 for the second, and 1/4 for the third. I used a 3 or 4 inch wide roller with a 3/8 nap. I wish I had done a fourth coat of Kilz2 since I can still see a hint of fabric weave in places after two coats of Epifanes yacht enamel.
I am very impressed with the strength of this fabric! I was a real bear just cutting off the edge of the Dacron where the outwale would go. With a few coats of paint it was incredibly strong and hard to cut.
Seats next!