Possible new project: choosing between two boats?

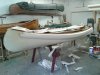
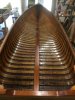
I appreciate the insights of both approaches to the sponson canvassing challenge. I've got Thurlow's book and had already looked over his description of the task. If I'm not mistaken Dave Osborn shared pictures of his approach earlier in this thread, seems like he uses a strategy closer to what Michael suggests? but maybe he will chime in here also, I'm going by this photo:

Dave Osborn sponson canvas .jpg

At any rate that will be a bit down the road. Spent yesterday soaking down screw heads with paint stripper (some of the last methyl chloride stripper I could find in town, guess that's going the way of five cent coca cola in another month or so) and removed the seats so I could get at the ribs and floor underneath them for scraping. And thank goodness for hollow ground screw drivers, there's not a matching screw yet. So far I'm only seeing a small handful of cracked ribs, spent some time last night reading up on backside rib repairs as an alternative to replacing ribs. I'll share some photos when I get closer to that stage of the work.

I'm a little nervous about getting the fiberglass residue off the planking. I was able to strip, scrape, and then sand the residue off of a section of the transom--but that's a much more substantial piece of wood then the planking. Any advice on cleaning up the exterior of the hull would be appreciated.
 
I appreciate the insights of both approaches to the sponson canvassing challenge.
In the April 2016 issue (#194) of Wooden Canoe there is a detailed article with photos on how to re-canvas sponsons. You can pick up back issues at the WCHA store.

Good luck with the project! Hopefully the "sponson haters" won't find this thread and start suggesting you leave them off! ;)
 
thanks Shari! I'll get a copy of that issue, really appreciate it. I could see how some folks might dislike sponsons on a 'normal' canoe, but on a wider square transom boat I think they add kind of a different look. I don't object to them. We'll see how I feel about them after removing them and then trying to get them back on in their original positions. :eek::eek:
 
As far as cleaning up the resin left on the planking... do not try to sand it off. The cedar is too soft to do that. It will dig the cedar out before you get the resin off. Save your sanding until all the resin is removed, bad spots faired, and repairs are made.
I do two things primarily... If the resin is polyester, paint remover will attack it some. I put the stripper in a squirt bottle like mustard comes in and apply it to the resin. Give it time. The resin will turn kinda sugary. Repeat as necessary.
I also use a heat gun, warming up the resin, and using a pull type scraper to remove the soft resin.
I find that the pull type scraper, Red Devil comes to mind, you lessen the gouging that a putty knife is prone to.
 

Attachments

  • 2486FFF1-463D-4C18-BC83-5B3DDC2B3657.jpeg
    2486FFF1-463D-4C18-BC83-5B3DDC2B3657.jpeg
    157.3 KB · Views: 399
Michael --

I think your critique of the sponson replacement method that once was on the Old Town web site is well taken, and your article in the April 2016 certainly explains, step by step, a better way to go.

I have a question about someting said in the Old Town text about filler:

"Once the canvas filler has cured for 24 hours, you will not be able to add more filler. If you “touch up” the canvas after that time, it will not bond. Although sometimes it appears to have bonded, it will separate, flake and peel later on."

Is it accurate that traditional fillers can't be touched up after curing for 24 hours? I don't have any dire4ct experience with this, and I expect that most folks do their canvas filling in one session, but it is not hard to imagine a scenario where a first coat gets finished late in the evening, and someone does not have a chance to get back to finish the job until a couple of days later.

I don't recall ever seeing a similar warning anywhere else. can you -- or anyone else -- comment on this?
 
Jim,
Here are a couple more photos. Unfortunately I don’t have any very detailed photos of the process.
I read Michael’s process and it is s the same as mine for Old Town sponsons. Kennebec and Racines are stretched and stapled next to the sheer plank.

Lay on and tighten canvas over the length of the boat
Attach the sponson.
Pull the bottom up and staple. Pull the top down and staple. A trim strip covers the staples out tacks.
Finish the ends.
A couple of things.... the ends need a little creative trimming so that the canvas will tuck behind the sponson. I try to trim leaving about an inch and a half left to tuck in. I push the trimmed canvas under the ends with a putty knife, then clinch tack the very end. The end will be crappy looking, but I use Total Fair to smooth the transition from sponson to hull. I load it up and sculpt it with a sander.
You will have a gap on the underneath side of the sponson. I use Sika-Flex 201, a general use marine caulking to fill and finish that gap.
 

Attachments

  • 15838E33-4D1E-4433-BCBB-5E363FDCBAE6.jpeg
    15838E33-4D1E-4433-BCBB-5E363FDCBAE6.jpeg
    173.5 KB · Views: 372
  • FDCDD7EA-9AD2-44EF-98A7-A6A0683EEFA3.jpeg
    FDCDD7EA-9AD2-44EF-98A7-A6A0683EEFA3.jpeg
    158.6 KB · Views: 423
  • 369741B6-9962-4FA1-B7DF-9184A79D11ED.jpeg
    369741B6-9962-4FA1-B7DF-9184A79D11ED.jpeg
    144.4 KB · Views: 395
In my experience (so far) I haven't seen a failure of the filler if a coat was applied later than the initial multi-step filling process. I try to get it all done at once as has been recommended, but for various reasons I've sometimes had to come back and apply more to a canoe. A coat added later seems to go on differently and has a different look (a glossy appearance) than the usual one-day final coat. But it seems to stand the test of time. I typically use Northwoods Canoe Co. filler; results could vary with different fillers.

Benson's comment is important - surely the big manufacturers wouldn't have stood the headache of returns if filler began to fail because of late applications. If failures occurred years later perhaps no one would have connected it to filler application, but it seems the big makers would have recognized a problem when they were shipping many thousands of canoes. So as long as a time-tested traditional filler is used, maybe late applications aren't too worrisome. It stands to reason - paint, drying oils and such can be re-coated forever, so why not a concoction made of these plus silica, mineral spirits, Japan drier, etc.?

Michael
 
As far as cleaning up the resin left on the planking... do not try to sand it off. The cedar is too soft to do that. It will dig the cedar out before you get the resin off. Save your sanding until all the resin is removed, bad spots faired, and repairs are made.
I do two things primarily... If the resin is polyester, paint remover will attack it some. I put the stripper in a squirt bottle like mustard comes in and apply it to the resin. Give it time. The resin will turn kinda sugary. Repeat as necessary.
I also use a heat gun, warming up the resin, and using a pull type scraper to remove the soft resin.
I find that the pull type scraper, Red Devil comes to mind, you lessen the gouging that a putty knife is prone to.

Dave, that's very reassuring about using the stripper and just being patient. The section of the transom I did yesterday basically was done the way you describe here, and I'll go back and scrape it a bit more to finish it up. "Sugary" is a good word for how the resin scraped off. The photo you include actually looks like much more resin is still attached to your boat than mine. here's a pic of the section where I experimented with the stripper and scraping:

transom section.jpg

Here's a shot from the other end--your point about scrapers is also a good one, that's all I use. I used to have a great set of Sandvik scrapers but I have no idea where they are now, and apparently Sandvik is out of business? anyway, the ones I'm using seem to be doing okay:

inside scraping.jpg

The old paint over the varnish just shears off with regular scraping--no need for stripper just yet. Mainly just trying right now to get a sense of what needs to happen with the ribs--there seems to be only one broken all the way through, and several with cracks or hairline cracks. a couple more pics:

broken rib.jpg cracked rib.jpg cracked rib 2.jpg cracked rib 4.jpg cracked rib3.jpg

I'm assuming the broken one is a candidate for replacement, but perhaps the cracked ones can be repaired?

Anyway. chugging along at cleaning it up. at some point the deck will come off so I can reach down in the bow to scrape. Hopefully at that point I'll discover a serial number, there was no number in the stern. Then the sponsons will come off and I'll give a look at what lies underneath.
 
guess my next quick question is an order-of-disassembly question. I've got the front deck removed, the seats are removed, and almost done with the interior fittings that are blocking access to the last of the sponson screws on the interior. When those screws are all accessible, is it time to remove the sponsons? or keep scraping the interior? or is there something else I'm missing?

OT 130667 Aug 2019.jpg
 
Sure, take the sponsons and outer gunwales off... be careful with handling the sponsons. Each end is tapered paper thin.
I typically remove as much of the “trim” as I can to make the stripping, sanding, and varnishing easier.
The outer gunwales, seat rails, seats, all get stripped, sanded and completely varnished off of the boat before going back in the boat. You will want to fix and fair the sponsons while they are removed.
It makes stripping, sanding and varnishing so much easier than when those obstacles are in the way.
When I do a boat or canoe, the interior is complete before canvas, sponsons, filler, prime r and paint.
That’s just the way I do it. Others varnish after canvas. I’ve had issues when I’ve done it in that sequence.
I’ve had varnish seep into the filler and soften it. I’ve also had varnish seep into the canvas and over time when the solvents dried a little blemish showed up in that spot. So for me, all interior varnish is complete before canvas.

Dave, that's really helpful, I appreciate the guidance. I had been wondering about the seat rails, thanks for answering that question. How do you handle the inwales and the framing for the front deck?
 
Inwale’s stay on. Deck framing can come off if it makes it easier to strip sand and varnish. Just screw them back on when the inside is complete.
 
Inwale’s stay on. Deck framing can come off if it makes it easier to strip sand and varnish. Just screw them back on when the inside is complete.

thanks again, good to know about the deck framing. More progress, got one sponson off, didn't know the end pieces were screwed on from the inside--took a while to figure that out. The thin ends survived pretty well. I definitely need a better tack pulling tool, I just used the stiff edge of a scraper, which worked okay but was slow.

couple more pics:

sponson off.jpg sponson end attached.jpg sponson end inside screw.jpg sponson end screws removed.jpg sponson end removed.jpg
 
There's no need to remove the tapered ends from the sponsons - this will just make more work for you later. If you haven't taken the other one off yet, just remove the whole thing intact. More generally, just look at the boat and you can see how it was put together. Leave as much together as possible as long as things don't interfere with what you need to do. These boats were built starting with the hull itself (inwales, ribs, planking), and then all the add-ons were installed (deck framing, decking, seat cleats, seats, etc.). Removing the add-ons should pose no problems, but as said before, you don't want to remove inwales unless necessary (because they're seriously damaged).

And yes, get a decent tack puller - it's cheap and will make your life much easier. Like any tool made for its purpose, a tack puller it will make pulling tacks easier and will help reduce damage from the tear-down. See the images below for two examples. I use the simpler one on the left most often; I grind the tool a bit to make a sharper edge which is easier to get under tack heads.

tack-puller.jpg tack_puller_2.jpeg
 
There's no need to remove the tapered ends from the sponsons - this will just make more work for you later. If you haven't taken the other one off yet, just remove the whole thing intact. More generally, just look at the boat and you can see how it was put together. Leave as much together as possible as long as things don't interfere with what you need to do. These boats were built starting with the hull itself (inwales, ribs, planking), and then all the add-ons were installed (deck framing, decking, seat cleats, seats, etc.). Removing the add-ons should pose no problems, but as said before, you don't want to remove inwales unless necessary (because they're seriously damaged).

And yes, get a decent tack puller - it's cheap and will make your life much easier. Like any tool made for its purpose, a tack puller it will make pulling tacks easier and will help reduce damage from the tear-down. See the images below for two examples. I use the simpler one on the left most often; I grind the tool a bit to make a sharper edge which is easier to get under tack heads.

View attachment 43168 View attachment 43169

good point about keeping the sponson and other things together--too late on the front one on this side but I'll try to do that on the other side of the boat. and good advice also on the tack pullers, I've got a mini-crowbar like the one you show on the left, but it definitely needs grinding down as you say. I'll pick up a normal tack puller tomorrow before I try to go much further.
 
a couple more quick order-of-disassembly questions. Deck framing and seat rails are removed, other sponson is waiting on a screw extractor but should come off this weekend. picture of current progress:

OT 130667 Sept 1 2019.jpg

My questions:

1) at what point do the stern quarter knees come off? one is in good shape and will serve as a pattern for the other which is busted up.
1.b) is there a source for salvage mahogany to make that quarter brace? or what kind of wood should I be looking at?

2) The transom needs the two pieces to be rejoined . . . at what point do I do that? can I remove the top of the transom, clean it up, and attempt to rejoin it to the lower half in place? or should both transom pieces be removed to clean up and rejoin?

3) does the keelson get removed and cleaned up?
 
The answers to these questions depend on the boat and what you're trying to do. Understand how the boat is constructed, and trust your judgement as you make a game plan. Just don't take it too far apart or you'll end up with a jigsaw puzzle that you may never get back together. Remember that the ribs are steam-bent, and the planking is under some (small) amount of tension, so if you take too much off at once, the hull will begin to relax and spread out over time. That's not good. As you have the boat now, I'd want to be working quickly since you've so much taken out of it. The stringers that support the seats, for example, give a lot of support to your hull, and the seats themselves hold the hull together laterally. All of these are now out of the boat. If you remove the knees and the transom, be sure you've got some bracing to hold everything together or you'll shortly find the boat in a very sad state. Alternatively, get the hull stripped and re-varnished (still best to have some bracing while doing this), and re-install the seat-supporting stringers and the seats before any transom removal. With all of this including the transom, you must decide based on the condition of this particular boat whether it needs more or less tear-down. It's hard to judge these things without seeing it in person. In any case, the more you remove, the more you risk causing damage in the process and the more you have to put back together.

Unless your keelson is damaged, I can't imagine a reason to remove it. "Cleaning up" can certainly be done with it in place, just as you're doing with the ribs and planking.

There may be some salvage sources of mahogany and other woods near you. Surely you're not too far from a good lumber supplier. Try woodfinder.com as a locator. You can use new mahogany and stain, dye or chemically treat it to match the old wood. Another option would be to go to a flea market, antique mall or similar and look for old mahogany pieces that you can scavenge from.

It may have already been said, but one of the best sources for information is the outstanding book The Wood and Canvas Canoe by Jerry Stelmok and Rollin Thurlow, available here:

http://wcha.org/store/wood-canvas-c...tory-construction-restoration-and-maintenance

At $24, this excellent book is a bargain and a must-have for anyone building or restoring wooden canoes and similar boats. There are several other very helpful guides as well, the most recently published here:

http://wcha.org/content/old-canoe-how-restore-your-wood-canvas-canoe

Hope this helps,
Michael
 
I would not remove the keelson unless it needs to be replaced.
Yes, there are over 100 little crannies that are hard to clean sand and varnish, but do your best.
The ribs are not full length. Each side is separate and they butt together under the keelson. If the keelson is removed, you’ve got a floppy hull.
I did replace the spruce keelson on mine. It was rotten. I replaced it with a mahogany keelson to dress it up a little.
Since you are facing transom issues, and not seeing exactly what they are, I will share what I did.
I cut the top 4 inches off with a circular saw. It had motor clamp damage beyond repair. I used the removed 4” as a template for a new piece. Luckily the grain matched up pretty good.
 

Attachments

  • 763C8230-5E37-409A-B6B2-797984517E8F.jpeg
    763C8230-5E37-409A-B6B2-797984517E8F.jpeg
    209.7 KB · Views: 357
Back
Top