Suggestions For Bending New Gunnels On Old Town Near The Ends.

I hope that this is not getting too far off topic. I have a question about the gap between the upper flange of the outwale and the top of the planking shown in post #31. The upper edges of the planking in my Morris were too far gone to determine whether there was a gap and what its dimensions might be. Can anyone tell me how the canvas was attached in that area, and how that gap figures in? At this point I have the new planking trimmed so that there is no gap when the outwale is attached.
 
I'm not sure what you mean by the "upper flange of the outwale." This illustration from the 1910 Morris catalog shows the various outwale styles used by Morris -- no upper flange on any of them. Old Town and Morris canoes were not built alike.

The top plank on a Morris was tapered to a thin (sharp) edge, and the canvas was placed over that.

Most Morris canoes had closed gunwales, and as shown, a thin topwale or rail covered over both in- and outwale, and everything in between, as shown. Only Fig. 1 below shows the canvas, but as I understand it, the canvas was similarly placed on all three styles.

1910 catalogue_Page_13.jpg
 
Thanks Greg. I have the 1908 Morris catalog. What I have is an outwale that has the basic shape as the center "Open Gunwale" image. EExcept that the planking, from what I could tell, was not tapered to a feathered top edge, and outwale has a flange at the top similar to what is shown in pattern piece shown in post #31 above. The flange extends about the planking thickness from the body of the outwale, and is about 3/16 inch thick. Where I left the planking repairs the outwale fits squarely over the planking, as shown in my sketch. The question is how is the canvas attached, and where is it trimmed ?
Morris Rail Sketch 1_02.jpg
 
The above discussion applies to the rail construction through the body of the boat. At the peaks the flange gradually disappears, the outwale is tapered. the ribs are let into the inwale and the planking edge is reduced to a feathered edge.
 
While I have worked on a Morris with the typical Morris closed gunwales with the ribs set into pockets in the inwales, I have no experience with an open gunwale Morris -- I don't think I have even seen one.

If someone comes along who has actual experience with a Morris with open gunwales, I would sure like to hear (and see) what they would do. Absent that kind of experiential knowledge, if I were in your shoes, I would staple (some folks use tacks, as Morris would have) the canvas to the planking at each rib, and I would trim the canvas even,or just below, with the top of the planking; the canvas should not be higher than the top edge of the planks. In this way, the edge of the canvas is hidden by the outwale flange, which sits on (or just above) the top edge of the top plank(s). On the last few inches of the outwale, the flange or lip is tapered away so the outwale sits tight to the inwale where it is fastened to the deck. This is, I believe, the most common way of fastening the edge of canvas to the hull on an open gunwale canoe.

See pp. 132-33 of Stelmok and Thurlow, The Wood& Canvas Canoe, or pp.201-04 of Stelmok'sBuilding the Maine Guide Canoe. I don't have my copy of Mike Eliot's book handy,but I expect he has something similar.
 
Here's how I did Old Town HW gunwales, in case it helps anyone.

I used 4/4 ash, but suggest starting with 5/4 instead - my finished gunwales are just barely big enough. I set a bevel gauge to the angle on the outer edge of the inwale. I tilted the tablesaw blade to that angle. Then with a few rip cuts, I cut the outside, inside and rabbet. These bevel rips are easy but now all the nice square corners are angled, so the rest of the steps have to account for that.

I made a form to prebend the gunwale ends, about 28-29" from the tip. The stack of plywood at the back is for the upward curve. Several beveled blocks support the beveled gunwale stock. JClearwater mentions twisting in post #40, which happened every time. The blocks are different heights to bend the gunwale slightly inward as viewed from above. My form curves slightly more than the canoe to account for springback. I put the stock in from the left as in the photo for one end of the canoe, and from the right for the other end. The form could be improved. The bend is nowhere near as dramatic as bending the stem. I made some extra gunwale stock which I used to make sure the final shape fit the canoe. I was able to steam my test stock a couple of times when refining the form.


Prebent pieces made it easy to mark exact locations for screw holes. I drilled the five holes at the end, which cover the deck area, where clamping is difficult. I wanted to be able to install screws to assist with clamping the gunwale while it was still steaming. I put the prebent pieces in a 6 mil polyethylene sleeve and started steaming. When the piece started to get flexible, I clamped it in place. I ended up only putting one screw in through the bag, which kept the piece from shifting. The plastic bag allows you to see what's happening and adjust while the gunwale is still flexible, but is very slippery, so the clamps can slide around.

I used this setup to maintain the upward curve. A curved caul puts the pressure in the center of the gunwale, and the 2x4 is clamped to the thwarts. My canoe has carry thwarts so I could clamp to those. Obviously I took this after removing the bag and installing a few screws, so it's easier to see.


With the clamps removed, it looks pretty good. I used blue tape to mark where I wanted to install screws, and drew an arrow so I'd miss the rib top nails.


Dogbrain has a nice photo in post #33 of the gunwale profile. I am going to use a Lie-Nielsen Bronze Beading Tool to make these rounded corners, because it will follow the curves easily and I can grind a blade to any profile I want. It should make a great consistent profile. The straight grained ash stock will work well. The tool is even more expensive now than when my wife* bought it, but you don't have to buy one. Lie-Nielsen sells five blank cutters for the tool for $10. It's easy to make a wooden body for those cutters similar to a marking gauge, called a scratch stock.

* My wife thinks some tools are cool and just buys them. She has her own collection of wooden molding planes.
 
You can't go wrong if you follow Greg's recommendation for canvassing...the canvas should be trimmed at the top of the planks. I use tacks, two per rib. Staplers/staples work just as well or better.
 
A few comments.

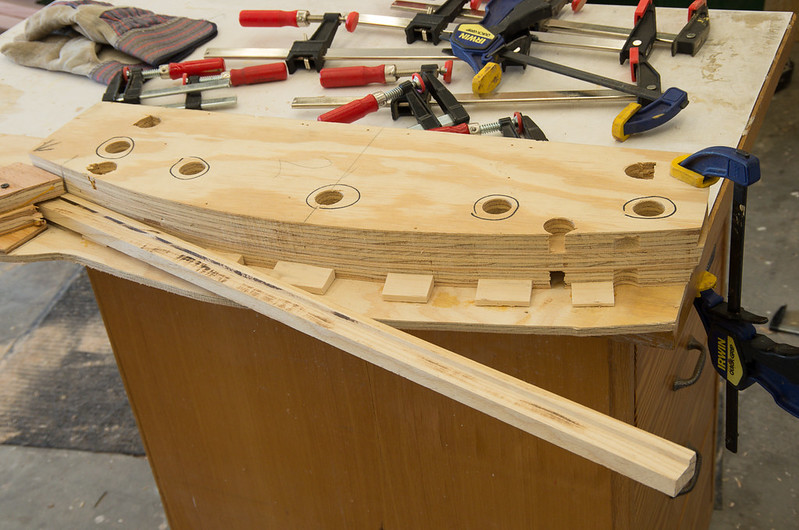
First, keep in mind that Morris did not build canoes in the same way as Old Town, and probably not like anyone else. Much of what has been said above is basically the way Old Town did it, and while it can be adapted to a Morris being rebuilt, it pretty certainly is not just the way Morris did things. It is clear from photos that Morris did taper the ends of his gunwales, but most of my photos are or closed gunwale Morrises. I have only a couple of very poor pictures of what appears to be an open gunwale Morris, and one that has seen better days at that. Note the short top rails adjacent to, and extending a bit past, the decks.

img_1601.jpg


img_1600.jpg


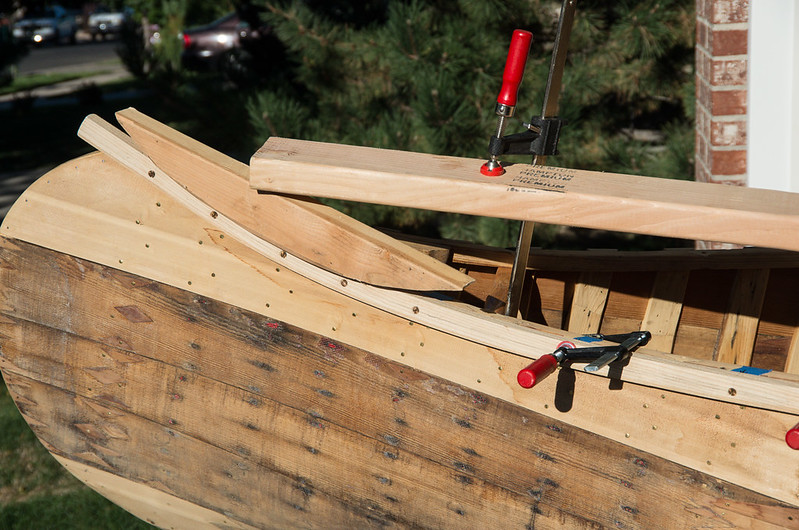
You describe your canoe: “At the peaks the flange gradually disappears, the outwale is tapered. The ribs are let into the inwale and the planking edge is reduced to a feathered edge.” In the photo above, no flange or lip is needed at the end of the outwale; you can begin to taper it away at the point where the sheer plank (the top plank) loses its square edge and becomes a feathered edge. Warning -- this is pretty much just speculation on my part.

On Morrises with closed gunwales, the ribs are let into pockets for the whole length of the canoe; your canoe and these two pictures suggest that they used a little of their unique gunwale technique even on their open gunwale canoe.

However, the flange or lip on an Old Town outwale (at least on older ones) is not tapered, but is kept the same size while running the full length of the canoe, with the flange sitting atop the sheer plank the whole way. The lip that forms part of the top of the outwale is constant in size -- 5/32" x 5/32" on a 50 Pound model -- I would guess that the rabbet is cut first and the outwale is then fitted and tapered .
ss cr IMG_0142.JPG


The body of the outwale outside the flange is where part of the outwale taper occurs. The original outwales on our 1931 OT 50 Pound model at midship are 15/16” high and 7/16” wide; at the ends, they are 9/16” high and 5/16” wide. The outwales are obviously less robust at the ends, right where some durability is called for -- all four outwale tips were battered on our 50 Pounder when we got it. On our 1922 OT Ideal, outwales are a bit more robust -- amidships they are 15/16” high and 5/8” wide, and at the ends, ¾” high and 7/16” wide. The ends on our Ideal are in great shape, most likely because it got better care than the 50 Pound model before we got them, but the extra size of the outwales certainly didn’t hurt anything.

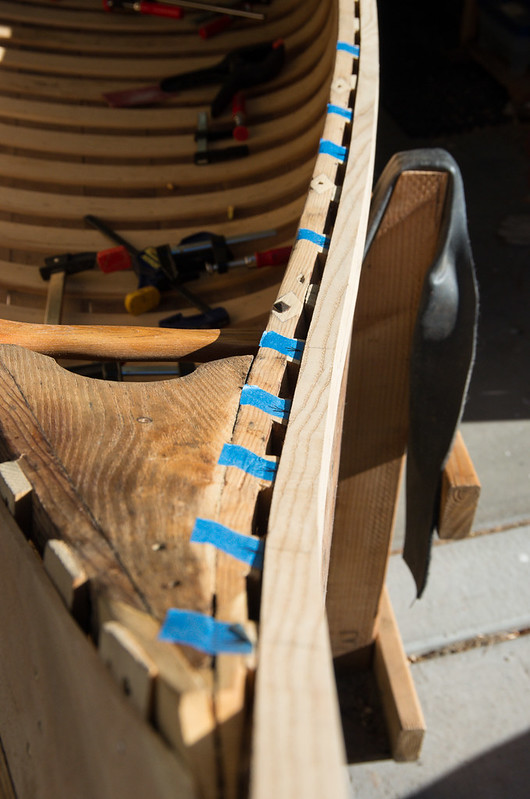
The inwale and outwale do meet a few inches from the ends, adding an elegant touch when done right, something possible because the tops of the last three or so ribs are made progressively narrower, as shown on a friends OT 50 Pounder:
ss cr 100_3305.JPG

and my 50 Pounder with canvas and outwale removed:

ss cr IMG_0132.JPG


On your Morris, the same effect is gained by recessing the last few ribs into pockets in the inwale.

When I got my 50 Pounder, the canvas had been replaced at least once. The person who put the last canvas on did not know how to do it. The unpainted canvas extended up and was folded over the top edge of the sheer plank and the extended up again above the rib ends. The outwale was fastened on with the canvas sandwiched between the outwale and the rib ends, and then trimmed even with the top edge of the gunwale. I suppose it was thought that this would fasten the canvas more securely. But the canvas was already fastened, and the lower edge of the outwale, when screwed down, would also secure the canvas. The extra unpainted canvas did nothing useful, but it did look ugly, especially where it frayed.
ss cr a955_3.JPG

ss cr ac5b_3.JPG


As to steaming, we had not pre-bent the gunwales that were fitted at the WCHA demonstration of steaming and fitting gunwales in a poly bag (post 11 above), and we had no problem fitting the outwale to the canoe. One of the advantages of steaming in a poly bag over using a steam box is that there is no need to rush to fit the steamed wood before it cools -- the continuous supply of steam keeps the piece flexible for as long as is needed while clamping the piece in place. A good supply of clamps is needed. The other major advantage of using poly tubing is that there is usually no need build a bending form, thereby saving significant time and some material.

Finally, I fully support any excuse that leads to getting a new tool. So if you “need” a Lie-Nielsen scratch stock to round over your gunwale edges, go for it. As King Lear cried, “O, reason not the need!” But you can do a fine job in a variety of ways other than using a scratch stock -- spoke shave, rasp, block plane, followed by sand paper.
 
I ruled out a router because of the tumblehome angle. If it was a nice square edge, a bearing guided roundover bit would work OK. Also, if there is a way to avoid using a router, I am all over that.

"A router is a tool to ruin wood more quickly than you can by hand." - James May.
 
I agree that a router would probably not work well for the outwale, and indeed, I don't think a scratch stock would work well either -- check the profile in post 33 above, and keep in mind that the profile of the outwale will change along the length of the canoe as the tumblehome changes.
 
Back
Top