Stem Repair and Otca Restoration

Thanks, Worth. I think a date is more important than a name. I sure would like to know when my canoe was last repaired.

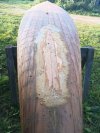
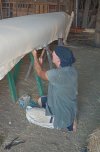
Here's another small problem this canoe had. I should have asked folks here how to fix it before I barreled ahead and just did it, but I didn't. Feel free to tell me why this won't work even though I did it already.

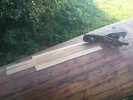
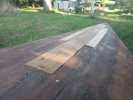
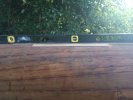
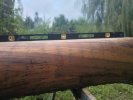
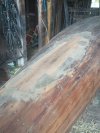
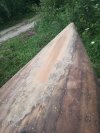
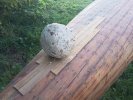
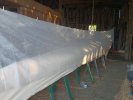
This old canoe had, well I don't know what you call it, a sunken area in the hull right under the rear seat just off the stem. It sagged in, or sucked up, a quarter of an inch. I don't like a saggy canoe. I had no idea how I could possibly push the ribs and planking back out again. And if I replaced them it'd probably come out looking far worse than the sag, so I decided to leave it alone and just fill it in. I laid my level over it to see were the sag started and stopped and how deep the sag was. It was almost exactly a quarter inch, which is the thickness of some planking I had on hand, so I cut some that length and glued it down with brass tacks holding it til the glue took ahold. The next day, when the glue was solid, I pulled the tacks and planed the planking until it agreed with the level and nowhere was sunken anymore. That left the planking pretty thin on the ends but 1/4" thick in the middle, but it's all glued down. I hope it keeps on sticking.

I'm really curious to know how you real canoe repairmen deal with a sag like this. I have a '36 Yankee that's a whole lot worse, and I'm skeptical that this method'll save it.
 

Attachments

  • Planing.jpg
    Planing.jpg
    222 KB · Views: 32
  • CedarPlaned.jpg
    CedarPlaned.jpg
    154.3 KB · Views: 34
  • Level.jpg
    Level.jpg
    194 KB · Views: 35
I used the glue and sawdust paste for filler wherever there was a void: the stems where the tacks had split them a little bit, at the end of one decks and stems, and all around the planking that filled the saggy spot. I didn't have any sawdust, so I made some by sanding that oak board and collecting it in a box. That worked pretty well. I still had a cloud of dust around me, but most of the solids stayed in the box if I kept the angle grinder spraying in the right direction. I did it outside of course.

I gooped that globby glue goo all around the planking at the saggy spot, troweling it down thin smooth as best I could make it. Woah was that messy! That was not the best idea I coulda come up with. I could have glued cedar planking across the entire area and worked it down thin with the hand plane. That'a been a lot easier. The glue would have held the planking no matter how thin it was. This goopy stuff doesn't work down very well after it's hard. I think it's best for small areas--if it's best at all. Oh well. Work and learn, right? Serves me right for not asking first.
 

Attachments

  • SawdustBoard.jpg
    SawdustBoard.jpg
    319.2 KB · Views: 36
  • SawdustBox.jpg
    SawdustBox.jpg
    351.4 KB · Views: 35
  • SawdustBagged.jpg
    SawdustBagged.jpg
    140.5 KB · Views: 34
  • Gooped.jpg
    Gooped.jpg
    259.5 KB · Views: 33
With 50 grit paper on my little hand held belt sander and a lot of going-over, followed by a hand held squishy sanding block, I got it all worked down smooth so there's no bumps or dips and (best of all) no more sag. Here's how it started, from holding the planks with tacks and a rock to the final shape sanded smooth to the level. (It feels better than it looks.) Might nota been the best solution, but it's gonna work just fine. It was pretty cheap too--just one and a half bottles of glue from the hardware, planking that I had, and sand paper.

I'm still wondering how you fellas handle saggy bottoms. Is there a way to push it all back up so you don't need to fill it in?
 

Attachments

  • StraightPatchWithLevel.jpg
    StraightPatchWithLevel.jpg
    132 KB · Views: 32
  • SandedInBarn.jpg
    SandedInBarn.jpg
    194.6 KB · Views: 30
  • SandedDoneOutside.jpg
    SandedDoneOutside.jpg
    234.6 KB · Views: 30
  • TackedAndRockOnPlanking.jpg
    TackedAndRockOnPlanking.jpg
    246 KB · Views: 32
Not quite understanding 'saggy bottoms' in this context, my thoughts would be to replace planks.
Sam
 
When the canoe was upside down on saw horses, the bottom under the rear seat had a dip in it: it sagged downward--or upward when the canoe was upright. The ribs and all were sagging 1/4" just past the stem, tapering to zero over about two feet. I wish I'd taken a picture.

Are you saying you would have replaced the planks with thicker ones, Sam? By golly, that would have worked! I would have needed some 1/2" cedar planking, but I probably could have found it somewhere.
 
I'd have to think about that.

The ribs are the problem........ perhaps I'd have put new rib tips on, fastening the new ends at a height that would get the planks where they were supposed to be? It's something I've never seen in the 10 or so canoes I've done and hope I never do

Sam
 
Mud. What you are describing is a hogged condition. You would not fill it in with thicker planking. They can sometimes be steamed or boiled and bent back to where they belong. It's a process. If a canoe is stored upside down and stuff gets stacked on the hull it will likely hog from the weight.
 
Dave, I don't remember this canoe having that saggy spot when my dad bought it for us. (It was our wedding present 27 years ago.) It has never had any weight on it while I've owned it, but it has been stored upside down. I've seen other Otcas advertised for sale that have the same problem in the same area--sagged right before the stems. I've wondered if it's a weakness of this design, yet they made the Otca for so long it seems like a problem like that would have been worked out of it.

I mentioned that I have a 1936 Yankee with the same problem but worse. That suck up happened when I replaced too many ribs in it. (Half of them were cracked or broken.) The new ribs were a lot flatter than the old ones I was replacing, so the contour didn't match when they met. I'm sure it was my lack of skill too, of course. When I saw what was happening I abandoned the repair. I've thought about trying to pour boiling water into it while it's under pressure outwards, but I don't know if it can be saved with any reasonable amount of work. If I decide to tackle it I'll get some feedback here before I barrel into it.

Are you saying that the 1/4" hogging that this Otca had could have been pushed outwards with steam or hot water?
 
If you're lucky you could lay towels in it and apply lots of boiling water. Add weight and hope for the best. Or Clamping boards across the gunnels and then bracing the bottom to where it should be and leave the braces on it for a good long while is how i would do it.
 
Brace it for a good long while. Worth a try. I doubt I'll get to it for at least that long anyway, since I have another canoe to do first. Thanks. I'll see what I can do.
 
Canoes get hogged. It's not a design issue. It's caused by poor storage. Boats stored properly will never suffer from stem rot or hogging.
We have all made a whack at a hogged hull at one point or another. I'm not aware of any other "layer cake" fixes.
Generally once hogged, always hogged.
Here is a related thread that covers a fix I did on a one of boat.
I guarantee no results and only offer it as an example of one way that has been tried (with success) to fix a hull.
 
A keel may help some.
I had a great thing happen on a Meraco Racer that I’m working on. There were support pedestals under the seats originally. It just so happened that they were right where some minor hogging was. I made the pedestal 1/4” too long and it wiped the hog away!
1724282958029.jpeg
 
Dave, I've done that (but at the thwarts instead of the seats) on two fiberglass canoes. One was "oil-canning" and the other was cracking its foam "ribs". Solved the problem on both.
 
We got the canvas stretched and tacked all but the ends yesterday.

For anyone who cares, we set the canoe up on four sawhorses under its thwarts so the canvas could hang down the sides. Then we clamped the ends of the canvas between boards and pulled it lengthwise and downward with ratchet straps. We adjusted how much downward pull it had by moving the straps' hooks up or down in the baler twine loops. We left it like that for a bit to let it relax flat while we ate some peaches, then we tacked it down. By then it was chore time, so we quit. We hung a nice, new, light garden row cover over it on a baler twine to keep the falling stuff off from it.

I know everybody here knows more about this than we do. I'm just showing what we did.
 

Attachments

  • StretchingCanvas.jpg
    StretchingCanvas.jpg
    235.3 KB · Views: 26
  • StretchingCanvasEnd.jpg
    StretchingCanvasEnd.jpg
    244.2 KB · Views: 25
  • MeTacking.jpg
    MeTacking.jpg
    182.4 KB · Views: 27
  • TentedCanoe.jpg
    TentedCanoe.jpg
    157.8 KB · Views: 26
Back
Top