Stem Repair and Otca Restoration

Mud Bug

Hand made things are better
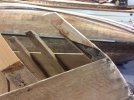
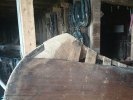
What do you fellas think of my approach to replacing the top of the stem? It's an old oak board I found in the barn and fitted to the curve of the stem and the angle of the deck. The tip of the deck was rotted away along with the stem, so I filed it back square between the inner gunwales to they can fasten to it too. (Four connections to the board: stem, deck, inner gunwales, planking.) I'll glue and screw it through both the stem and the deck, with the deck screws' heads underneath the copper band. Once it's in position I'll work the top down flush, of course. Seems like it'll be about as strong as the original. Oughta work doncha think?

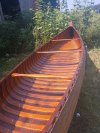
This is a 1969 Otca my dad gave me a number of years ago which I'm finally am getting around to restoring. I'd never noticed that the center thwart is held on with wing nuts. I'm guessing that's so it can be taken in and out easily. Now why would anyone want to do that? A carrying yoke? I wouldn't think a single carrying yoke would be very useful with this 18 foot brute. And if you're paddling a canoe this big, wouldn't there be someone else to help carry it? The other two thwarts have regular 'ol brass square nuts.
 

Attachments

  • StemPatchRemoved.jpg
    StemPatchRemoved.jpg
    157.4 KB · Views: 62
  • RottedStem.jpg
    RottedStem.jpg
    177.1 KB · Views: 64
  • StemRepair1.jpg
    StemRepair1.jpg
    188.5 KB · Views: 64
I wouldn’t do this. There are many examples on this forum for proper stem splice repairs, gunwale splicing, and deck splicing and replacement. This will not only add a ton of weight but also be unrepairable down the road if you glue it all together. Also won’t allow for proper drainage if you get it wet.
 
I would trim the piece of oak about where the taper starts and cut it off so that it fits under the deck. Then, scarf in new deck and rail tips. But, it is your canoe so do whatever you want.
 
Chris, Good point about repairing it down the road. Thank you for pointing that out. If it's only screwed in, it can be removed. I'll leave the glue out of it. I'm not worried about weight. Overall percentage-wise, this little board won't amount to much. Just in case though, I'll try to remember to carry this end and let my wife grab the other. That'll help me feel more proper again. :)

Gil, I don't think much of the board is gonna show--maybe an inch at the tip of missing deck. Scarfing in a new deck and rails sounds much better, but it's way above my skill level even if I did have the tools for it. If I can get this canoe solid again and water resistant (!) I'll be doing well. I shoulda brought it down to you to have it done right, but I decided to tackle it myself. It's not that valuable a model, after all.

Chris and Gil, I literally have more hoof picks than wood tools. I couldn't even find a rasp. I cut the board with my wife's Sawsall and sanded it with my angle grinder and a sanding disc.
 
Shucks, Dan. I can identify nearly every living tree in our area, but this one's not living. How do I tell now that its bark and leaves are gone?
Will red rot even when it's not dunked in water or lying on the ground? A lot of barns are made of red oak, I'm pretty sure. Isn't a canoe basically a small portable barn for spiders?

Gosh, I don't wanna sound like I'm arguing with you better craftsmen. I'm not. I just don't know a lot. I appreciate the advise.
 
The video at the first link below provides an example of how to test for red oak. The second link has some good information about rebuilding rotted tips. Good luck,

Benson


Mud - just take a small left over piece and see if you can blow though the end grain.
red oak has hollow xxx passages, white oak is filled with xxx.
 
Just gotta say...I search the heck out of the forum and know this type of conversation comes up once in a while. Got to admit I learn something each time someone asks a question. Glad new members are here, learning from each of them!
 
Dave, That looks like a nicely neater splice than I made. I gotta wonder though: why not make it a bigger board, say, twice the width, insteada adding that small strip on the back, then notch it down to size again where it meets the deck? It'd be stronger. The very skilled canoe craftsmen here abouts (you included) don't seem to like my board approach, but nobody's gonna see it unless the canoe comes apart (by choice or otherwise).

Anybody have any guesses about the wing nuts holding the center thwart on this Otca?
 
Bug,
I used to use a “birds mouth” approach that added more strength but I had a hard time getting them right. I suppose I could add a thicker backer to add some strength but the thinner piece conforms to the original stem better. With epoxy and screws it winds up very strong and once it’s all finished there is no pressure on it.
As for wing nuts, I’ve seen them on several canoes. It suggests that there is a need to remove the thwart. Not sure why though.
 
Makes sense, Dave. Conformity = better contact. No matter how well I fit my thick old board there will be unavoidable little gaps, since it can't conform to the stem. As a matter of fact, I'm counting on the stem conforming to it. Thanks for explaining.

A "courting canoe." Well it did occur to me that it could be for making a bed for camping, but I didn't consider a girl involved. I'm getting old. Thanks, Benson.

Mud
 
A couple things. First, I use the middle thwart to carry. It's only an 18 foot canoe. One person should be able to carry it.
When I was a bit younger and agile I often carried our 20 foot canoe, on carries up to 2 1/2 miles, solo. I loathe trying to carry with two people. The middle thwart is essential for that unless you replace it with a carry thwart. You also need it to help hold the shape.
WRT to stem repairs. I like to replace the stem well past where it is punky or bad. I do not use a bird beak but most of the good restorers (I don't count myself) do. I would not go overboard with the repair. Weight in the decks and stems affects balance when you carry. Keep it light and simple.
I never use screws, nails, pins or any other hardware unless it is original to the canoe.
 
Mud, you have to consider how the loads are shared. The stem, planking on both side, two inwales, and two outwales are all sharing the load at the bow and stern. So no need to go overboard on the wood. But the fasteners are crucial. Right size, right grip, and pre-drill everything - except tacks of course.
 
Benson and Dan, I cut a 1 X 6 piece of the board I made my stem splice out of, and I put dish soap on the other end and tried to blow through it. I could get no bubbles no matter how hard I huffed or puffed. Must be white oak? That board was left over from a stack of boards I bought from a sawmill 12+ years ago for fence boards, so maybe they knew not to sell me red oak for that. I do vaguely recall that conversation. Thanks for the test method. I feel better about using it now.

Worth and MGC, Your points are taken. In this case it's my knee-level skill, coupled with the excuse of a lack of tools, that's led me to take this simple method of connecting A to B. This board's only gonna show only at the very tip of the deck. When I'm all done, the canoe will be solid, will float and will look more-or-less fine. Some day I might reach higher than more-or-less (along with having a workspace that doesn't drip on my canoe when it rains or shower it with bat and pigeon droppings), but today isn't some day.

Mud
 
I got the first coat of Marine Man o War on the 'ol girl. Pardon my ignorance, fellas, but how in the WORLD do you get these things clean for varnishing? I put it on saw horses by the house where the extension cord would reach, and I swept and shop vacked it from one end to the other, but I still had bits of hay, dust, crud and spider egg sacks get in my brush! Some of that's permanent now, sealed for posterity. Sheesh. Well, I suppose the first trip down the Crick will add more gunk anyway.

Doing this is giving me a deep appreciation for the amazing work some of you fellows do. (Who'da thought spider egg sacks?)
 

Attachments

  • VarnishFirstCoat.jpg
    VarnishFirstCoat.jpg
    273.8 KB · Views: 39
Back
Top