I finally wrote up what I did for making stems, in case anyone might find it useful in the future. By rights, this should have been posted before the stem bracket discussion above, so it is out of order. The stems were made and installed before the brackets, obviously.
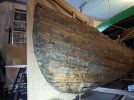
After the rib ends were all fixed, replacement stems were next. This was considerably harder than the rib ends and I learned quite a few lessons along the way. Some were educational and some were just painful!
Straight grain wood helps a lot.
My pieces of oak had grain runout to the sides, so they split when I tried to clamp them to the form. I glued both and tried again with a sheet metal backing strip but still no luck. I had to start over.
Steam bending stems is much harder than gunwales.
I steam bent my gunwales using the plastic tubing method, and it was pretty easy. But the stem bends are much more severe than the gunwales. The tightest bend on my stems has a radius of perhaps a foot, and the gunwale radius must be ten times that.
Don’t shape the stems before steaming them.
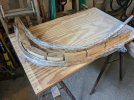
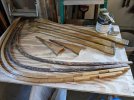
All my work on shaping the first set of stems was wasted when they broke. The second time, I made the stems in three layers, then steam bent them and epoxy laminated them, all before shaping them. To further help keep their shape on the form, I didn’t use three separate laminations, but instead took a piece of oak of the correct size and slit it twice for most of the length. I left uncut the inboard portion which sits flat on the ribs.
Use a fine tooth band saw blade.
I was lazy and used the coarse blade that was already on my little band saw. It left a bit of a jagged mess in each slit. But there was a plus side to this later.
Determining the shape to make the form, and being confident in it, is not easy.
I slid a piece of cardboard into the open end of the hull, clamped it in place, and marked the ribs and planking. After removing it and cutting it to the marks, I tested the fit and trimmed it until I felt sure, then did the same at the other end. But this is where it got complicated: I wanted to use the same form for both stems, so I had to trace both cardboard templates onto a fresh piece of cardboard, then cut a compromise shape that would fit both. That is what I used to make the form.
Rework is inevitable sometimes.
I steamed and bent the two stem blanks with their slits, using the plastic bag method on the form. When I took them off the form, they had too much springback at the tips, so I had to steam the ends a second time. This time they had only a little springback, and I figured the epoxy would hold against that, and it did.
Epoxy sticks to plastic wrap.
I had read that people use packing tape to keep epoxy from sticking to their forms. I tried plastic wrap because I needed the two stems not to stick to each other, as well as not sticking to the form. The epoxy stuck pretty well to the wrap unfortunately. But I got it scraped off and had a look at the joint. As I hoped, the coarseness of the band saw cut prevented epoxy squeeze-out when I clamped it on the form. I was counting on this, because otherwise I would have needed to thicken the epoxy with milled glass fiber and/or fumed silica. (Of course, there are epoxy formulations nowadays that have that stuff in them already, but I was using what I had on hand.)
The best tool for removing dried epoxy (and plastic wrap scraps) is a cabinet scraper.
I got all four sides of each stem cleaned up pretty well, paying the most attention to the inside of the curve since it is the only surface that will really be visible later.
Shaping the stems with a hand held power planer is an alternative to a band saw.
I just got Jerry Stelmok’s book “Building the Maine Guide Canoe”, in which he describes the band saw method. But I used the planer, even though it took longer, because that worked OK on my first set of stems – the ones that split when steamed and bent. I didn’t have confidence that I would get the taper right on the band saw, whereas the planer method took off a little bit at a time so I could check the dimensions periodically.
Careful measurements pay off.
On the old stems, I measured the thickness of the inboard edge every 6 inches, using dial calipers. The old stems were in tough shape so the measurements were erratic. Therefore I averaged the values from the two stems, and “smoothed” the average values. The stems started out straight on the ribs at 0.82” wide, began to taper at the 6 inch point, and then tapered over the next 42 inches to reach 0.40” at the deck. It worked out to 0.06” every 6 inches, which was easy to work with. (So the taper is 0.01” every inch, an amazing coincidence!)
Shortcuts can come back to bite you.
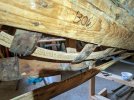
On this canoe the first three ribs are in two halves (then ribs 4 and 5 are each one piece bent around the stem). Those first three ribs were a bit ragged at the bottom due to iron fasteners used originally. I had previously fixed things like this with a mix of glue and sawdust and that worked well, but I didn’t do it here because there seemed to be enough good wood to nail into. But when I actually drilled for the ring nails, I was very limited because I could only nail into the upper side of the stem (bottom too thin) and I had to consider nails coming in from the other side of the stem from the other rib bottom. If I had patched the rib bottoms I would have had more freedom on where to nail.
Cutting the stems and inwales to length is scary – there is no re-do!
I thought I had a clear concept of the stem and inwale joint (and how the outwales would fit later), but I should have made a mockup, even if just in cardboard. I planned to re-use the existing decks, and they came to a point, so that meant the stems had to end under the deck at each end. But in actuality, the stems ended under the inwales, since the top plank came up over the inwales but also was nailed to the stem.
Lots of good ideas on the WCHA forums!
For my canoe, the stem was narrow, the deck was narrow, and the inwales were tapered, so none of these offered a strong attachment to the others. Others on the forums have dealt with this by building a bracket to join the stem to the inwales and deck, and that is what I did.
Attaching the inwales to the last few ribs at the ends, before installing the stem, was a mistake.
When I nailed each inwale to the ribs, I had the whole boat perfectly level and I used a second level to make sure the inwales were level from side to side, in addition to being the right height off the bottom of the canoe. But I should have left the last couple unattached until I had the new stem in place. That’s because I messed up my careful alignment when I pulled the bottoms of the ribs into place and nailed them to the stem. So when I went to install the decks, the inwales weren’t quite level and it was a real struggle to get them lined up with the decks.
Pre-varnishing the inwales is a good idea, but…
I had steam bent the inwales around the outside of the canoe before removing the old inwales, then varnished them. This worked well for protecting the inwales from any stain touchup on the interior. But it also meant I couldn’t steam the inwale ends again to get them to cooperate, unless I wanted to strip the varnish, which I didn’t. So I had to just brute force the inwale ends into position and screw them to the decks. It got done, but it was harder than it had to be.
Finally…
Thanks again to everyone who has posted their good ideas on these forums, even if it was years ago. I found so much good info!