Old Town seat frames

patrick corry

solo canoeist
Is there a period correct treatment for the frame members on a 1938 era Old Town Canoe seat? I have made the frames from air-dried Ash (noted as the species on the original build sheet) but I'm unsure about the treatment of the corners of the frame components. Leave 'em square, small round over, larger radius round over, chamfer? I have made them square for Chestnuts,
67563339729__549D4727-AB81-4F9A-B721-95B99630B83D.jpeg
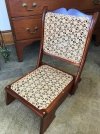
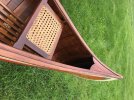
and here a solo seat for my Island Falls Willow which has a stopped round over shown here:
IMG_7436.jpeg
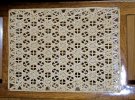
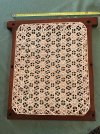
Or... is this larger round over posted by Dave Osborn in a 2016 post more appropriate?
Image 14.jpeg


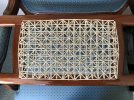
Here are the frames; still to be sanded prior to final detail. By the way, I chose to join the rails & spreaders with loose tenons using a Festool domino tool which worked quite well!


IMG_3087.jpeg

IMG_3075.jpeg
 
I would encourage you to round them like Dave's picture. The image below shows the the Old Town canoe seat from serial number 125927 which is slightly less than your serial number.

Benson


1764884744777.png
 
Yep, just like the seat in the image from Dave Osborne - appropriate throughout that time period. Note that sometimes they had corner holes and sometimes not, so either way is fine.
 
sometimes they had corner holes and sometimes not, so either way is fine.
Yes, I did notice this on the pictured frame. On a purely aesthetic note, the lack of a corner hole appears out of character with the right angle of the frame. Without the corner hole the cane must make a 45° angle across the 90° corner. Also, without the corner hole the pattern lacks the two converging diagonal canes pictured in my first two pictures. I did say aesthetics.... or maybe I should have said "obsession with minutiae"?
 
Your first picture caning pattern is impressive!
Thank you Todd. The pattern in the first picture is that used by the Chestnut Canoe Co. of Canada. It's remarkably similar to the second picture, but differs only in that the vertical and horizontal strands do not "weave" at their intersections. Other than that the process is the same and perhaps takes less time. Digging deeper into the weeds, I think but I'm not sure, that the Peterborough Canoe Co. used a similar pattern except that the diagonals crossed over the verticals and under the horizontals rather than the way Chestnut did it. Maybe this is true, and maybe I made it up.... I can't remember all my lies!!
 
Personally, I wouldn't obsess over caning patterns. Most of these canoes aren't exceptionally rare or historically important, and seats from the same canoe company, same timeframe, can have different patterns of original cane. Individuals did the caning, and at least with some companies it is said that caning was piecework done at home. Thus caning patterns varied. And if seats were ever re-caned, different patterns could obscure what was done by a given builder. Finally, just as paint color can easily be changed, it's not a big deal if you want to re-cane someday. I see no problem with using a preferred method/pattern. In a canoe intended to look period-correct, I wouldn't put in an outrageously complicated pattern that would look out of place but among the styles above, all seem to be reasonable for most older cedar-canvas canoes.
 
Last edited:
This thread has sort of drifted to cane patterns so I thought I would add a couple pictures of seats that I have done. First off I agree with Michael in that I don’t think we need to stress over doing the exact “correct” cane pattern to match how the canoe looked when it left the factory. No seat cane lasts forever and what is on an old canoe when we acquire it may not be the same as the original. The owners could have changed the pattern a couple times in the 100 year life of a canoe. It is only on the rarest of canoes and truly historic canoes that we should try to replicate the original. That being said I offer the following…

Before I start Jean Bratton is the cane master and has done a caning class almost every year at Assembly and hats off to her for doing it.

The first and second pictures show a variation on one of the patterns in Patrick’s first post. I believe it’s called the Diamond Pattern. The difference being that there are two diagonal strands going each direction rather than just one. In doing this pattern you must pull both diagonal cane strands through at the same time. You can’t do one strand and then try to pull the second one through – it doesn’t work. This pattern makes for a stronger seat because there are eight cane strands running across the seat as opposed to six. The first picture is a Morris the second is the stern seat on my Rushton. When you have a non-rectangular seat, like the Rushton, you have to plan ahead a little so the pattern lines up on the correct holes. I should also add that when you start the first diagonal strand that you run it through the correct hole on the opposite frame. Count the holes back to the corner and make sure they are the same number.

The third picture is of the seat in my Crandell, the fourth is from my Detroit 15. I did the Daisey Pattern. With this pattern you have to be mindful of the number of holes in the frame. You need an odd number of holes (not counting the corner holes) in both directions of the frame otherwise the completed pattern will not be centered on the seat. With an existing canoe seat frame you are stuck with the number of holes provided so avoid this pattern unless you don’t care that the pattern ends up one hole off center. On my Crandell you can see that the pattern on this seat is off center. The bow seat is correct. The casual observer will never notice but people like us will.

Pictures 5 and 6 show the Star pattern. I did this pattern on an E.M. White folding canoe seat. This pattern works best when you have a bigger area to cane. The caned area of a canoe seat is not really big enough to show off this pattern well but it does work on a standard canoe seat. Picture seven is a seat done by Jean Bratton that shows the weave well. This is a difficult pattern to do. It uses two different size cane strands and it’s easy to mess it up. This pattern requires an even number of holes on both sides of the frame, not counting the corner holes. My seat originally had the old standard seven step cane pattern that is seen all the time. I wanted to try the Star pattern. My mistake was not realizing that the existing holes needed to be bigger to accommodate the increased number and size of the strands going through each one. It added to the difficulty. Next time I’ll drill out the holes a little.

There are a couple books out there on caning. One is pictured below. There are also YouTube videos. I found that a good way to keep myself straight was to print out a decent picture of the pattern I wanted and using a colored pen trace the strand I was trying to weave through. That way I could keep track of the “over or under” problem. You can also try to eliminate the knots on the bottom of the seat. By being mindful of where you start and stop a length of cane you can avoid a knot by locking the finished strand under the wrap of the next strand running through that hole. It’s easier to explain in person while demonstrating than in text form. Steve Lapey is the master of “no knots.”

The most important thing is to have some fun and teach yourself a new skill.

Cheers,

Jim

PS: I guess you have to turn your head again with these pictures. It drives me nuts!
 

Attachments

  • IMG_9.JPG
    IMG_9.JPG
    316.5 KB · Views: 42
  • IMG_8.JPG
    IMG_8.JPG
    252.8 KB · Views: 39
  • IMG_7.jpg
    IMG_7.jpg
    329.7 KB · Views: 42
  • IMG_6.JPG
    IMG_6.JPG
    426.4 KB · Views: 43
  • IMG_5.JPG
    IMG_5.JPG
    352.7 KB · Views: 35
  • IMG_4.JPG
    IMG_4.JPG
    309.6 KB · Views: 37
  • IMG_3.jpg
    IMG_3.jpg
    239.7 KB · Views: 36
  • IMG_2.JPG
    IMG_2.JPG
    339.8 KB · Views: 37
  • IMG_1.JPG
    IMG_1.JPG
    317 KB · Views: 41
Jim, I'm completely content with thread drift! It's all fun information about the canoes and canoe parts that we like to work on.

With respect to the pattern one chooses to use on a given canoe, it's certainly not mandatory to use the original pattern which in many cases is long gone after extended use anyway and probably unknown. Cane, of course, is an expendable component, not unlike the canvas and we all get to choose the new paint color when we re-canvas, so why not choose a cane pattern that appeals? I touched on the minutiae of seat design, and Jim did as well when mentioning the necessity of making an odd number of holes for a particular design. This odd or even business I didn't consider when making these seats- I'll have to see how the pattern works out and perhaps learn yet another little detail in the process!

So far none of the canoes I own and have restored, or the one I built from scratch, are historic or unique, so I have chosen to use patterns which are appropriate mostly in my own mind. For example, I made a seat for my Island Falls Willow canoe which when I acquired it had no seat at all- just a kneeling thwart. Since it's an adaptation of an E.M.White design and therefore of American origin, I chose not to use the Chestnut or Peterborough patterns (which I like very much) because they were used by Canadian builders. That's not to say I couldn't.... I just chose not to.

Just for fun, here's my Willow seat with my lunch companion admiring the cane pattern while I was paddling in the Whitney Wilderness in the Adirondacks.
IMG_8185.jpeg
 
Back
Top