You are using an out of date browser. It may not display this or other websites correctly.
You should upgrade or use an alternative browser.
You should upgrade or use an alternative browser.
Construction of a Morris
- Thread starter yeolwoodsman
- Start date
yeolwoodsman
Rolf Warncke
Need a little help.
We are at the point on the project of building the structure for the decks. Its a model A Type III and I'm hoping that someone out there might have a photo of the supports for the long decks. The plans from Northwoods shows a great plan view but Im trying to determine if the cross piece where the combing is has a crown to it. I have not had the best luck searching for pictures of this detail on the forums. I'm looking forward to any help I can get. Thanks!
We are at the point on the project of building the structure for the decks. Its a model A Type III and I'm hoping that someone out there might have a photo of the supports for the long decks. The plans from Northwoods shows a great plan view but Im trying to determine if the cross piece where the combing is has a crown to it. I have not had the best luck searching for pictures of this detail on the forums. I'm looking forward to any help I can get. Thanks!
Steve Ambrose
Nut in a Canoe
I have one in the shop with the decks off. I'll get you some images later today.
yeolwoodsman
Rolf Warncke
Awsome! Thank You!
Steve Ambrose
Nut in a Canoe
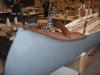
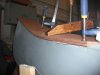
No problem! In the meantime the answer to your basic question is yes, the crosspiece does have a crown to it and the support that goes from it to the tip is also bent. It curves up to match the sweep of the rails. This piece is also slightly beveled on top from center in both directions so the two deck halves will land flat. The end result of the crowned cross-piece and upswept center support once the deck halves and center trim are in place gives you a deck that curves up to the tip parallel to centerline and curves down to the rails at the combing.
fred capenos
Canoe Pilot
Will this help? Fred


fred capenos
Canoe Pilot

Here's another angle
Steve Ambrose
Nut in a Canoe
Great job Fred! Now I don't have to take pictures or clean up my shop ") What type of wood did you make the replacements out of? They look far better than the pieced-together originals which seem to be made out of cedar on mine.
What type of wood did you make the replacements out of? They look far better than the pieced-together originals which seem to be made out of cedar on mine.
What type of wood did you make the replacements out of? They look far better than the pieced-together originals which seem to be made out of cedar on mine.yeolwoodsman
Rolf Warncke
Exactly what I was looking for. I'm also curious on the material.
Thanks
Rolf
Thanks
Rolf
fred capenos
Canoe Pilot
That wood was in the rafters when we bought our home. I asked a friend who is up on wood species and he said it was Douglas Fir. I would think you could glue up about anything and saw it out. I don't think cedar would be a good choice though. It may be too soft to hold the small small fasteners. If it would help, I could send you the best pieces that came out of our canoe. Fred
yeolwoodsman
Rolf Warncke
Deck Frames On
First I have to thank Fred for posting the pics. That was a big help!!
Here is what we we ended up with. Back frame is in and the front is waiting for the center piece. Nice and solid! We needed to get the cant ribs in and it was easier without the center piece there. Now we get to finish up the planking and clinching and see about getting some canvas on it.
Greg Nolan
enthusiast
Looking really good!
fred capenos
Canoe Pilot
My pleasure. Glad I could help. Fred
yeolwoodsman
Rolf Warncke
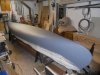
Planking on and almost ready to fair the hull.
Steven and I got the last of the planking on today. The slight gaps in the planking is getting some filler pieces before we get to fairing the hull. I ordered the canvas and filler yesterday so we should be able to canvas next weekend here at home. The canoe will go back to the school shop after canvasing so that we can fill it. Should be good to have it drying in a nice heated shop while the seats, thwarts, decks and outwales get fabricated.


How's it looking?
Steven and I got the last of the planking on today. The slight gaps in the planking is getting some filler pieces before we get to fairing the hull. I ordered the canvas and filler yesterday so we should be able to canvas next weekend here at home. The canoe will go back to the school shop after canvasing so that we can fill it. Should be good to have it drying in a nice heated shop while the seats, thwarts, decks and outwales get fabricated.
How's it looking?
Dave Wermuth
Who hid my paddle?
Very nice! May as well start another while you're at it.
yeolwoodsman
Rolf Warncke
Home for Canvas
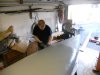
Brought the boat home today so that we can canvas it here in the garage. I have a canvas stretching set up all ready I just need to clear out the garage enough to get to it. That should be the hardest part...I hope.


Brought the boat home today so that we can canvas it here in the garage. I have a canvas stretching set up all ready I just need to clear out the garage enough to get to it. That should be the hardest part...I hope.
yeolwoodsman
Rolf Warncke
Stretching Canvas
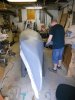
Got the canvas on today. The setup I have for stretching the canvas is in the garage. I wish it was a little higher on the walls though. After a couple hours it kind of gets to the back at the height we were at. The second photo shows the new canoe with my next restoration project hanging from the rafters to the left. Its a 1922 Old Town HW. It's stripped and ready for some woodwork.


Got the canvas on today. The setup I have for stretching the canvas is in the garage. I wish it was a little higher on the walls though. After a couple hours it kind of gets to the back at the height we were at. The second photo shows the new canoe with my next restoration project hanging from the rafters to the left. Its a 1922 Old Town HW. It's stripped and ready for some woodwork.
yeolwoodsman
Rolf Warncke
Update
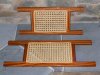
We are making progress on the Morris. The filler has been on for 5 weeks today (It's been drying in the heated shop at school the whole time). The seats and thwarts are ready to go on. We bent the deck boards. We have had some trouble bending the outside stems but will be attempting another try tomorrow. Tomorrow the boat comes home for varnish and paint. We have two and half weeks to go. The boat is scheduled to go on display at the North Jersey Student Craftsman's Fair from May 16-22. NO PRESSURE??
Pictures:
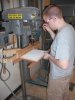
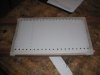
1 Seat frame drilling pattern printed in AutoCAD and taped to Seat Frame
2 Steven Drilling out the seat frame
3&4 Second coat of filler going on
5&6 Decking clamped up after steaming
We are making progress on the Morris. The filler has been on for 5 weeks today (It's been drying in the heated shop at school the whole time). The seats and thwarts are ready to go on. We bent the deck boards. We have had some trouble bending the outside stems but will be attempting another try tomorrow. Tomorrow the boat comes home for varnish and paint. We have two and half weeks to go. The boat is scheduled to go on display at the North Jersey Student Craftsman's Fair from May 16-22. NO PRESSURE??
Pictures:
1 Seat frame drilling pattern printed in AutoCAD and taped to Seat Frame
2 Steven Drilling out the seat frame
3&4 Second coat of filler going on
5&6 Decking clamped up after steaming
Attachments
yeolwoodsman
Rolf Warncke
pklonowski
Unrepentant Canoeist
Coming together nicely!