Construction of a Morris

yeolwoodsman

Rolf Warncke
I had an idea that some people might be interested in a project I have going with my son. My son is a senior in the wood shop class that I teach and he has started on the process of constructing a 17' Model 34-A Type III B.N. Morris (1908 reproduction) We bought the plans from Northwoods Canoes last summer while we were at assembly. It's a great set of plans!! I'd like to post some pictures as we go through the process both to show our process and to get some feedback from the experts! If this is okay with all the good folks here on the forum? Let me know. Here are some of the first construction photos.
 

Attachments

  • Strongback.jpg
    Strongback.jpg
    286.1 KB · Views: 655
  • Strongback and Brackets.jpg
    Strongback and Brackets.jpg
    284.2 KB · Views: 635
  • Station Molds 2.jpg
    Station Molds 2.jpg
    299.3 KB · Views: 631
  • Getting ready for stem molds.jpg
    Getting ready for stem molds.jpg
    293.3 KB · Views: 669
  • Stem mold on.jpg
    Stem mold on.jpg
    204.5 KB · Views: 643
Off to a great start! Nice having plenty of clamps, isn't it. Keep the Build Diary coming...

Dan
 
Thanks for sharing this project with us! Building a canoe with a son or daughter seems such a wonderful thing to do-- creating an heirloom to fill with happy memories.
 
Progress and a question on the mold.

I've attached two photos of the stem area of the mold. If there is anyone that might be able to share some photos of a mold from the same or similar angle it would be greatly appreciated. The detail in this area is a little tricky to work out and I need to get it right. I've emailed Northwoods Canoe for the same info but I thought it might be worth putting out here as well. Since it is a reproduction of a Morris it will need to be a splayed stem.

Thanks!
Rolf
Stem Pocket 2.jpgStem Pocket.jpg
 
Rolf, this looks like a great project. But your last two pictures indicate your plywood stem mold may be installed at the wrong height (3/16" too low). Be sure to check this out with Northwoods Canoe.

Here's my thinking (a picture would be so much simpler, but I don't have one!). At the end of the flat run of the stem, it’s essential that the "top" faces (as viewed on the form) of the installed stem and adjacent rib be at the same height. The top face of the rib will be 1 & 1/16” higher than your plywood station mold (assuming typical mold stringers ¾” thick and standard ribs 5/16” thick). But it looks like the top face of your installed stem will be only 7/8” higher than the station mold (assuming your stem is typical 7/8” thick), because your plywood stem mold appears to be attached at the same height as the station mold. This is a 3/16" discrepancy. In other words, it looks like your installed stem face will be 3/16" lower than the adjoining rib face. They need to be the same height.

The best solution is to remove and re-attach the stem mold 3/16” higher than the station mold. If that’s not possible, you could fasten a 3/16” wood strip along the flat run of the stem mold, gradually tapering its forward end into the existing curve of the stem mold. In any case, the goal is to construct your form such that the top face of the installed stem and adjoining rib will be at the same height.

CAVEAT: my comments are based only on your pictures, and they assume typical w/c construction. Your situation may be different, or I may be missing something, so be sure to check it out with Northwoods Canoe. And good luck!

Jerry
 
Jerry thanks for the heads up. I will keep a close eye on that as we get a little further. I think that part of the 3/16 will be made up as we fair the mold prior to putting the metal straps on. I've also built up the area on both sides of the stem which will eventually be carved out to accept the splayed stem. Rollin sent me some pictures as to how that should look. I put the stem mold even with the first station mold hoping it would be right... I guess I should have done the math. Thanks again for the very clear explanation.
 
Update

Well as promised here is another update on the Morris project. Most of the rib bands should be on by the end of the week and then we will begin fairing the shape. We have done a little faring where the stems will be. So cool to see the shape of the boat starting to appear. I've started shopping around for the sheet metal for the where the ribs would be bent... ouch. Good thing I didn't price this out ahead of time...:eek: 
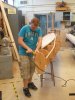
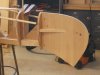
If any one has a good source please let me know. The pocket for the splayed stem still needs to be carved into the mold.
Stem end ready for fairing.jpgOne side ready.jpg
 
Last edited:
you should fair the form BEFORE you install the rib bands. (if you are talking about the metal bands that clench the tacks)
 
I took an idea from DAn Miller and used button head screws that fastened at the edge of the metal bands. therefore I did not have to drill holes in the bands. I went to the yellow pages for the bands. I looked for metal fabricators. My bands were I think 20 gauge but I am not sure. I had the fabricator make them for me with his big hydro shear. It wasn't expensive at the time.
 
Terminology opps! When I used the term ribbands I was referring to the "strips" used to sheath the form. Everything wil be faired before the metal bands are attached.
 
See if you can get uesable scrap from an industrial roofer in your area. They often have pieces that they cannot use and may be willing to shear and donate useable strips.
 
Success

Discovered that I had a student in my home room at school who's father owned a metal fabrication company. Called him today and went to the shop this afternoon to order the metal bands. What an amazing shop! It actually turned out to be the shop that produced the large metal name plates for the 9/11 memorial at ground zero. Got a complete tour of the shop and a close up view of the prototypes and a model for the memorial. Their website is www.servicemetal.com Quite amazing! I should be getting the metal bands next week...progress, a cool experience, and great story. It's a good day.
 
Fabulous project for a woodshop class! Ambitious, too. Who keeps the mold?

I second Dan's recommendation re. the screws. I started out by countersinking the metal straps for flathead screws. The metal isn't really thick enough to have enough of a lip for the screw to hold it. And if you, even slightly, over size the countersink your screw head will pull right through.
 
To give credit where credit is due, I am pretty sure I got the idea from Tom MacKenzie...

Dan
 
I have a punch that I made. It is out of 1/2" steel rod, with a flare turned into one end. It tapers down to a 5/32 or so spindle. It matches a countersunk recess in an old weight machine plate. I drill a hole in the steel band, hammer in the countersink, then countersink the sheathing to match. The screwhead in the band is below the surface of the band, and there is no way it will pull through as there is a 5/32 hole in the band. It takes a bit of time to put the banding on, but it is well worth it. If I can find the digital camera, I'll post pics.
 
First question... "Who keeps the mold?". That would be me. Its all our own material so i get to take it home. I keep telling my son that I get the mold and he gets the canoe. He seems okay with that. I'd like to do a matching canoe after his comes off.

I appreciate the advise on fastening the metal straps. Do they have to get attached along their entire length or just at the ends? With the screws at the edges I can see them being out of the way. Do they get in the way at all if they are along the whole piece?
 
I had an interesting question from one of the students today. They asked me what the mold would be worth when its done. I had not considered that and I don't think I've ever come across a post that talks about it. Any speculation on the value of a mold?
 
Back
Top