1911 aa Old Town Charles River

Nick Dennis

WCHA UK
I didn't need another canoe but when someone says they would like you to have it and spend time fixing it up then it would be rude not to accept the challenge. It was free.

This is going to be a real challenge. I have the original build sheet for the canoe provided to me by Benson Gray.

The canoe was built by Old Town with construction started on 9th March 1911. It was finished in May 1912 and was shipped to the UK via Liverpool on 1st June 1912 . Deciphering the handwriting looks as if it was for a R S Jaines who purchased through a firn Cook & Arthur of Chester.

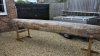
The canoe is 16' long. AA grade being a Charles River model. At the time of delivery it was light blue, with a mast seat, floor rack . Planking is western red cedar, the gunwales, decks and finishings were all in mahogany. The gunwales are capped or closed rather than having open scuppers.

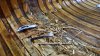
For the last 20 years or so it has been in Leicestershire with the intention that it would be properly restored; prior to that it was hanging in the rafters of the Mobile Adventure store being one of Colin Broadways collection. At that time it was coated in fibreglass which was subsequently replaced with a different layer of fibreglass rather than a canvas.

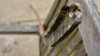
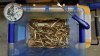
My mission; which I have accepted, is to get it back to near how it should be; I repair rather than restore so that the canoe retains its history and life. This will be a challenge so if you are up for it, do dip in and follow this thread. First job will be to work with a heat gun to remove the glass and then assess what is needed. I have ordered the Old own catalogue from the States along with the sheet depicting the paint colours and patterns that were available at that time.
B9E88D05-D9DA-43BD-B27A-1EDB684BBC61_1_201_a.jpeg
8353B5A2-00AF-46FF-B1BE-9DD8E4F7C3AB_1_201_a.jpeg
C113AE42-6FEA-483F-A2BD-B2B9E4C62279_1_201_a.jpeg
 
I made a start on Friday . I find if I commit to the job I will get it finished.
I stripped some brasswork off and then took one of the outwales off. This one is fractured as is the other so they will both need to be renewed. Floor boards and fittings came out as did the mountings which I think are for a canopy. I could then have a good look at the structure and see what I will need to do. There are eight cracked ribs; this canoe has clearly taken a punishment in that area. I have labelled them 1-8. A smiley face means that I can hopefully get away with a backside repair on ribs 1, 2, 3 and 8. Ribs 4, 5, 6 & 7 are mullered and took the brunt of the damage; they will need to be renewed as they are deformed. In fact it may be easier and better in the long run to renew them all and probably easier.
The deck have had their tips replaced; there is more original deck than repair so I will keep but blend the new tips in to match using some shellac. I may even put some brass tips.
With one out wale off I took a heat gun and a wide wallpaper scraper and when the glass was warm eased it up, grabbed it with some mole grips and then slowly worked along heating and pulling. The glassfibre canoe away easily. I made good progress but it will be a few days to get all the glass off. There is some on the inside too but it appears to be restricted to where the ribs were broken so hopefully it will come away.

Over the weekend I cracked on with the heat gun and got all the glass off the outside and also the patch on the inside. The next laborious task is to scrape all the residue off. I think I will do an hour or so each day so that I don't tire of it.

Sam came and had a look and we agreed that the inwales are fine so they can be kept but I found another broken rib so that's nine in total. The canoe had clearly been dropped at some stage in its life to cause such damage. Four new ribs and five backside repairs. I have ordered tacks, will see a sawmill about sourcing some western red cedar for the rib stock and then think about what to replace the out wales with. Good sustainable mahogany which will steam and bend is hard to come by in the UK so I may go with oak and stain it to match. The chicken and egg question is to steam and bend first and then rout the fine profile or the other way round? The fear is that the fine profile will fold on itself if steamed and bent.
The stern seat is tiny and won't take even a single buttock cheek so a larger seat is needed. I need to try and find an original seat design.
I will amend and change the stem tip repairs so that they match in far better than at present.

Progress; me and the heat gun are best buddies. I will hate to see the electricity bill tho!
 
Maybe I'm wrong (someone please correct me) but this canoe looks more like Double Gunwale construction not Closed Gunwale construction. Closed gunwales are made in three pieces, inwale, gunwale cap and side cap. The top and side caps are thin, say 3/16" or less thick. The side cap conceals the top ragged edge of the canvas and the top cap covers the joint between the side cap and the inwale. Your canoe gunwales are made of two pieces, inwale and outwale. The outwale covers the top of the canvas and mates directly to the inwale with the tapered rib tops, planking and canvas sandwiched in between. Technically I suppose it does have "closed gunwales" and maybe it's really only the definition, but there is a difference in how the two types are put together. Looks like a nice canoe. Good luck with the restoration and have fun.
 
Nick - Note on the build sheet: OS Stems - May 21 1912. Thought I'd seen that. . . . . another adventure in steam bending?
 
Thanks Jim & Benson, we are two nations separated by a common language.

So Sam, where the hell have the OS stems gone and how are they fitted/finished. I assume they go on as a detail after the canvas and then the stem bands on top. Anyone got photos of how it should look?
 
They would have run into the keel which you weren't planning to refit! :)
I had outer stems on my Cheamaun if you remember. I just tapered the bottom away to nothing and ran the brass over the end. Not 100% satisfactory I think.

Sam
 
Thanks Benson, looks like I will be steaming a fair bit of timber. I have the glass off half the canoe as of today. Getting the residue off is the time consuming exercise; it's like removing burnt toffee. Next step is a trip to the sawmill to see what they have for gunwales, ribs etc.
As my father used to say..."It's all in the preparation".
44B50EF0-4269-4076-BFC3-1E00552F7FEA_1_201_a.jpeg
DAF0D741-46A6-4205-B4B1-5AFA03E972ED.jpeg
65A45152-33F1-4FED-ABEF-0A447260CA95_1_201_a.jpeg
D93A247F-FBDE-47B2-AAA0-9BC22F462A8B_1_201_a.jpeg
 
After doing a few hours each day over the last week the glass and toffee resin residue is off save for a few areas where it had soaked into the planking. That was a job that I do not want todo again. The Bosch heat gun and a wide scraper was the best combination. I then sanded, filled any big holes and gouges and then hand faired the hull again so it is like the proverbial babies bottom! the canoe is now washed and now hung away whilst I source the timber for the ribs, outwales etc. I am going to go with oak for the stem and outwales as it is easier to obtain than sustainable mahogany. Having replaced and bent with Sam the oak for the outwales on my cedar rib we know that it should work Ok on the CR. I will get the outwales cut and jointed and then steam and bend before routing the fine profile afterwards. The fear is that they would fold if I did the profile first and then steamed and tried to bend as the caping profile is very thin.

Looking at the build sheet which Benson has provided I am intrigued that it took 14 months to build and finish this canoe.
 

Attachments

  • 265357E9-402B-4FA1-8B98-4AA4C78835D4_1_201_a.jpeg
    265357E9-402B-4FA1-8B98-4AA4C78835D4_1_201_a.jpeg
    76.9 KB · Views: 435
  • CE82939A-A90C-4087-B3BA-B3B48138ED56_1_201_a.jpeg
    CE82939A-A90C-4087-B3BA-B3B48138ED56_1_201_a.jpeg
    207.1 KB · Views: 402
I am intrigued that it took 14 months to build and finish this canoe.

This is not unusual, especially for a canoe that was filled in late June. This would not have been dry for the summer of 1911 and it would have been on the bottom of the pile of canoes that were built for the summer of 1912.

Benson
 
834844C6-C2BE-4E8A-8B73-24007E421ECA_1_201_a.jpeg
27ED92AA-4368-4187-BD25-038C08250A63_1_201_a.jpeg
The good news is that I have sourced some mahogany for the gunwales. I need to get it stripped down and routed to the profile. Next on the shopping list is some rib stock. I managed to tidy up the deck tips and attach some photos. Progress.
 
After a weeks R&R in the Yorkshire Dales and a few days camping in North Norfolk this wet and horrible weekend gave me the opportunity to get in the garage to do some work on the canoe. I have been busy building a router table so that I can do the profiles for the ribs and the outwales. I sourced Western Red Cedar for the ribs and stripped that down to 2" widths. Having measured a selection currently on the canoe they vary from 1 -3\4" to 2- 1/4". I will take all the rib stock to a friend who can thin it down for me to 5/16". I will then put the edge curve on. I was given some mahogany and that too need stripping down to 1"x3/4". I will then scarf and router the profile before steaming.

Today was a start on rib removal. To preserve as much as possible of the original I have decided that rather than replace 9 ribs I will replace those with multiple fractures and do "backside" repairs on those with hairline fractures. So it was out with a Stanley knife and a small pry and the first rib was attacked. I will remove every other so the 4 adjacent ribs which need to be replace will be done in 2 batches, It took an hour; then of course with the wicked tacks sticking up there is always the opportunity to snag a finger so it was out with an Elastoplast before turning them all out. You can see how the clinching iron works with the tacks being turned over to varying degrees. It is also interesting to see how different manufacturers use different tacking patterns. Chestnut used offset groups of three tacks whilst Old Town put them in neat lines. I will get two ribs out this week and then look at taking some planking off in the areas where I want to do the "backside" repairs.
 

Attachments

  • AD8673FD-B1C0-4922-8512-CAD54E6181D1_1_201_a.jpeg
    AD8673FD-B1C0-4922-8512-CAD54E6181D1_1_201_a.jpeg
    215 KB · Views: 405
  • 70651566-C606-4987-85EB-2409C8F19B9D_1_201_a.jpeg
    70651566-C606-4987-85EB-2409C8F19B9D_1_201_a.jpeg
    148 KB · Views: 425
  • A32B4AEA-6BAB-4FC8-80C8-A4C21031017D_1_201_a.jpeg
    A32B4AEA-6BAB-4FC8-80C8-A4C21031017D_1_201_a.jpeg
    146.4 KB · Views: 411
  • 0FDC3867-F1D4-4519-96D1-E0BDD941C74A_1_201_a.jpeg
    0FDC3867-F1D4-4519-96D1-E0BDD941C74A_1_201_a.jpeg
    182.7 KB · Views: 397
Thanks Craig, I will have a go as I have a plug cutter like that. Will save a lot of swearing! Trust all is well with you over there.
Nick
 
I had a lot of luck using a Dremel with a cutoff wheel to grind down the tack tips through the ribs. The rib pops off and you don't have any trouble pushing the tack through the planking because the tack tip has been ground off.
 
I tried Craig’s idea but the fact that the ribs had been glassed over made it still tough so I reverted back to the sharp knife. By working in strips from the outside of the rib in to the centre I halved the time and mess in removing the 2nd rib. Just got to repair a hole in the planking from the plug cutter now.......the story of my life :)
 
I've not tried to remove a rib with a plug cutter....the plug cutter looks like it leaves too much wood around the clinched tack. I use a wood auger bit, 3/16th. the threaded center pulls the cutters into the wood and rips the peened over bit off of the tacks. It's incredibly effective. Most auger bits are not designed to an electric drill chuck but you have choices, either chuck it up and go or cut the shank down. Either way works fine.
 
I just take my angle grinder with a course sanding disk and grind off the clinch portion of each tack. Then the rib literally lifts out and tack heads pop out the outside. I have a video on my Youtube channel.
 
Sorry this thread got sidelined, none of these methods will help Blott much since his ribs have been fiberglassed over. When you say glassed over I assume you just mean the resin, I don’t see any fabric in your photos.
 
Back
Top