1911 aa Old Town Charles River

May I ask- I have been seeing several restorations where people repaired broken ribs from the outside of the hull instead of just replacing them.

Is this with the idea of preserving an original rib? Make a small repair to a not far gone rib?

It would seem that just bending up and installing a new rib would be easier, stronger and ready to last another 100 years. I may try it on the boat I am working on now to see how it works out, I have a few cracks that impact the hull shape, but might shake out with the reverse repair.

I assume you cut a hollow and insert some cedar or scarf in a section? Is there a post with a description of this technique?
 
Look back at page 2 of this thread and it shows the process. A relatively common and effective repair which preserves the originality

Nick
 
restorations where people repaired broken ribs from the outside of the hull instead of just replacing them.

Is this with the idea of preserving an original rib? Make a small repair to a not far gone rib?

It would seem that just bending up and installing a new rib would be easier, stronger and ready to last another 100 years.
You captured the point perfectly...on a boat where you would like to retain the original wood you may opt to do the so called "backside repair" on ribs that are cracked or not severely damaged...but as you note it is generally just as easy to simply make and install a new rib. If you opt for a backside repair what you should be mindful of is that you need to plan out the joints in your planking so that none of them end up lined up with each other. You should stagger your planking joints at least one rib apart and perhaps even two. That's on both ends so to do three or four ribs in a row you will need to invade quite a bit of planking to avoid lining up the joints. I don't know if I'm being adequately clear about this but envision what you do when you lay bricks...you always stagger the joints. Here you do the same but preferably with a longer span.
The downside (if there is one) to new ribs is blending the new wood with the rest of the hull....not a big deal but something to think about. The downside to the backside is that you end up pulling planking that would otherwise stay in place...unless you do it another way.
 
Nick.
Here are the photos you asked for on the Three Rivers site. I thought this was t better place to share them. The first 3 are of the thwart I was repairing. the next 2 were today in poor light but I think you can get the dimensions. The last one is not my boat but it is a better shot of the overall shape.
Your decision about the keel always starts a robust debate. I have never had a keel that I installed leak but maybe it is just a matter of time and heavier use and less maintenance. I like to follow the rule that if it came from the factory with one I go with that. Now that Ive said that when I restored my 14' Peterborough Mermaid for my own everyday user I made several changes including moving the seats and thwarts and leaving off the keel. I just find the transition from outside stem to no keel awkward.
Now that Iv'e brought that up I have a question for the experts. I am working on my 30s era Peterborough Champlain. It has a standard keel, not a shoe keel, and I was wondering if they sometimes came with this or if it might have been a later addition. I thought the Canadians eschewed keels.
DSC_0859.jpg DSC_0860.jpg DSC_0861.jpg PB170019.jpg PB170020.jpg 1909 Old Town 187.jpg
 

Attachments

  • image.jpeg
    image.jpeg
    3.6 KB · Views: 336
I have a question for the experts. I am working on my 30s era Peterborough Champlain. It has a standard keel, not a shoe keel, and I was wondering if they sometimes came with this or if it might have been a later addition. I thought the Canadians eschewed keels.

I am not an expert on Canadian canoes but the 1908 Chestnut catalog says "We put keels on any canoe to order" as shown below. The 1909 Peterborough catalog lists "KEELS fitted to canoe, $2 to $3." and the circa 1920s one also has multiple references to keels. The note below the Cruiser description there says "KEELS: Shoe Keel (flat type 1/2" thick, 1 3/4" wide) or 7/8" Keel, $2.00 extra." and is also shown below. The catalog descriptions of the Peterborough Champlain model in the 1930s and 1940s list a shoe keel but I suspect that they would have made one with a standard keel upon request.

Benson


Chestnut-Keels.jpg


Peterborough-Keels.jpg
 
Last edited:
Thanks for the photos of the thwart Craig.

Well that's the Pandora's Box ("A present which seems valuable but which in reality is a curse") now well and truly open on the question of keels or not!

The question arose because I tapered the outer stems down on my Charles River. It came out of the Old Town Factory in 1911/12 with a keel but I had experience of having knocked the keel on my Chestnut which then leaked; when I re-canvassed I left the keel off so have done so again with the OTCR. The Chestnut paddled far nicer without than with and I do notice that my Cedar Rib paddles beautifully in a straight line with her keel but is a real pain to turn.

It was a European thing; here's some info I poached from elsewhere:

As people of European ancestry came in contact with canoes through the 1800’s and tried to build them, they tended to approach the task of boat building from a European perspective. For them, the process of boat building begins with a keel. The rest of the vessel is built around that. So, some early canoe builders added a keel to the vessel. As canoes became a commodity for the general public in the early 1900’s, canoe builders had to appeal to a market that viewed a canoe as just another kind of boat. Again, the general public in that time viewed a boat as a vessel that had a keel. Many people who were unfamiliar with canoes felt unstable in a canoe without a keel. They also had trouble travelling in a straight line unless the canoe had a keel. As a result, most canoes sold in the better part of the 20th century were equipped with a keel. However, it is interesting to note that true working canoes built at the same time (such as the Chestnut Prospector and the Chestnut Ogilvy) were never equipped with a keel.

Nick
 
true working canoes built at the same time (such as the Chestnut Prospector and the Chestnut Ogilvy) were never equipped with a keel.

I hate to seem argumentative but the 1958 Chestnut catalog listed keels available on both their Prospector and Ogilvy canoes as shown below. This wasn't just a Canadian thing either. The similar I. F. and Guide models from Old Town were commonly listed as being "carried in stock with or without keel."

Benson


page-18.jpg


page-16.jpg
 
Last edited:
This weekend has been a bit more fettling and cleaning up of the outwales. They were stained to darken the mahogany so that they match in with the rest of the woodwork. I then gave the backsides a coat of varnish and then once dried they were tucked away in the rafters as I will only now refit them once the canvas is on, filled and primed. At that point they will be finished to fit, stained again and varnished.
FD9B7C1B-11DE-420B-9F9B-6CFFDF33E11C_1_201_a.jpeg


A4AB7AC9-F654-4101-A443-AEAFF675D588_1_201_a.jpeg

The hull was given a coat of thinned varnish over the everything and a coat of varnish was given to the sailing seat frame and the new stern seat. The first on many with rubbing down between. When dry they will be caned.

78F9A317-3FDB-44DD-8C3C-E3ECE5E72137_1_201_a.jpeg

I then when dry, turned the canoe over and took the stem bands off and hand sanded the new outer stems. I also glued some dowels into screw holes which were oversized and at the tips glued in some additional wood which will give the screws a better purchase when the outwales are fitted for the final time. Screws can't grab in air !

651AF748-128C-4A08-95B9-B4116F5AEB59_1_201_a.jpeg


9FCE9E9F-CCDB-4ADC-8164-FB24B2C1606F_1_201_a.jpeg

The laborious task of rubbing the inside down was then started using a Scotchbrite pad. These are good as they go around profiles easily. I did half the ribs initally and will work through the others over the week. Then I will then do the planking between the ribs. The inwales and decks were rubbed down too and the final job for the day was the first coat of varnish on the decks and outwales along with an additional coat on the seat frames. I suspect that the decks and inwales and outwales will have 4-6 coats of varnish in total. I will put the deck decals on and varnish over so that they are protected.

ED55410C-208E-45DA-AC9E-F063F0164E2D_1_201_a.jpeg


2E7F59DF-0276-4FD7-AD48-1CB4F3622013_1_201_a.jpeg
C4ABD2EF-B8CD-4861-B950-A1F6AA0DE26D_1_201_a.jpeg

9F87682F-A22D-4079-A729-45B3CD1A0BFA_1_201_a.jpeg

This is a closed gunwale canoe with no scuppers to allow drainage. I am therefore going to drill holes through both decks at the far ends close to the stems; these will have brass ferrule inserts but will be hidden beneath the stem band where it turns over the deck. I will make a slight depression in the stem band above the ferrule so that when the canoe is upside down any water can drain out but the hole should be invisible.

Jobs to ponder on this week:

Make a pair of carrying handles for bow and stern.
Make a thwart
Level the existing thwart ( it is currently set as a kneeling thwart)
Persuade a wood turner friend to turn me some decorative seat hangers.
Get the gear together for the canvassing

Thats it for now. Sore fingers and no finger prints left at the end of the week I fear
1573566558.2371-smilie.gif


Nick
 
This week has been perishing here in the UK with overnight frosts and sub-zero temperatures so work on the canoe slowed a bit. I managed to get the insides rubbed down and then the first coat of satin yacht varnish applied. It adds a beautiful rich tone to the wood. My repairs have matched in well and I am happy with the colour match; it will continue to darken with time. When the varnish had dried off for a few hours I flipped the canoe over to let the fumes fall out so that it would dry. I may need to invest in a small low wattage heater over the winter.
DCCCD5A8-F2B1-4403-B59D-87515ED7C097_1_201_a.jpeg


20AA107D-F498-4710-BF23-879EB34C07F5_1_201_a.jpeg


Off with the outer stems and a coat of varnish.

52D22037-1863-480E-85FC-65F18B6178B3_1_201_a.jpeg


Using the old rear lifting handle which was a crude piece of 2" x 3/4" mahogany I fashioned a couple of carrying handles. (I detest seeing people lift canoes by the decks). As these are additions, I am happy using the diamond head bolts which post date the canoe.

027F0974-F437-4AD6-86CE-47DFC378E549_1_201_a.jpeg
4EAFA041-C372-4400-9ACB-53990D9B70F8_1_201_a.jpeg


I then fitted a couple of drains in the stems. I drilled some 8mm holes to about 5mm depth then drilled the centre out with a 4 mm drill, dribbled in a bit of varnish and then tapped the brass ferrule in. One at each end. They will be covered by the stem bands but will allow some drainage.

681EE23C-D8F5-4909-BDAC-6E59165BD7B9_1_201_a.jpeg

I am trying to use up the wood that I have so will use a remaining length of 2" x 1 " mahogany to fashion a thwart which will sit behind the front seat. It will be a bit narrower than the original but I can cope with that.

B26ECDB9-532A-4F30-88DA-5FF280617232_1_201_a.jpeg


I also cut down some 1" square mahogany off cuts which I will use as seat hangers. I may carve some decoration on to them. I rubbed down the mast step and gave it a coat of shellac. It will be glued and screwed in position once it has had a coat of varnish.

7A9D8CDF-71C8-4BBE-BB6E-293517138199_1_201_a.jpeg


With a dew drop forming on the end of my nose I retreated back into the warmth of the house.

Belated Happy Thanksgiving to those of you in the US.

Nick
 
This week has been a week to do indoor stuff as the temperature dropped below zero most evenings. We had rain of Biblical proportions on Thursday and on Friday the white stuff arrived.
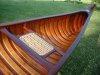
I therefor took up a bit of weaving and managed to get both the front and rear seats re-caned. All they need now is a final rub down and a coat of satin varnish before the brass mast ring is re-fitted. I am not unhappy with my first ever attempt at weaving; there are a couple of unders where there should be overs and vice versa but that's life. They will do the job.
C1170BB8-26D4-40AC-9337-F155B55732C0_1_201_a.jpeg

I made the stern seat. The bow seat is the original.

E011BD8C-649C-461A-82AE-3EB0F7E3544B_1_201_a.jpeg


On Saturday the weather whilst cold was dry and sunny so I thought I would get the canvas on. First job was to check the hull over and give it a final sand and check for raised tack heads. That done we were good to go but with a bit of improvisation. It was to be a three way tug of war:-

In the red corner...

AF8ED7C1-F1DC-4E7F-87B3-C4B3F9D43EE9_1_201_a.jpeg

In the blue corner....

3F49CE89-A28D-4372-9A9B-11C4CE493797_1_201_a.jpeg


and in the middle......

7155A68D-32B6-4AEB-BF7D-8892111C39A4_1_201_a.jpeg


So I set it all up on the trestles attached the straps to the tow bars on each car and to the bemusement of the neighbours and passing dog walkers I started to put the tension on gradually working out all the creases and folds until I was happy and we had a drum sound from the canvas at either end.

EFCBB9EF-0556-4FD8-B397-BCB3B79646E7.jpeg

Although I live in Norfolk, I have not yet grown a third arm and hand so to make life easier and to stop the thin rib tips from splitting, I stapled the canvas using stainless steel staples. The job took much longer than I anticipated for a couple of reasons (a) the world and his wife were passing so stopped for a chat. (b)I wanted to ensure that especially at bow and stern every crease was pulled out. I tacked the canvas along the stems using a waterproof exterior mastic as a bedding compound.

EB948DB6-9BC9-41D2-A578-5B7EF477E18D_1_201_a.jpeg


In the end I was happy with the job and the canvas is tight and smooth but leaves nothing to the imagination as it highlights every plank ripple and blemish but much will be evened out by the filler, primer and paint.

F3B60C5E-CC3E-4FA9-B322-FF6D6174A22B_1_201_a.jpeg

I trimmed the excess canvas down using my canoeing rescue rope cutter which has the sharpest blade in the world. I will go around and check the staples and replace any that are not fully home and check some which may be just below the level of the outwales so will take those out and replace with ones slightly higher.

88B0A467-E888-483D-B51A-572F453ECE76_1_201_a.jpeg


It"s looking like a canoe now. The temperature was dropping rapidly so I tidied up and got the canoe back in the garage.
That's it for this week. Time for tea. Keep warm & safe.

Nick
 
Having got the canvas on the other weekend. The next job was to get it filled. So in a workshop which ended up smelling like a fishmongers stall ( if this is low odour I would hate to work with high odour stuff!) I got two coats of Zinsser Watertite on and after a few days lightly rubbed down the surface read to start with the laborious task of applying primer, letting it dry, rubbing most of it off and then repeating the process until I am ready for topcoat finish. Blogging that process will be as interesting as watching paint dry so I will concentrate on finishing the topside for the blogg.
BCC3FFF5-EBBF-4472-9A5D-7FBA6CD95F6B.jpeg

It does give a nice finish. Using a stiff brush I "stippled" the first coat on forcing it into the weave. The second coat was brushed on in a swirling pattern before then "tipping" both vertically and then horizontally.
C21735B5-4896-4F9B-8C04-89FEE08FE65D.jpeg

At £50 a tin its not cheap but on the canoes I know that have been filled this way it certainly appears effective.
3B032635-334A-4BFF-B45E-E8B284EDB4B6.jpeg


I will let it all cure for a bit longer before starting the primer. The temperature this week is set to rise which will help the process. I have also purchased a small workshop heater which will warm both me and the canoe.

Time for a shower and clothes in the wash to get rid of the fine dust from sanding.

Nick
 
With the filler gone off and above average temperatures I managed to get a couple of coats of primer/undercoat on and then using a ROS took most of it off
1f642.png
I duct taped the vacuum cleaner to the sander which got rid of most of the dust. The next job was to refit the outer stems; easier said than done as they had relaxed a bit over the last few weeks but with a bit of huffing and puffing the the careful use of some compression straps I pulled them in having first laid down a bead of bedding caulk which was squeezed out and then finished and cleaned back off the stems and the hull.
741F19FD-0B3B-441A-9F87-BC0E36D8D96C_1_201_a.jpeg


337B2BBA-E4DB-42F0-B2B4-A0868AA36477_1_201_a.jpeg

I will let it go off for a couple of days before putting the next coat of undercoat on.
ACA0CAF0-A02D-40D8-97B7-B6F066568B64_1_201_a.jpeg


I need to get some more mahogany so that I can make a pair of thwarts; the piece I have is a tad too thin being 2" which would result in them looking mean so I must source some 3"x 1" wood. I trimmed the canvas back flush with the top plank so that it doesn't get caught and distorted by the trestles. I will wrestle the outwales back on over the next couple of days and get the seats in so that the hull has rigidity back.
The observant will note that I have tapered the stems to the hull. The keel is not going back on !!

Seasons Greeting.

Nick
 
I am on to the bits and pieces now.
I have wrestled and fitted the outwales back on; there was some swearing as they had relaxed a bit but in the end they went back as best as I could get them. As I have said before, mahogany does not steam well and likes to crack, fold and twist quite randomly. I fitted them using some bedding compound so that any small gaps were filled and tight which will be backed up with the varnish which will get drawn in by capillary action.
C703534B-9DE9-4BCE-B7DB-A7E66443AEA4_1_201_a.jpeg


36F25DAD-B011-4761-8909-A220DFAC2AF8_1_201_a.jpeg

I purchased some hardwood dowel to make some seat drops. The front seat came to me fitted directly under the gunwales; this doesn't help with the centre of gravity so I cut the drops to give a drop of 1 1/2". To allow for the sheer I cut shorter ones for the rear pair on the bow seat whilst the stern seat only has them at the rear so that the seats now sits level. These will all be stained and varnished to colour match. I will leave the bolts long as if anyone else wishes to adjust they can do so. If the canoe were to be sailed I would have left the seat under the gunwales as this would be far stronger and resist any mast induced twist. I drilled the holes off centre so that I can get all of the seat drop under the inwale; You simply turn them like a cam until they fit.
BBBCEC51-FC59-4DF3-BE3F-5E89D48FB041_1_201_a.jpeg

I have got a new lot of stainless steel bolts for the seats. Once the seats are all fitted perfectly I will take the seats off, varnish and then recess the bolt heads and cover with the mahogany plugs which I have cut from the original outwales.

229DADEC-FA28-4837-BEC0-58B99B217E8A_1_201_a.jpeg

There had always been an old split on the inwale so I strengthened this by knocking some hardwood dowels through and across the crack.

B883F90B-390E-494B-AB2D-3AB450BD9633_1_201_a.jpeg
5D088D0F-6635-4D1D-8B75-D4B0317AD538_1_201_a.jpeg


When all is dry I will get the sander out and sand the gunwales and plugs flat and even ready for shellac and varnish.

Seasons Greetings from a very locked down UK!
 
The Devil is in the detail:
This week has been cold in the UK so not conducive to long periods in an unheated workshop. Having sanded the double gunwales level I stated plugging the seat bolts holes.
B883F90B-390E-494B-AB2D-3AB450BD9633_1_201_a.jpeg


80D3B9D8-E033-4760-B139-E077EB49CEC3_1_201_a.jpeg


773BB70F-9B45-44A6-92C9-2AB0AC093ED4_1_201_a.jpeg

I also found that someone previously had simply filled other holes with soft white filler so that too were drilled out and plugged. All of the plugs were made using wood from the original outwales. In the end I used a good waterproof adhesive rather than epoxy as this will make removal easier in the future if any seat repairs etc are needed.
Using the stem form which I made I heated up the brass stem band and got that cut and fitted; It gets it safely out of the way as a 3m length of brass was getting in the way and I was worried it may get snapped as I was working around it. I need to countersink the screw heads a tad more but it will be a delicate task as I don't wish to compromise the integrity of the band which will always be weak at each and every hole.
1F8F3554-2927-4FB9-95E8-B090347933CF_1_201_a.jpeg

The plugs were cut down and sanded and a bit more stain applied. I will now leave it until I can make the pair of thwarts, mount them and plug those fixings. At that stage I can lightly rub down everything with fine grade stainless steel wire wool and the build up the layers of varnish. I am pretty happy with the tight joint achieved on the double gunwale.

8B8B400E-97D1-4506-8C0A-FA3639F18CA8_1_201_a.jpeg
B93763D0-5846-408F-A345-3EDD150932E9_1_201_a.jpeg

I started to experiment with the deck decal. I had some which I had printed but they were too translucent and wouldn't show up well so I binned them and ordered some from the WCHA store.

93D28DC6-682D-4AFB-B78A-F3C16CA51086_1_201_a.jpeg

When the temperature warms up a bit I can get on with the hull painting and then turn the canoe back over for the final varnish coats on the inside and to refit the mast foot, sort out the floor boards and the brasswork.
 

Attachments

  • CB27E398-013C-47D8-8969-280351EC617E_1_201_a.jpeg
    CB27E398-013C-47D8-8969-280351EC617E_1_201_a.jpeg
    134.1 KB · Views: 214
The Devil is in the detail:
On a Double Gunwale the outside screws securing the outside rail are also plugged. The exception are the first five screws on the end of each rail. These screws are countersunk so that they are sitting below the surface of the rail. It's a nice finishing touch to clock them.
There are no washers used under the screws.
The rails are squared, not rounded over. You may see this in a photo of an original DG that was attached in an earlier related post.
The boat is looking good and you have certainly made progress, but as you note, the devil is in the details.
 
On a Double Gunwale the outside screws securing the outside rail are also plugged.

There appears to be some variation on this. The one shown at https://www.wcha.org/forums/index.php?threads/12320/ does not have any of the horizontal outside rail screws plugged. The vertical seat and thwart bolts are plugged. Another shown at https://www.wcha.org/forums/index.php?threads/3823/ may not either. The picture at https://www.wcha.org/forums/index.php?attachments/11209/ appears to show exposed screw heads along the outside rail.

Benson
 
Last edited:
The question of originality always comes to mind. Removing and replacing them without damaging them can be a bugger to deal with.
The 1906 I owned had plugs in all of the outside rail screw holes past the decks. There were 3 plugs missing from the entire boat. They were lost when it was recanvassed. The boat was wearing only it's second canvas... I was the second owner so I am certain of that particular boats assembly. Regardless, you are right to point out that there was variability in the construction. It is entirely possible that there may have been no plugs used as is the case in your 1907.
Having said that, these boats were the very top of the line Old Towns. They were constructed using the best quality woods and fitted to perfection. The build quality was exceptional and excellent. The plugs to complete the appearance of a solid mahogany rail seems logical.
 
The original gunwales which I took off were rounded so that its what I have replaced with. Square gunwales are prone to knocks and damage so I am happy with a smooth finish. I have sat looking at the screws and had already decided to plug them too as they don't sit comfortably being counter-sunk or recessed.

There is always the distinction between restoration and repair. I repair so that I have usable canoes retaining as much originality as I can. If I had gone down the restoration route there would have been little of the original left. It will get scratched and the gunwales rubbed on its first outing; it's there to be used but not abused.
 
Back
Top