Under sterm rib repair

Tom Widney

LOVES Wooden Canoes
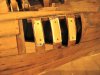
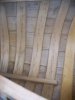
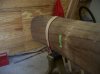
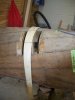
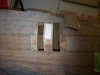
So far the easy ribs, eight of them, are completed on my first restore on a ’61 16 ft. OT Guide. I have a cracked rib which is located a third of the way up from the keel line and is tucked neatly under the stem. It is the third rib running under the stem from mid-ships on an otherwise perfectly good bow.

Is this the time to open up an access hole/plank and hollow out a space in the back of the cracked rib, splice and put back together?

Or how does one remove a rib from underneath the stem channel without destroying otherwise perfectly good canoe?

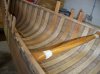
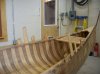
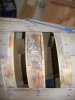
I will have a challenge repairing the stern which a truck tire had made love to decades ago and left severely skewed. This being my first restore I had figured that I might as well practice with the more straight forward repairs before encountering too many moving parts to align at the same time. It also makes sense to me to leave the structural integrity of at least one end so I’ll have something to measure against when I do get to the tricky part.
 
Cant rib?

Tom, is the rib cracked on just one side of the stem? If so, perhaps you could remove the cracked half of the rib and replace it with a cant rib. For that matter, you could probably remove the rib on both sides of the stem and replace it with a pair of cant ribs without appreciably weakening the hull. In either case, you would avoid having to remove the section of rib directly under the stem.

Jerry
 
Hi Tom

I removed enough planking on one side to get the rib in. that's for a dry, and already bent rib. took some wriggling. You have to do some disassembly, or think about a back side rib repair, or like mentioned, a half cant rib. Or Consider working the rib right in after bending while it's still hot and flexible. Still have to take stuff apart. Think about lifting the stem from the other ribs and then sliding the new one in from amidships. Then re-attach the rest of the ribs/planks.
 
In most cases I'm not an advocate of back-side rib repairs, but this is an exception. Don't remove any planking at all. Remove any tacks in the way, and using a utility knife and chisel, cut through the planking And chisel a slot into the rib. Epoxy in a splint thick enough to be flush with the surrounding planking. Since it will be difficult to clamp, turn the canoe so that the repair is horizontal, and put duck tape over the repair until it dries. Remove the tape and sand smooth after the epoxy dries. Gil
 
Rib repair

Here's a picture from Tom Seavey's repair from behind of some ribs on my Carleton.

Norm
 

Attachments

  • rib repair.jpg
    rib repair.jpg
    209.1 KB · Views: 367
Gil

So i understand; the splint is going into a mortise in the back of the rib and is equal to the thickness of mortise and plank for the area of the patch?

I am thinking I would do that next time. I like it.
 
I'm not sure I understand all aspects of the photo... Should the splint be made out of cedar? I would think so. I can see the mortise and the wooden splint screwed in order to clamp the splint until the epoxy sets. But what is the white material between the wood and the rib? Also the thickness to the total repair to the rib should equal the original thickness of the rib after faired, in order for the planking to sit correctly after reinstalled shouldn’t it?
 
Rib repair

Tom and Dave,

The picture I posted was of a repair done by Tom Seavey in Henniker, N.H. He's restoring my 1927 Carleton, which had three cracked ribs, side-by-side. They weren't very bad, so he restored them from behind. The planking was cracked and needed to be replaced anyway. I asked Tom about your questions and here's what he said:

"Hi Norm,

The technique used in this application was to repair only minor fractures. I carve out grooves and apply a light fiberglass cloth over the grooves. That is the white stuff he sees. Then I mix a thick batch of epoxy and work it into the grooves and over the cloth. The cedar backer pieces are there to achieve fairness to the ribs. Had this been a more serious fracture, I would carefully remove 1/2 the thickness of the rib with a small router, being careful not to go beyond the edges.That way a cedar or hardwood filler piece can be fitted and epoxied in and is probably stronger than the original cedar rib itself. This preserves the patina of the original rib which is highly desirable for vintage canoes.
If the rib is completely broken this technique would probably work fine if the top was visually acceptable. Otherwise I replace the rib with a new one and color and finish to match as best possible.
I think this answers all the questions.Maybe you can post this to the fellow who was wondering.
Tom"

On the inside now, you can only find evidence of those three cracked ribs if you know exactly where to look. And the little bulge in the hull created by the crack has completely disappeared.

Norm
 
Thanks Norm, the photo and explanation helps a lot, now I know what I'm after, will post photos.
Tom
 
Here are some pics

four new bow ribs
four newtern ribs
cracked bow rib under stem needs the splint
bending the new splint

I'm getting better with each rib and am still amazed at how easy they want to bend and how tricky it is to get it just right...but its so much fun doing it and I'll get to paddle it when finished.
Tom
 

Attachments

  • 61 OT Guide splint b ribs.jpg
    61 OT Guide splint b ribs.jpg
    157.1 KB · Views: 312
  • 61 OT Guide splint s ribs 2.jpg
    61 OT Guide splint s ribs 2.jpg
    445.8 KB · Views: 297
  • 61 OT Guide splint cracked rib.jpg
    61 OT Guide splint cracked rib.jpg
    369.4 KB · Views: 310
  • 61 OT Guide splint bending splint.jpg
    61 OT Guide splint bending splint.jpg
    432.6 KB · Views: 325
Finished Splint

Sorry for the delay in posting, battery problems. I first bent the splint on the canoe so it would have the same curve. Second I opened the planking up using the same rib stagger the joint a bit, I've never seen it done before so why not try it, eh? Seemed to work fine in this case. After marking the loction of the crack and the mortise and the splint, I did the wood work to make it happen. Next I epoxied a strip of fiberglass cloth between the splint and the mortice and simply used small "C" clamps to hold it while drying. Then a little sandpaper for fairing and clinched her back up. Seemed to work great you have to look close to even see it and its as sturdy as could be.
Thanks for the advice guys, it makes a huge difference!
Tom
 

Attachments

  • 61 ot spline marked.jpg
    61 ot spline marked.jpg
    148.6 KB · Views: 269
  • 61 ot spline wbent rib.JPG
    61 ot spline wbent rib.JPG
    485.9 KB · Views: 287
  • 61 ot spline mortise set.JPG
    61 ot spline mortise set.JPG
    351.2 KB · Views: 285
Back
Top