Tricky repair problem

ddewees

Woodworker
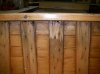
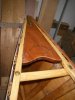
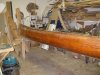
I tried to avoid it, but have agreed to rescue a fiberglass-covered (by design) Rheaume 18-foot Huron-style canoe, built in the 1990's. The outwales have recently been replaced and it looks pretty good, but a whole series of rib tops are rotten under the discolored surface of the cedar, and the rot is in the sheer plank and pockets of rot also in the inwale. At least 15 ribs are compromised, all in the way of the port gunwale, the result of being overturned on a dock for long periods resting on the one side. The inwale (white ash) might be salvageable, but it too would best be replaced. The ends of the canoe, including stems, decks and planking are all OK.

If this were a canvas-covered boat - and this is identical construction except for the fiberglass - I would feel less intimidated about tearing off planks in order to get at the rib ends (about the top 4" needs to be replaced on most of them). As it is I am afraid it will be very difficult matching the deep golden-red patina of the outside of hull (WRC planking) and fairing new fiberglass into the old, and I am very hesitant to start. I've done a fair amount of repair to w/c canoes that involves replacing ribs, planking and rails, and have some familiarity with fg repairs, too, but I can see this turning into a big mess. Does anyone have any sage advice, or do I just get out the heat gun and start removing fiberglass? I've already told the owners it will cost way more than the canoe is worth, but they are attached to it and want it put it in good shape.

Any encouraging words welcome.

Don in Vermont
 
Don

Consider transecting the ribs below the rot against the inside of the planking using a razor saw or a fine dovetail saw. Split the rib tops away from the tacks, snip or grind the tacks flush with the inside of the planking. Then grind a scarfing bevel about 2 inches long on the remaining ends of the ribs (you'll end up grinding the clinched hooks off the tacks that traverse the scarf bevel, but you can probably pry the rib away from the inside of the planking enough to sneak a little epoxy between them) Scarf in new rib tops gluing them not only at the scarf but also to the inside of the planking. This whacked out method will prevent you from having to disrupt the planking or fiberglass on the outside of the boat and minimize the risk for a real mess

BTW, you're welcome to borrow my Makita grinder - the one you could never figure out how to shut off

Bill
 
Bill, thanks for the reply. I like your "whacked out" (read creative) thinking. Your method probably will work if I can justify not replacing the planking near the sheer, which has some rot. Perhaps I can stabilize that sufficiently with epoxy, since there is glass and epoxy on the outside already, and it doesn't look bad. Getting the inwale out without destroying planking or the good rib tops will be a bear, but some judicious sawzall work in the inwale behind each rib might allow withdrawal of the critical part of all those ring nails holding ribs to the inwale. The job still will not be much fun, and gluing ribs to the planking will raise some eyebrows, but considering the planked hull is welded into one piece anyway there's no point in trying to be a purist. I'll let you know how it goes.
Don
 
Use a dremel tool with a round cutting bit make a line as far down from the gunnels as you need. Use the dremmel tool and cut through the fiberglass use a heat gun and just take off that narrow strip or fiberglass. . Should be easy to put new glass and feather the edge to the old glass. I cut out old glass in my shop like this all the time.
 
Thanks, Gary. I'm thinking in the long run it may just be easier to do the more thorough job, rather than patching here and there. That means replacing some upper planking (which really should be done anyway), and once the sheer is opened up rib and inwale repairs become more straightforward. Using the Dremel (or Fein) tool does seem the right approach for neatly cutting the FG to a line.
Thanks again,
Don
 
Don:
I have repaired several American Traders canoes (Built by Alain Rheaume) when I worked for them as some would get damaged by the shipping comp. usually by a forklift.
The previous advice is great, but i have found that a sharp utility knife works very well. Be carefull not to score the planking below as it will take up the new epoxy and darken to become very noticible. If you have a flexable metal rule to use as a guide and make several light passes. I found that cutting away the epoxy along planking joints helped the new blend in. In many cases the new epoxy will darken the planking to almost match the existing. Make sure you strip off he existing varnish well beyond the area that you will be fairing the new epoxy.
Good luck
Brad C
 
Brad, thanks for the tips. I can imagine you are right about making sharp, crisp cuts along plank lines to make a less noticeable repair. Actually, matching the color on the hull exterior is one of my concerns. The existing planking is a deep orangish-red on the outside, which initially made me think the material was western red cedar. Inside (no fiberglass or epoxy, of course) is the light amber color I associate with newly-varnished eastern white cedar, which I think it is. Do you know what species would have been used for planking? (As I mentioned, this boat was built in 1994.) And are you suggesting that fiberglass set in epoxy as a repair on the outside of white cedar planks will produce the red color? I was assuming I would need to stain to match the old, probably both inside and out. I can't do it with this post, but if you would like I can post some photos of what I have.
Thanks again,
Don
 
Hey Don,
Remember how the West 205 transistions to a red-amber as it ages? Perhaps that as well could be a source of color-blending if you've got some older hardener kicking around - should be fine structurally

B
 
Don:
First of all Merry Christmas!
If the canoe was made of red cedar it would typically be dark and contrast with the white cedar ribs.

The white cedar will darken over the years and may account for the difference between in and out.
I went on the American Traders web site to see if there were some obvious comparisons, but the photos don't show the difference as well as i was hoping.
In 94 Alain Rheaume was able to get nice dark red cedar so I think you may have a white cedar canoe. Pictures will help.
Brad C
 
LJ,
I had exactly the same thought overnight. It had not occurred to me that the cured epoxy darkens with age, though I have long noticed the darkening of the liquid hardener you mention. Do you suppose the builder used old hardener? (I doubt it.) Anyway, it happens I do have some old, dark 205 fast hardener which would be just right for my moderately cool shop, and maybe it will help with the color. I'll experiment.
Thanks!
Don
 
Brad, and all,
Merry Christmas to you, too. (Why are we doing this on Christmas morning??) I just went out to the shop and took a few pictures and to get clearer in my mind the colors I'm talking about. I'm pretty sure now that the planking is white cedar, same as the ribs. You are probably right about the darker exterior being due to age. I know the canoe was stored overturned on a dock all summer for years, which probably darkened the outside more than the inside, and also led to the rot problems. I've attached photos that suggest both the color differences and appearance of the rot in the rib tops and planking. ( Note that some of the look of the sheer plank on the outside is due to some sanding of the varnish.) The closeup of the rib top also shows the discoloration due to rot in the sheer plank. My plan now is to remove the top two planks the length of the boat to expose ribs and inwale. Thanks for giving me some confidence that that I can both do a proper repair and hide the evidence.
Don
 

Attachments

  • 007.jpg
    007.jpg
    486.1 KB · Views: 297
  • 009.jpg
    009.jpg
    499.4 KB · Views: 287
  • 011.jpg
    011.jpg
    459.7 KB · Views: 281
  • 012.jpg
    012.jpg
    510.7 KB · Views: 304
Don:
This is white cedar and the color is from the epoxy aging. You can experinent with colr in the new epoxy, but I think you will still have a big color difference until the new ages and colors on its own.
Good luck and keep us posted on how it goes.
Brad C
 
Brad, I've got planking off and looking at next steps. The glass was no problem coming off - a little heat and it stripped right off. Now that I can see the extent of rot I count 32 rib tops that need to be scarfed, so I'll be busy for a bit! Thanks for the help.
Don
 
Hi Don, interesting project you have there- don't you just love fiberglass (probably poly-resin rather than epoxy, since you say you heated it and it came loose- to easy for epoxy) but I just wanted to say that you DO NOT want to cut your ribbs at right angle (ie: straight across the rib). You may be able to blend it in to the original rib but it will be weak. You might consider removing the rot and making your cut on the diagonal. For the widith of your ribs I would suggest at least a 3" to 5" cut. It is a little more work now but with a sharp chisel and a piece of alum. flashing(to protect the planking) you can cut a fair bevel to accept the new rib top. and it is a Strong repair. BTW, photos of your progress will be appreciated by all- just a fact of life with WC people.
yelnif
 
Greg, thanks for those links on scarfing rib tips. I looked for them and didn't find them, and have been looking for the right technique to do 30-some ribs. A real help.
Don
 
Hi Don,

7 rib scarfs in about 10 minutes: I spent waay too much time thinking about how to do this efficiently until I finally regressed to some old "git-'er-done" techniques:

Cut the rib tip off square. Mark the bottom of the scarf two inches down (eyeball square good enough) Buzz the scarf in with a four inch angle grinder (you can get it really close), dress it to final flatness with a sharp sharp block plane set fine.
Back the rib as you plane with a block from behind. The grinder will expose any remnants of tacks that threaten your edge tools such that you can push them out the back before you apply your block plane
It takes longer to write about than to do!


The only caveat, is that there is enough space between the bottom of the scarf and the top of the plank edge below so that your block plane doesn't end up riding against it as you plane the scarf.

Git 'er Done...
 
LJ,
I know I didn't do 7 in 10 minutes, but I did get 32 done in a day, including gluing the scarfs. I cut tips off square, squared a second line 1 3/4" below, then cut the scarf with a wide paring chisel. To insure flatness I backed up the feather edge with a block of wood, then trued the surface with a small block and self-adhesive 80 grit paper. The new tips got cut from matching rib stock using a jig set up on the chop saw. Apply glue (I used Titebond III on this). use a spring clamp to hold top in position on inwale, check alignment, then clamp scarf between non-stick gluing blocks. The Titebond works as well as epoxy in this application - strength, waterproof quality and gap-filling capacity are all good - and has the distinct advantage of half-hour clamping time. I did not nail the tips to the inwale because the inwale will be replaced. Your approach using the block plane would allow more accurate cutting the scarf on the old rib, but in this case the inwale got in the way of the plane. The grinder would have made the process faster, but I can use the chisel practice anyway.
Don
 
I think I switched to a grinder the first time my paring chisel encountered a tack - It was so fast that I used the same technique with a block plane for cutting the scarfs in the new tips. I cut my rib tops right below the inwhale and could flex them out enough to get a plane to run by. Then I glued the new tips on using Titebond III, a small c-clamp with a couple pads to span the joint. I then faired the new tips (glued on wider) to the rest of the rib and nail 'er on! I'm using bronze ring nails instead of the steel nails that were used originally. I'm considering trying to pull all of the rusted steel nails and replace them with bronze ring nails on the remainder of the ribs - assuming I can do that without creating more mayhem!

I tried the tack removal technique described in Stelmok & Thurlow but without much success. Instead I've been splitting planks off by hand then I simply twist the tacks to break them. The clinched end remains in the rib. The ones that I have pulled out, the clinched ends curl beyond 180 degrees which keeps them from falling through to the inside.
 
Back
Top