Finally done!

Steve Ambrose

Nut in a Canoe
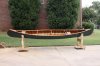
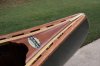
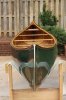
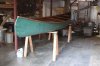
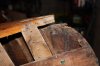
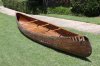
The 1937 Guide that has been creating all kinds of excuses to keep me from finishing her finally gave up. :D Stripped the fiberglass, replaced 30 ribs and half the planking, spliced stem tips and rib tips to rebuild the ends that had been cut down, new decks, new inwales, new outwales, canvas filler and paint, new stem bands (after snapping an old one trying to re-use it). By the time it finally cools down around here the paint will be good and hard and it'll be time to paddle!
 

Attachments

  • 1009_guide_complete_006.jpg
    1009_guide_complete_006.jpg
    156.9 KB · Views: 354
  • 1009_guide_complete_008.jpg
    1009_guide_complete_008.jpg
    294 KB · Views: 342
  • 1009_guide_complete_010.jpg
    1009_guide_complete_010.jpg
    406.7 KB · Views: 362
  • IMG_5179.jpg
    IMG_5179.jpg
    88.7 KB · Views: 315
  • IMG_5239.jpg
    IMG_5239.jpg
    84.8 KB · Views: 318
  • IMG_5197.jpg
    IMG_5197.jpg
    174.3 KB · Views: 337
Last edited:
Nice job! I love seeing old ones put back into use.

A guide is for sale in Denver. Seems like it would be a good one for someone.
 
Thanks for the responses! It was definately a labor of love (wife says obsession) and hell of a project to cut my teeth on as far as restore/repair lessons go. Taught me a lot and more importantly, what to look for when someone says "needs a little work"! :rolleyes:
 
Steve,
I've just started working on a 1941 Old Town canoe. Right now it looks remarkabley like your "before" pictures. Here are some photos that I posted a few weeks ago: http://forums.wcha.org/showthread.php?t=6399 (2nd page)
You've set the bar very high for the work that I have ahead of me!
Thank you.
Bill
 
If you get frustrated with yours I'll send you close-up shots of some cracked ribs that magically appeared after the new canvas was on, bulges created by so many new ribs in a row, the impossible results of trying to stain the rib tips I spliced on, and the three colors of planking to make you feel better ;)

The old planking soaked up so much oil it's almost black and my attempts at staining the new planking didn't pan out as I had hoped and tested. Must be different trees at play here because some planks accepted the stain better than others.

In my own defense, the images were not altered but I did use distance and lighting to my advantage :D

Your boat looks like the Scouts must have been running from a beaver on steroids!
 
Good job Steve

I bought a 1970 Chestnut Guide this summer. One of my smokejumper friends just hired me to restore it this winter. I can't wait to get started. Initial survey shows the canoe needs new inwales, 5 ribs, a little bit of planking, re-cane seats, canvas, paint,and varnish. I would like to find the old Chestnut side decals if anyone has a source. Hope to make enough on this project to fund the restoration of the 1914 OT IF I bought at the assembly year befor last. Pete
 
I worked in the store at the Assembly this year and we had those decals available. You might contact the store if they are not listed on the website. Also I'm fairly certain you can obtain them from the Canadian Canoe Museum in Peterborough. I assume you're referring to the white decals that say "Chestnut" in cursive that go amidships just below the gunwale.

Have fun with your restoration job and post some pics of your progress.
 
I bought a 1970 Chestnut Guide this summer. One of my smokejumper friends just hired me to restore it this winter. I can't wait to get started. Initial survey shows the canoe needs new inwales, 5 ribs, a little bit of planking, re-cane seats, canvas, paint,and varnish. I would like to find the old Chestnut side decals if anyone has a source. Hope to make enough on this project to fund the restoration of the 1914 OT IF I bought at the assembly year befor last. Pete

Good to hear from you, Pete. Have fun with the inwales!
 
Steve,

After you removed the fiberglass, was there a lot of resin stuck to the planking? How did you remove it?

Bill
 
Steve,

After you removed the fiberglass, was there a lot of resin stuck to the planking? How did you remove it?

Bill

There wasn't much left because it took a bunch of bad planking with it! What did remain was tedious - combination of heat gun, scraper, putty knife, utility knife, and sanding.
 
Back
Top