Slippery slope

Craig Johnson

Lifetime member
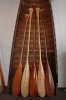
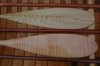
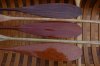
Wow, I thought working on old canoes was a slippery slope but carving paddles was like falling off a cliff. After spending up to a year restoring old canoes being able to make a paddle in one day was instantly gratifying but I couldn't stop. So for the last couple of weeks my 1910 OT double gunwale, that I am trying to restore in time to bring to assembly, has been languishing in the shop while I satisfied this new passion. After 6 paddles I cooled down on that enough to get back to the boat but here are some photos of the paddles. Thank you Murat, meeting you at Killbear inspired me to get started and your web site is wonderful. Left to right the wood and weight is, cherry 745g, sassafras 528g, Honduran mahogany 863g, tiger maple 841g, walnut 627g.
Craig
 

Attachments

  • DSC_0890.jpg
    DSC_0890.jpg
    279.5 KB · Views: 744
  • DSC_0894.jpg
    DSC_0894.jpg
    324.7 KB · Views: 705
  • DSC_0898.jpg
    DSC_0898.jpg
    305.7 KB · Views: 672
  • DSC_0901.jpg
    DSC_0901.jpg
    295.3 KB · Views: 677
Wow, Craig-- they're wonderful! It must be very satisfying to know you can produce such beautiful works of art. I just want to reach out and run my hand along the surface of them.
 
Very nice work! Question, second picture, second paddle from bottom, what type of wood is that? It has an interesting grain pattern. What plans or template did you follow?
 
Hi Jason.
That is just about the prettiest piece of cherry, some might call it "flame" with that grain pattern. I'v had it lying around the shop for years and and never used it for furniture legs because it would seem like a waste. Paddle making seems like the perfect use for a particularly beautiful piece of wood. The blade pattern was one of Murat Vardar's that I enlarged to suit me and grip is just similar to the Old Town paddles I have always used. here is a link to Murat's site. http://paddlemaking.blogspot.com/
 
I've recently subscribed to follow Murat's blog, very nice work and interesting. There is a ton of info, I couldn't decide where to look at first with all he has. Seeing his work has inspired me to look at attempting to carve my own too. What tools or approach do you take at making yours? BTW, one of my teenage sons spied your paddles as I was looking and asked, "How do you make those? Those are nice!" Maybe I can get him to try it too.
 
Last edited:
Thanks Jason.
I am afraid my method is a little more machine intensive than Murat's. I really respect his use of traditional hand tools but I also enjoy trying to figure out the most efficient way to make a piece with the machines I have. I start by squaring up a piece of stock the desired length and width and 1 1/4" thick. Procedure is join one face, plane opposite face to 1 1/4, join one edge then rip opposite edge to desired width. Then I mark the blank at the point where the shaft meets the blade. From this point I use the joiner to taper the blade end down to 1/4". then same process to taper the handle end down to 7/8". Now I have a rectangular blank that tapers in 2 directions from the point where the shaft will meet the blade. Now I trace the outline of the paddle and cut it out on the band saw. I use a stationary belt sander to fair to the line. from there on out it is plane and spoke-shave to shape blade and handle. Final thing is to use router with 3/4" round over bit on handle which is 1" thick side to side but tapers from 1 1/4" at blade to 1" at handle face to face. A little hard to follow without diagrams. Then sand, sand, sand, by hand, with grain, no sanders. preparing the blank with machinery before hand finishing allows me to pretty easily make a paddle in 1 day even allowing for varnish time.
 
Craig,

Thank You for taking the time to explain your process. I'll have to look and see what I can adapt for the tools I do have at hand. I have minimal time, so being able to speed up the process with more than just hand tools would be a help. At least on the first one. Thanks again, look forward to seeing more of your work. Now I need to study more of Murat's blog.
 
Nice paddles! I like the phrase "see what I can adapt "

Adapt indeed... not only tools, but which steps you do in which order. I like to cut the outline shape, mark the centerline all the way around, then taper the blade. I use a hand-held power plane to rough out the blade thickness (thanks to Doug Ingram for that tip), work the shaft to an octagonal shape with a 45degree router bit, then use hand tools the rest of the way. there are many ways to do this, and they all work just fine!

Oh, and welcome to yet another addiction...
 
Fantastic paddles Craig! I'm using your pics as my part of my screensaver...they're so gorgeous! Really like the spined blades. I haven't varnished any of my paddles for a while but think I might - just to get that glossy look again. I also picked up some Sassafras for the first time. Planning to use the same blade pattern but with another grip style, from a paddle at the Hudson Museum in Maine. Can't wait to start carving that one and will hopefully end up with a mesmerizing grain pattern like yours. I'm envious of your shop tools though...if I had the space I'd likely be mechanizing my process too. Slippery slope indeed...the only way to break the paddle making addiction is to go work on your canoes.
 
on the first couple of paddles I also tapered the blade by hand after it was cut out. I want the centreline of the blade to be a perfectly straight taper from the shaft to tip. Then from that centreline out to the edge of the blade it can be straight, concave, or convex. I discovered that the largest amount if time was spent tapering that large blade area down by hand so by doing that on an 8" joiner I saved the most time. The reason I do it before I cut out the blade shape is because the square end on the blank keeps it from tipping side to side as is possible with the round tip riding on the in-feed table. Cutting a taper on a joiner is quick easy and accurate, I'll describe incase anyone doesn't already know. If you start with the front of the board on the in-feed table, push it into the knives which are say 1/8" higher than the in-feed table, 1/8" of the wood will be removed and the outfeed table which is also 1/8" higher than the in-feed table catches the stock and 1/8" is removed from the entire board, But if you put the front of the board up on the outfeed table before it hits the knives and then proceed to feed the board 0" will be removed at the beginning of the cut with gradually increasing to the full 1/8" at the end of the board. Repeat this step as many times as necessary and the front of the board never loses any thickness while the end loses an 1/8" each time.
 
Hi Murat.
that sassafras is wonderful to work with. It is very light and cuts like butter and the aroma is wonderful when sanding. One thing I ran into is that the winter and summer wood in the ring pattern is so different in hardness that when sanding you can get a wavy surface from cutting away the soft wood faster than the hard. It is pretty though. Thanks again for the inspiration
 
I use a rotary rasp in an air powered die grinder for roughing out the shaft. Like any powered tool it takes some getting used to. I also use it for rough shaping banjo necks.
 
Curious since I am still in the stages of set up, what do you use or where do you do your handwork? I know Murat uses a shaving horse, do you just clamp to a work bench or something entirely different? What has been your preferred method?
 
Hi Jake, I use holdfasts on my bench mostly. Sometimes I hold the end on or between my feet and the other end with one hand while using a tool or sand paper with the other. I wish I had a shaving horse.
 
on the first couple of paddles I also tapered the blade by hand after it was cut out. I want the centreline of the blade to be a perfectly straight taper from the shaft to tip. Then from that centreline out to the edge of the blade it can be straight, concave, or convex. I discovered that the largest amount if time was spent tapering that large blade area down by hand so by doing that on an 8" joiner I saved the most time. The reason I do it before I cut out the blade shape is because the square end on the blank keeps it from tipping side to side as is possible with the round tip riding on the in-feed table. Cutting a taper on a joiner is quick easy and accurate, I'll describe incase anyone doesn't already know. If you start with the front of the board on the in-feed table, push it into the knives which are say 1/8" higher than the in-feed table, 1/8" of the wood will be removed and the outfeed table which is also 1/8" higher than the in-feed table catches the stock and 1/8" is removed from the entire board, But if you put the front of the board up on the outfeed table before it hits the knives and then proceed to feed the board 0" will be removed at the beginning of the cut with gradually increasing to the full 1/8" at the end of the board. Repeat this step as many times as necessary and the front of the board never loses any thickness while the end loses an 1/8" each time.

Correct me if I'm wrong here...I take it that you lay the shaft end of the paddle up on the jointer outfeed table then lay the blade section down over the knives to begin the shaving? So by doing this multiple times you increase the taper from shaft to blade tip, right? So how much do you remove or how little so you can still maintain that central spine? I usually use hand tools to carve out that hollow along the center spine to accentuate the spine. Also, from the spine the blades can taper stightly out to the sides of the blade. Any tips on making that a more efficient process?
Thanks
 
I taper it from 1 1/4'' at the shaft to 1/4'' at the tip of the blade, taking equal amounts off of both faces. Next I mark a line down the center of the blade face. I make sure never to remove this line as it becomes the spine as I then taper the rest of the blade from that line down to 1/4" at the edge of the blade. Next time I will take some photos of the set up and process.
Craig
 
I make sure never to remove this line as it becomes the spine as I then taper the rest of the blade from that line down to 1/4" at the edge of the blade. Next time I will take some photos of the set up and process.
Craig

So this removal from the spine out to the sides of the blade is done by hand? or with the joiner, or maybe a 6in. belt sander??
You do marvelous work I must say. Gives me lots of inspiration to make a few more this winter...
 
By hand with a plane and spoke shave. I don't trust power tools at this point, too easy to get away from you before you realize it. I really enjoy using the hand tools as long as I am not just removing large amounts of stock. Thanks for the compliments.
Craig
 
So OK, here is a link to some photos of my paddle making process. Please remember I am just a beginner at paddle making.I know there are many right ways to do anything. I am just showing you mine because some seemed interested.
Craig
http://www.flickr.com/photos/71113210@N08/sets/72157628208640781/

Just click on the first photo to read the descriptions. they don't seem to be included if you click on slideshow. I am not sure though because I just set this up.
 
Last edited:
Back
Top