Scarfing on new rib tips

Andy Hutyera

The Red Canoe Guy - Life Member
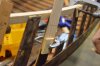
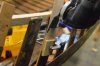
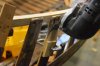
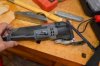
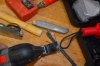
I’m in the process of attempting to rebuild a 1943 eleven foot Old Town Trapper. The inwales and most of the ribs must be replaced. The few ribs that were more or less in tact all needed new tips scarfed on. The first few I did were done with a Japanese pull saw. It was a challenge to stay away from adjoining ribs while sawing. That was when I started thinking about a multitool. I went on line and ordered a Porter Cable multitool. It made this job very easy. This tool allows you to plunge cut both the rib and the replacement at the same time. It also allows you to make a fairly steep scarf join thereby increasing the glue area. By clamping the replacement tip to the old rib, you can make both cuts at the same time thereby guaranteeing that the angles will be the same. As a bonus, the tool also works great to taper the ends of the last four ribs adjacent to the stem . Attached are a few photos of the process.
 

Attachments

  • DSC_3433.jpg
    DSC_3433.jpg
    18.9 KB · Views: 1,080
  • DSC_3435.jpg
    DSC_3435.jpg
    18 KB · Views: 1,116
  • DSC_3436.jpg
    DSC_3436.jpg
    18.1 KB · Views: 1,115
  • DSC_3439.jpg
    DSC_3439.jpg
    14.7 KB · Views: 1,108
  • DSC_3440.jpg
    DSC_3440.jpg
    20.1 KB · Views: 1,079
  • DSC_3441.jpg
    DSC_3441.jpg
    19.1 KB · Views: 1,002
Hi Andy,

Looks like a good process, but you might want to cut from the other side of the rib so your high on the inside and low on the outside. That way you won't be able to see the scarf from inside the canoe.

Paul
 
great tutorial. I have a cordless multi-tool that I use for this, except I'm not smart enough to think to do both at the same time.
 
I thought about using something like a mulitool - but being my cheap miserly self, I first tried my 4 inch angle grinder with an 80 grit disk, and between that and a sharp block plane (or maybe it was a broad paring chisel - I can't remember for sure) , I had new rib tips glued in place quicker than I could have gotten back from the hardware store. The nice thing about a grinder is that it exposes the tack ends you missed before you plow into it with an edge tool or rip teeth off your japanese saw.

I sawed the damage rib tip off square then marked another line across, 2 inches below, to define the scarf face (~ 1:8) blasted the bulk of the waste away using light strokes with the angle grinder (takes literally seconds but easy to control) then pared the face uber flat with a sharp chisel. The rib tips were prepared before hand, cut wide enough to have their final width/taper shaped in place after glue-up.

It literally took me longer to explain this than to do it!
 
Last edited:
Andy,
Paul's suggestion of cutting so that the new wood does not show from the inside of the canoe is right on target but I suggest that you make your cut with the multitool from the outside as you show but do the cut up towards the inwale rather than downward towards the keel as your pics show. This will give you the cut that leaves the original rib wood on the inside of the canoe and the new wood on the outside after glueing up. Good job on this tip.

Ed
 
Thanks for sharing the tutorial. When I recently got to meet Dave and tour his shop, he showed how he was using the multi-tool to remove the tips. Thanks to you guys, a multi-tool is going on my Christmas list. I didn't know how useful it could be until the demos.
 
Ok, another questions .
Looking for a detail pictures on how the joint in the bow matches witht he rail ( Last 3 inches gon, deck ( a couple of inches gone and the bow stem My sense is the bow covers the stem but maybe it is ? cut so the tip of the stem shows thru .

Now the next question , Since the rail is gone for the last several inches I need to scarf in New rails . I am planning a scarf joint of about two inches. This means I only need to remove tacks from two ribs. If I go back further more ribs and more potential for mistakes and (swearing :) ) ) I plan to use epoxy and it will be backed by the deck screws.
I think ?
The upward curve and decreasing width of the rail will be easier to match the closer distance I have to go but is this a long enough joint to give the strength needed ?
which is the next part of the question , what about the orientation of the grain. I have 1/ 1 oak and ash to choose from .
and If we scarf the joint does it mater what wood is used ( I dont know what wood they used for the rails on Oldtown but I assume ash ?
 
Last edited:
Just a note . as I measure the ribs I noticed the ribs do not match in terms of distance from a set point like previous ribs or bow stem . Off as much as 3/4 inch .. so ea ch scarf joint is " unique " . Giving rise to possibility of nasty language :) .
 
If the inwale joint is made next to the deck, strength is not an issue, but aesthetics are. Old town usually used spruce on cs grade canoes and mahogany on AA grades. Lumber yard spf wood will work. Some people match the grain, and some don't. Canoes were hand made. wooden ribs sometimes have a mind of their own and don't exactly go where one thinks they should.
 
Thanks . I thought the rails ( In wall and stems were ash ).
spruce is softer and easier to work with.
 
Back
Top