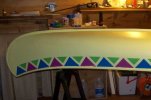
OTCA Color Scheme Design #4 - How They Do It ?

jenshenliu

Curious about Wooden Canoes
My 1967 OTCA 16 was sold and later bought back with new white paint, but without the original color scheme Design #4 (Indian pattern). I am ready to repaint those red / blue triangles. It is logical to think Old Town must have an efficient way for the paint job. Does anyone know how the triangles were painted in the factory, or how other canoe restorers do it?

Thanks.

Jen
 
variations

There are a number of variations on design no. 4 -- some orthodox, and some not so.
 

Attachments

  • 5.jpg
    5.jpg
    54.4 KB · Views: 565
  • design-4 outside stem.jpg
    design-4 outside stem.jpg
    36.8 KB · Views: 495
  • Old Town Antique 2 007.jpg
    Old Town Antique 2 007.jpg
    237.1 KB · Views: 1,105
  • Cropped 100_3519 ed 2.JPG
    Cropped 100_3519 ed 2.JPG
    98.8 KB · Views: 473
Does anyone know how the triangles were painted in the factory, or how other canoe restorers do it?

The factory had a collection of cardboard triangles that were sized to match the different gunwale lengths on each model of canoe. The triangles helped to rough it out but there was still a lot of time adjusting to make it all fit and look right. Sponsons made it even much more difficult. The Wooden Canoe Journal issue number 117 from June, 2003 has an article about this design and how it changed over time.

There is no 'efficient way' to create this design. A design number four typically increased the price of a canoe by twenty to thirty percent. Old Town's wooden canoes currently list for over $7000 so this design would probably add about $2000 if they still offered it today.

I worked with a graphic designer who thought that some computer generated plastic templates would simplify the creation of a design number four on my 1936 Otca with sponsons. This idea was quickly abandoned once it became clear that each triangle is a slightly different shape due to all of the compound curves. I ended up using a cardboard triangle to rough it out in pencil and then simply adjusted the difficult parts until it looked right to me. There was a good original picture of the canoe to work from as shown at http://forums.wcha.org/attachment.php?attachmentid=6208&d=1222825989 but it still took a long time. I am happy with the results at http://forums.wcha.org/attachment.php?attachmentid=8099&d=1248028261 although it is far from perfect.

There is a canoe currently listed at http://cgi.ebay.com/250689822826 on eBay and one at http://forums.wcha.org/showthread.php?t=4175 with other variations of this design. The one at http://www.rossbros.com/images/18octa.JPG and shown in the images attached below appears to be an example of a factory version on an 18 foot long Otca with sponsons from 1966 which might be a good starting point for your project.

Please reply here if you have other questions and attach pictures to show how your efforts come out. Good luck,

Benson
 

Attachments

  • 18octa2.jpg
    18octa2.jpg
    12.6 KB · Views: 494
  • 18octa1.jpg
    18octa1.jpg
    21.6 KB · Views: 962
Last edited:
You start with a plan and a pattern. You lay that out and it doesn't fit. You make a new plan, a new pattern, lay that out and it doesn't fit. By your third pattern you're finding out the pattern has to be more flexible. Sometimes 4" is really 4.25" and sometimes 3.8". What is good is that the spacing between the large and small triangles is fairly constant, until its not and then its sometimes larger and sometimes smaller. By now you have 8 different patterns to go by. On your fifth attempt at laying it out you get much closer but then you find you have an even number of large triangles but you really need an odd number for the colored triangles to be correct. By now you need to purchase a new paint pencil but your layouts are getting much closer. Maybe next time! Then your neighbor drops by to watch you work and he offers the suggestion, "Why don't you use a pattern"?
 
When I did my Charles River I started in the centre and measured and re measured using paint striping tape and a soft pencil until it looked symmetrical, stand back and drink a nice single malt ; add or subtract small amounts so that you start/end on a whole triangle. Have another single malt. You then think you have it and start on the other side. You then realise that a 100+ year old canoe has warped slightly so that each side are of unequal length so you start again and drink more single malt. You then stand with glass in hand and look at bow and stern stems, say, bugger it, drink more single malt and start over. In the end with blurred vision I said to myself “ that will do “ threw the empty bottle in the bin and looked at my Chestnut and decided to paint that red; now that’s a completely different matter and involves another bottle of single malt and a plethora of paint swatches and ended up with an orange.

Warning, painting canoes can induce a modicum of alcohol addiction!

Have fun!
BD7A1E2C-F93A-457A-82CD-7AA8CDA4BC6A.jpeg
 
One problem with using triangular templates or stencils to lay out a triangular design such as OT's design # 4 arises from inevitable errors in measurement. It is difficult to get a precise measurement of the curved sheer line of a canoe, and any error in the dimension of a triangular template baseline will be multiplied by the number of times the template is used. For example, if painting design #4 on a hypothetical 18' canoe (216"), with a hypothetical sheer line of 202" requires 43 large triangles under the gunwale, each triangle base will be 4.7 inches. If an error as small as 1/32' is made in creating the template, the accumulated 1/32" error of 43 triangles will be 1 and 11/32" -- more or less.

The trick is to distribute this one large error into many small errors which are essentially invisible.

I have used a method that does not require using templates, and accommodates and hides small errors. All that is needed is a tape measure, a small square (or square-cut piece of cardboard or wood), masking tape, a pencil or washable marker, and a small sharp knife to cut the masking tape.

First, determine the size of the triangle you wish to use -- for the hypothetical canoe above with a 202" sheer line under the gunwales, the base of the hypothetical triangle will be about 4.7" and its height will be 3".

Next, determine the center of the sheer under the gunwale and mark with a pencil. Then, mark the ends of a line 4.7" long centered on that marked center. These two points will identify the base of your first, central triangle -- leaving you with the bases of 21 triangles to mark out on each side of the central one.

But do not now measure 21 bases one after the other.

Instead, mark the ends of a 4.7" triangle base at both the bow and at the stern -- leaving you now with 20 triangles to place between the central triangle nd each of these end triangles.

Then divide this 20 triangle distance distance in half, giving you a space into which 10 triangles will fit. Mark the center of this space, and you now have eight segments with the space for five triangles.

Now, for each of these 8 segments, meaure the distance and divide by 5, and mark the 5 triangle bases along the gunwales (see pencil marks in the 3d photo below). Do this separately for each or the 8 segments -- the distance for each will not likely be exactly the same, but the difference will be negligible. And then when actually marking out the 5 triangle bases with your pencil in each of the 8 segments, minor fudging is easily done by eye if needed so the five triangles equally fill the segment.

Next, mark a line 3" below the sheer under the gunwale -- I made a series of pencil dots using a short story stick, and then following a fair curve, connected them with masking tape. First and second photos below.

Now go back to each of your 43 triangle bases, and mark the center of each. Locating your square from this point, mark the apex point of your triangle below on the masking tape. (As seen in the photo, I marked the base of each triangle and its center on the gunwale, which was to be painted over.)

With masking tape, connect the ends of the base of each triangle under the gunwales with the apex point marked on the masking tape 3" below, photo 3. The tape now defines the larger triangles which touch each other under the gunwales, as well as the smaller trangles which are not connected.

Paint the triangle with whatever color(s) you are using. When the masking tape is removed, you will have your triangles defined by the base color of the hull. The broad band of blue maksing tape was simply to guard against drips and smears.

This paint job was an adaptation of design #4 -- obviously, the colors are not the classic red, white, and blue. Further, my small (green) triangles are not separated from the larger triangles as much as in the classic design, and they are not as small as in the classic design. Had I used wider masking tape, I could have come very close to the proportions of the classic design.

Also, I did not put triangles on the curve of the stems -- but I think this method could be readily adapted to a curved line, or the usual template method could be used -- only a few triagles can fit along the curve of a stem, and small errors in placing templates should not be visible.

This all seems like a lot of work, but it is not difficult. From what I have read, using templates is probably at least as much work. I have never tried using templates, so I cannot say that this method is easier or better -- but it does get the job done.

100_3493.JPG sm cr.JPG

100_3503.JPG sm cr.JPG

100_3505.JPG sm cr.JPG
 

Attachments

  • 100_3508.JPG sm cr.JPG
    100_3508.JPG sm cr.JPG
    105.7 KB · Views: 23
Brilliant!
To paraphrase; Rather than be constrained by fitting a rigid triangle along a fixed length line, work to the apex (marked on masking tape at the height, parallel to the curve) adjusting as needed.
 
I use a pair of identical plexiglass triangles and a washable marker to mark off the triangles. Since the design starts and stops with red, there is an odd number of triangles, and the middle one should be at the exact center of the canoe. The size was determined from an original design.
Starting from either end, mark off the triangles. once you get to the center, you can see how far off you are. Erase and slightly adjust the base of 6-8 triangles from the center until it fits. Step back and see if you can detect any size differential. If not mark the other end.
For the ends, place the triangle base along the curve and mark. It is surprising how easy it is to do the ends.
 
When I did my Charles River I started in the centre and measured and re measured using paint striping tape and a soft pencil until it looked symmetrical, stand back and drink a nice single malt ; add or subtract small amounts so that you start/end on a whole triangle. Have another single malt. You then think you have it and start on the other side. You then realise that a 100+ year old canoe has warped slightly so that each side are of unequal length so you start again and drink more single malt. You then stand with glass in hand and look at bow and stern stems, say, bugger it, drink more single malt and start over. In the end with blurred vision I said to myself “ that will do “ threw the empty bottle in the bin and looked at my Chestnut and decided to paint that red; now that’s a completely different matter and involves another bottle of single malt and a plethora of paint swatches and ended up with an orange.

Warning, painting canoes can induce a modicum of alcohol addiction!

Have fun!
View attachment 56864
I personally like Nicks technique!!! And this canoe paint job is absolutely awesome.
 
I have taken detailed and precise measurements of several canoes that were painted with the design number four at the factory over the years. They all had triangles with a consistentant size in the middle and some 'adjustments' in the sizes near the ends. This is not a new problem.

Benson
 
Last edited:
Back
Top