Morris Outwale Dimensions

divedog

LOVES Wooden Canoes
I've got to create some new sections of outwale on my ca. 1913 Morris # 9565. I started by measuring the original sections. Attached are tracings of the outwale for anyone wanting to recreate from scratch.

Mike Wootton - Spokane, WA.
 

Attachments

  • ca. 1913 Morris Outwale Dimensions.pdf
    163.6 KB · Views: 354
Thanks for the info. I think that what I have matches your measurements. Does your Morris have long decks ? I'm curious about the fastener plan. My Morris has screws at every rib for most of the length, but near the ends there don't seem to be any screw holes through the inwales in the area of the decks or in the outwales, and small tack holes toward the stems. My Morris has a 36 inch forward deck and a 24 inch aft deck.

Also, since I've replaced all of the tops of the sheer planking, and left extra wood, I'm curious as to how much of a gap should I leave between the planking and the inside lip of the outwale as I do the fitting.
 
Hi Paul,
My Morris has 24 inch decks. Based on what was left of the original outwales, it looks like they were screwed on from the outside in the deck areas. In the remainder of the canoe, it looks like the inwales were attached from the inside via counter-sunk screw holes on either side of the thwarts and seat locations and counter-sunk and puttied finish nails at every remaining rib.
During an earlier restoration, My outwales were reattached with giant finish nails from the outside. I have plugged the holes in the outwales and am not sure how I will reattach at the remaining ribs. I may put in more #6 screws from the inside. As for the gap, it looks to be about 3/8 inch until you get to the ends where the planking is flush with the inwales.
I’ve attached a couple pictures for an example. Everything is rough fit with temporary steel fasteners.
Looking forward to seeing pictures of your Morris and hearing about your progress. Regards,

Mike Wootton - Spokane, WA
 

Attachments

  • Outwale ends.jpg
    Outwale ends.jpg
    87.3 KB · Views: 239
  • planking closeup.jpg
    planking closeup.jpg
    52.6 KB · Views: 244
  • Screws in inwale.jpg
    Screws in inwale.jpg
    49.6 KB · Views: 233
Thanks Mike:
I've had my boat since 1990. At the time we couldn't actually say that it was a B.N. Morris, since there was no number plate. Since then, with Katherine's help, we are convinced that it is a Morris Molitor.
I started the repairs at that time, then got distracted. I'm retired now so I'm back at it.
I repaired the stem tops, replaced the planking at the peaks and tops of the sheer planking, similar to what your pic shows. To do that work I removed the outwales and decks. Those pieces have been off the boat since that work was done.
The sheer planking top edge was so bad that I couldn't see where the edge should be. I left extra material and expected to trim to fit once I got to that stage. I'm not there yet, but I don't want to do that after the canvas is on.
The outwales are in good shape with some minor bruises. They were attached with f.h. screws at each of the ribs except that the ends where there are small holes nails. There isn't any indication of fasteners in some places near the deck framing.
Since the decks and outwales have been off the boat for all this time, they have relaxed somewhat. I don't want to chance breaking the outwales, so the plan is to steam the ends. They have lost about four inches of arc both horizontally and vertically. I've managed to stabilize the deck pieces on some fixtureing that duplicates the boat's shape.
 

Attachments

  • MorrisPlanks02s.jpg
    MorrisPlanks02s.jpg
    23.4 KB · Views: 236
  • MorrisCanoe02.jpg
    MorrisCanoe02.jpg
    76.6 KB · Views: 239
  • MorrisCanoe03.jpg
    MorrisCanoe03.jpg
    69.8 KB · Views: 238
So. I'm working on fitting the outwales prior to canvassing. I want to get "perfect" fit between the outwales where they meet the ribs, since this will be a highly visible and very varnished location. I think I've got the planking tops trimmed to fit the vertical, at least on the port side. I'm working on fitting the outwales horizontally. My now question is that since I've replaced the tops of the sheer planks, and there wasn't enough of the original planking to measure the original planking thickness in that area, how much space should I allow for the filled canvas, either by thinning the planking or working down the mating surface of the outwales ? The diagram from the old Morris catalog doesn't show the style of rail construction that I have, but seems to show the planking beveled down to nothing. That would worry me.
I'm thinking that if I get a gap of one sixteenth inch, that should be correct for light filled-canvas.
 

Attachments

  • Morris Rail Sketch 1_02.jpg
    Morris Rail Sketch 1_02.jpg
    32.9 KB · Views: 224
  • Outwales 2.jpg
    Outwales 2.jpg
    66.5 KB · Views: 220
I would guess about 1/16" is about right. I wouldn't think you would need to pair down the lip on the existing outwales. On mine, the planking is tapered in thickness the closer you get to the ends. A spokeshave works great for shaping the planking. Let me know if I misunderstood your question.

Mike Wootton
 
Mike: Thanks for the response. I will leave the lip at the top of the outwale as it is, and I have tapered the top edges of the sheer planks where they meet the ends of the outwales that have no lip. What I'm concerned about is the fit along most of the length where there is a lip. I plan to steam the ends of the outwales since they have lost some of their shape having been off the boat for some time. I want to be sure that when I finally attach the outwales, I don't have to deal with any gaps between the lip and the frame tops induced by the filled canvas. I think I should simulate the filled canvas and get everything to fit, before I steam the outwale ends. I don't want to have to trim the outwale in the area below the lip if I don't have to.
 
Paul, how high up did your sheer edge planking repair go? Or how far down from the rib top does the planking start? My sheer edge looks intact but I have found some suspicious tacks that seem to indicate the sheer edge was originally higher. I have D-shaped outwales (open). Most of my sheer planking is 3/8 inches from the top of the outer thickness of the ribs. I also noticed that my planking appears to be almost full thickness at the sheer (except near the decks).
 
Scott:

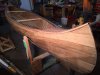
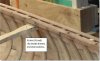
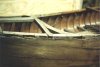
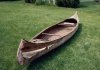
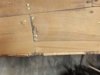
None of the upper edge of the original sheer planking remained in a state such that I could preserve it, or even use it to determine the thickness dimension. Except in the peaks, I only replaced the top inch or so. Since the plan was to dab some epoxy on the rib tops, I also glued the planking tops at that time. The picture shows the Stb-Fwd repair, where the transition to full width planks, for the peaks, shows. I'll add tacks before I canvas. This is typical of all four quarters. The plan was to trim top sheer to fit the outwales, which I haven't done yet on the Stb side. I have trimmed the Prt side to what I think will be a good fit, with some space for the filled canvas. In my defense for the unauthentic repairs, when I got the boat, twenty-some years ago, I wasn't able to determine that I actually had a Morris. I still don't have a builder's plate.
 

Attachments

  • Sheer Plank Repair Stb Fwd.jpg
    Sheer Plank Repair Stb Fwd.jpg
    41 KB · Views: 180
Back
Top