Morris - Broken inwale, stems, decks - Help!

divedog

LOVES Wooden Canoes
Hello from Spokane, WA,
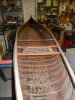
I’ve been busy on my B.N. Morris (my first restoration attempt) and would really welcome some guidance. So far, I have removed the fiberglass off the hull and removed the spruce topwales, which are too far gone to save.
My preferences are to have a nice looking canoe with fair lines and to keep as much of the original canoe as I can. I’ve added some pictures of the biggest problem areas for your consideration. Below are my newbie thoughts/questions. Sorry this is so long…
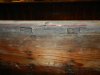
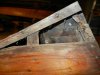
Inwales –
The starboard inwale is broken where the center thwart hanger is located. The other inwale appears OK. I was thinking of making a plywood form to match the curve of the other inwale for reference. Next, remove the starboard inwale, make reference marks to ensure it is repaired to the right length. Then scarf in a sound section and clamp it to the plywood template to dry in the right curve. Anyody done this?
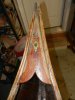
Stems –
Both appear to need a little bit scarfed on to the tops to replace rot. Were the stems ever attached to the inwales on Morris canoes, or did they just sit on top? Also, a previous owner made stem bands by splitting ½” copper pipe and bolting it on through the stem. Should I glue in some dowels to fill these holes? Or, were these the holes used to attach the original stem bands? Heck, did this canoe even come with stem bands?
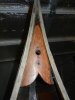
Decks –
The rear deck is nearly complete, but has an unwanted hole in it, aft of the flag holder. I’m wondering if I should remove the deck and scarf a new piece on to cover the hole and replace the pointed end of the deck? This would leave a scarf line, but would retain original wood…Or, would I be better off making a new deck and reinstalling the flag holder?
The front deck is missing a chunk out of the side and has an unwanted hole aft of the hole for the flag holder, which I do not have. I’m thinking it would look best to make a completely new front deck, without a flag holder, and put a decal on it. Thoughts?
Ribs –
I have a half dozen or so ribs that will probably need replaced. Some are cracked, and some have been built up with a horrible dark epoxy stuff.
Planking –
I destroyed a small piece of planking while removing the fiberglass from the hull. One other piece has a hole plugged with that black stuff, and another flat section of the second plank is cracked.
I am going to strip the varnish next, but in what order should I proceed with the other repairs? Thanks for any advice or comments you have!
Mike Wootton
 

Attachments

  • broken inwale 1.jpg
    broken inwale 1.jpg
    96.2 KB · Views: 312
  • broken inwale.jpg
    broken inwale.jpg
    90.4 KB · Views: 309
  • front deck.jpg
    front deck.jpg
    61.7 KB · Views: 304
  • rear deck.jpg
    rear deck.jpg
    65.6 KB · Views: 297
  • stem.jpg
    stem.jpg
    100.6 KB · Views: 317
I'd start with the inwale. You could splice in with a long scarf joint, like 8 to 1. or longer. I don't think a plywood template would be needed. Just get the angle on the scarf right and clamp it in place and make sure it looks ok by eye. I've done this without removing the inwale. But not on a Morris. Those rib pockets can be tough to replicate.
 
Those holes in the stems are for the rivets that should be holding the stem bands. Morris bands are not held on by screws (or bolts).
 
Mike,

Since you want to retain as much of the original canoe as possible, I would encourage you to repair and retain the front deck. There is nothing like having matching, nice dark color original mahogany decks on your Morris. Finding nice old growth mahogany for a new deck is next to impossible these days. I have repaired two Morrises with identical deck split outs as yours where the screw is located. I used a rabbet plane to make two perfectly flat surfaces with a 90 degree angle cut where the vertical and horozontal surfaces meet. Tightbond III or epoxy in the spliced repair piece of mahogany, selecting a piece with grain orientation the same as the deck. Fortunately I had on hand salvaged old mahogany from decks and thwarts of previously repaired canoes. Lifting the canoe by the deck causes this problem with Morrises due to the thinness of the decks at that screw location. After repair, I suggest you consider adding lifting thwarts to prevent a reoccurrance, not original but wisely functional. You have one diamond shaped original flag staff plate and you might be able to find or fabricate a matching one for the bow deck flag staff hole.

Morris officionados have conjectured that Morris used a forstner style drill bit and precisely drill holes on 4" centers down the center line of double wide rail stock material. The double wide rail stock was then cut precisely in half providing 2 rails with the pockets for the rib tops perfectly in place. I suggest you consider preparing your rail splice the same way as it will surely span several ribs and will give you accurately located rib top holes.

If the broken ribs are only slight, not unsightly breaks, you might consider doing backside rib repairs. I have successfully done several of those on a personal heavy user canoe and they have held up. I used a router and excavated 1/2 the thickness of the rib 1/3 of the rib width and epoxied in a splice of hardwood. I even experimented with doing the routing on a few ribs by not removing the planking and routing right thru planking and 1/2 rib thickness. When doing the latter, care should be taken not to get any epoxy on the planking so future planking removal , if necessary, would be easy.

Good luck with your project.

Ed
 
Last edited:
Mike,

Forgot to mention repair of the rivet holes in the stems as MGC mentioned. Morris used white cedar for his splayed stems and since cedar does not retain screws well, he riveted the stem bands on. You don't want to attempt re-riveting the stem bands. Firstly you cannot find appropriate length copper rivets. As you mentioned, I suggest you drill out slightly each rivet hole and epoxy in a hardwood dowel plug. This will enable you to use regular #4 stem band screws and have good screw holding capability. Where you will have to put on new stem bands, drilling your holes in the bands will have to be carefully done to position them right over your hardwood plugs. Best that you position and drill your stem bands before putting on your canvas otherwise you won't be able to exactly locate the dowell plugs.

Ed
 
Last edited:
>Firstly you cannot find appropriate length copper rivets

I have been thinking of the morris stem, stem band issue. A guy out here sells 1 1/4 brass rivets. Emailed him but haven't purchased. 38 bucks for 20. Anybody use them? I was thinking some small brass thru bolts. That's as far as I've got though.
 
The original Morris stem bands came up over the tip and extended toward the deck, but just barely touched it--- the stem band didn't extend out onto the deck. This amounts to only about 3/4" of stem band on the top edge of the canoe. Some of the other builders used stem bands more liberally, carrying them out onto the deck and fastening them there. I'll try to find a picture if this description is confusing, but am not at my computer that has the Morris pictures.
 
How many rivets in a Morris stem? I have a quantity of 2" x 0.12" (approx. 8AWG) brass round head rivets that were custom made for a Morris restoration (not by me). I might be able to put some sets together.
 
I'm out of town so I'll count when I get home.

I'm pretty sure that the rivets are copper......
They are surprisingly easy to set. I would practice on a few first to get a feel for it.
Snowshoe makers use these to close up the frame...same method and also copper rivets and burrs.
I suppose that it might be easier to plug the holes and drive screws but I wouldn't. The rivets are a unique signature item for BN's.

There are places that sell the rivets and burrs.
http://www.bmametals.com/rivets-burrs/copper-rivets-burrs.aspx
http://www.kyhorse.com/store/hardware/rivets.htm
etc.

Brass should also work just fine.
 
While rivets are typically copper, and with good reason, the advantage to brass in this case is that the rivet, when filed flush with the stem band, will be nearly invisible. Copper will contrast. a minor detail, but some may care.

The big challenge, if you plan to re-use the old rivet holes, is getting the holes in the stem band in the right location. A bucking iron will also have to be located or fabricated.

I have enough brass rivets for 5 or 6 sets. They are similar to Todd's that were linked to above, but mine are longer and have a point. I'll put them on the classifieds later - they won't cost quite as much.
 
Once I removed the decks, I found half of a copper rivet still in place. It appears to be only about 1/16" in diameter with a small copper washer behind. The remaining holes in my stem have been enlarged to about 3/16", so I will fill them in with hardwood and epoxy for now.

Also answered my own earlier question about stem attachment. It looks like the inwales were just nailed to the top of the stem. Also, my first set of cant ribs are attached to the inwales with only nails through the top (no pockets).

Thanks for the ideas about saving the decks and ribs. I'll try those techniques, first.

I'm about half way done pulling the tacks along the broken inwale.

Thanks for the advice everyone!
 
Well, how to locate the old holes ??? I had a thousand little holes in the outside of the bottom board on my Rushton Saranac. They were made when the three brass strips, one down the center and one on each side, were installed to protect the hull. To complicate things the two outer strips were also curved to follow the board's outer edge bow to stern. I was able to find brass strips in one length with the same thickness and width as the originals. I found the strips would easily conform to the curve, but the screw HOLES...oye...could not come to grips with filling the old ones and drilling for another jillion holes. Lets sleep on this. So the next day I was packing up a box of stuff for the mail, and got out the packing tape, and all I had was the narrow 3/4", but really strong with 0 stretch. As I was closing up the box, I had to use a marker to go over the clear, slippery nylon-reinforced tape...and had to dot an i.....then the light bulb !! The tape was also 3/4" wide
 
Back
Top