Chestnut stem joint

Bruce Whittington

Curious about Wooden Canoes
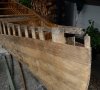
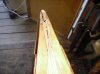
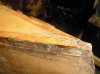
Hello all - I joined this forum over three years ago for information on refurbishing my 1972 Chestnut 17' cruiser (original owner.) I have put a couple of guitars aside until the winter, and finished the woodshed, and finally begun the project. I stripped the canvas and outwales and an ill-considered shoe keel added long ago. I was a bit relieved to see that the rot in the peaks was not as extensive as I feared. I grudgingly made new maple decks because of a tiny bit of rot in the tips, but now that it's done I am happy. I'm making scarf joints in the inwales at the decks to replace rotted tips and that just takes lots of fiddling. I have to replace the rotted tips of the stems next. And herein lies my first question. I can't find a definitive explanation of how the stem meets the tips of the two inwales. I see some people cutting a full-width tenon on the tip of the stem, and running the inhales past on each side. Hard to tell from photos of finished canoes because that detail would be hidden under stem bands. But on my canoe (see photo) it looks more like there is a smaller tenon, cut on all four sides, that may have fitted into a mortise in the joined tips of the inwales. There is no mortise in the underside of the old decks. Second question - I was relieved to find that the planking is fastened with brass nails - I thought I had heard somewhere that in its last years Chestnut was using steel nails to save money. But there are rusting steel nails fastening the rib tops to the inwales, and I am wondering if I should replace those with brass or bronze? Nothing seems to have let go yet. Third question, are old stems generally okay for nailing new canvas? This is the first re-canvas for this boat but the stems look pretty pockmarked. Use longer nails? After this I will replace the outwales with one-piece ash (I hope) and replace some of the top planks and a few selected B-grade planks - I have a ready supply of edge-grain cedar. I'll tackle new canvas probably next year. Thanks in advance for sharing your expertise.http://forums.wcha.org/images/attach/jpg.gif
 

Attachments

  • DSC_9322.jpg
    DSC_9322.jpg
    275.2 KB · Views: 255
RE: “I can't find a definitive explanation of how the stem meets the tips of the two inwales.”

In the Forum Knowledge Base is a tutorial by Treewater that deals with this problem (rebuilding rotted tips) very thoroughly.
(See forums.wcha.org/knowledgebase/BuildRestore:Rebuild+rotted+tips

RE: “rusting steel nails fastening the rib tops”

This is a symptom of a Chestnut canoe built in the late 60s and 70s, when Chestnut’s quality was slipping. My (late 60s) Prospector had this problem. Yes, the nails will rust away. Yes, the ribs tops are therefore not well secured to the inwales. Yes, the steel nails should be pulled and replaced with ringed boat nails, IF you want a long-lasting canoe to be happy with. This is kind of a tedious process but will go quickly once you get practice at it. (I did not do it the first time I rebuilt the Prospector and as I used it, more and more gaps opened up between rib tops and the inwales.)

RE: “are old stems generally okay for nailing new canvas?” This is not a subject area I know well, but yes old stem faces get pretty beat up with fasteners. One fix is to generously slather the old stem face with epoxy. Another is to epoxy onto the old stem face a thin new wooden face. Short of pulling out the old stem and steaming and installing a complete new stem, both these fixes are not that aesthetically appealing, but they are effective and they do work.
 
Chestnut stem inwale joint

We have a Chestnut Pal in the shop now that we have just started to take apart, the stems and inwales are in pretty good shape and have never been worked on. I took a couple of pictures this morning of the stem/inwale joint which I will attach.

Chestnut cut a tenon on the tip of the stem, about 1/4 inch wide and the height of the inwale. The inwales were cut to the desired angle and then about a 1/8 inch dado was cut from each inwale to form the 1/4 inch mortise. Usually we find a small nail holding things together, but, on this one there appears to be no fastener, they must have trusted the planking to hold it in place. I normally will pre drill and put in a bronze ring nail and clinch over the end for a more secure joint.
 

Attachments

  • Pal Stem wale 001.jpg
    Pal Stem wale 001.jpg
    109 KB · Views: 324
  • Pal Stem wale 002.jpg
    Pal Stem wale 002.jpg
    77.9 KB · Views: 302
  • Pal Stem wale 003.jpg
    Pal Stem wale 003.jpg
    107.2 KB · Views: 297
Thanks to all for this information. Larry, I should have been a little more precise - I was looking for tip-joint details specifically for Chestnut. Steve, thanks for clarifying with the boat you have in your shop. This video shows clearly how to do the through-tenon: https://www.youtube.com/watch?v=9zwSih76wcw
But I was confused about whether that was how Chestnut did it, since the remains of the original stems on my cruiser look different (well, they're rotten . . .) And it also seems to me better if the end grain of the tenon is not exposed at the top, but capped by the inwales. (Well, I suppose every rib end is exposed that way . . .) So another question: Is this a matter of economy? The "second deck" approach seems a good plan, and covers the tip of the tenon, even if it is not the traditional approach. And another beginner question: I read here that some use small wood screws to reattach planks to stems. Any reason for not using brass or bronze screws for fastening rib tops to inwales, rather than ring nails?
 
I knew what you were getting at, Bruce: my answer was really by way of killing as many birds as possible with one stone. I asked that question when I was rebuilding Chestnut tips. And came to find out the answer didn’t matter a hell of a lot or help me when I learned it! Making a fancy mortice and tendon joint where a tiny bit of stem and two inwale tips come together is not all that essential to getting it back together.

Small wood screws are fine, too: much less stressful than pounding little tacks in with a hammer.
 
I have seen other Chestnuts where the tenon does not go all the way through the inwale leaving the tenon capped at the top. Maybe it was just their mood of the day. Either way the stem band covers the seam.

Use #3 x 3/8 brass screws to attach planking to the stems, you can avoid hammering on the old fragile stem that way and not cause new problems.
 
I use 3/8's inch bronze ring nails to attach planking to the stems. If you pre-drill the planking and back the stem up with your clinching iron the nailing goes rather well.
 
Back
Top