Treewater
Wooden Canoes are in the Blood
This is my first experience canvassing sponsons and only my 4th total canvas. Reader beware, I have made mistakes but even so, this is what I did.
This is a 1937 16' Old Town HW. It had been fiber glassed and rebuilt before I got it. it was in overall good shape, sponsons excellent in that they had not been removed for the fiberglass job, only covered over. Thus, I was dealing with a factory original.
I removed each sponson carefully saving all the screws and buttons. LABEL the sponsons and their solid end pieces as well as the gunwales when they come of. All screws were collected and labeled as well. Care at this point saves much work later.
I sanded and glued splits, but otherwise had little repair to do on the sponsons. I put a coat of sanding sealer on after sanding.
After I had canvassed the hull of the canoe and applied a mildew treatment I set about the sponsons. I first re-drilled out each hole in the ribs where the screws were to go through. Obviously using the original holes. This made it easy to get the original holes in the sponson. I set up the wood sponson for a trial prior to stretching any sponson canvas. I made sure I could match original holes throughout and gave me the chance to ponder the fit of the end pieces. The factory must have put the solid end pieces on first judging from the screws under the sponson planking but I opted not to try that.
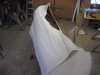
When I was satisfied I could match the holes okay I cut a 60” piece of canvas in half, 30” wide. The total sponson length was 13ft and I cut my canvas 14 ft. This was even more than needed since 13’ 4” would have sufficed. I had to guess how the canvas would be stretched to the hull and still pull over the sponson planking with minimal trouble. I was glad I had cut a wide piece of canvas. Tacking the canvass at the ends with four or five staples (they were to come out soon). I went the length of the hull and put one tack in each rib and gauged the tacks to be below the sponson top. Remember, the sponson has narrow freeboard in the center and more at the ends. It does not really follow the upsweep at the ends of the canoe. With the canvass held in place I began the sponson frame installation.
I think it important to realize at this point that we are essentially “sistering” (“scabbing”, “doubling” etc) a wide beam on the side of the canoe. This process has the potential to change the shape of the canoe if the thwarts and seats are not firmly in place. I placed the first screw in the center rib then went to the end and put one screw in just part way, only enough to hold the position . Then working side to side I put in the remaining crews in each rib, using a larger screw when the old screw would not hold. A fair amount of creativity is needed to set the end pieces since they are solid and likely split. However, with tack, brads, and screws, the ends get set in place and it is time to stretch the canvas.
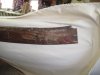
I started from the middle, and it is the bottom which is pulled up first and tacked to the upper and outer face of the sponson. ( You noticed this when you pulled the old canvas off, right?) This is identical to doing the canoe hull canvas. I used the staple gun to hold canvas stretched at the ends to get a smooth fit down the side since the staples pull easily. After the bottom is pulled up and tacked it is cut off exactly at the top edge of the sponson. The ends take creative work again since the edge must eventually feather out. Again, the staple gun gives the chance to trial and error.
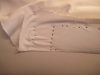
Now the top canvas is pulled over and tacked to the face, outer edge where is just covers the previous row of tacks. My gunwale is ¾” wide at the inner face on the canoe sponson so any tacks within ¾” of the top will be covered. After the top flap is tacked it is cut off in preparation for filling.
I was pleased with the job done and credit most of the good fortune to carefully finding and using the original holes. Granted, some ribs in the canoe hull were replaced but even those I carefully measured and set new holes to match the old holes. Let’s face it, the “ribs”, actually “d” shaped gussets or forms, are all that hold the whole thing together. Avoiding damaging them is essential in my view.
I’ll get more pictures from the other side. Filling will be a challenge and will require several coats to built up and hide the transition points. More later.
3,19,2013. After three days of stretching canvas the arthritis in my hands tells me I am done.
The sponsons took four hours each and I spread it over two days to rest my hands.
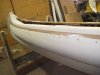
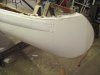
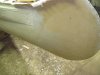
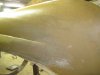
The photos show the canvas tacked in place. Then the sponson fastened over the canvas. Next the bottom stretched up and tacked. Then the top pulled over and tacked. I also have ends shown for they are most difficult. To get alignment on the ends I re-used tack holes but failed to find the original screw holes so I may have the wrong curve at the end. Again there is a joy in feeling the original screws sink back into their original holes.
I diverse to describe what I surmise on the original build. The factory would have placed the ends on the canoe first. Then the gussets, or minor bulkheads if you call the “D” shaped 7/8th thick frames. These pieces were fastened on then a gunwale set into a prepared notch. The sponson had extra wood where a rowing oar socket would sit. After all this, it was planked by narrow strips of cedar and sanded.
So while the factory built it piecemeal I have dealt with it as a whole. I still feel fortunate to get it back on without distortion. The ends had been so badly chewed up by the fiberglass job that they never did settle in and hide the transition from planking to solid. I could have spent an extra day gluing, filling, and sanding this area. Instead, I expect to spend a great deal of time putting on the filler and several coats to get the smooth transition.
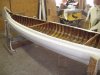
Photos were taken before I painted on mildew prohibitor. It will shrink dry the small ripples out.
This was my first sponson job so any suggestions or comments are welcome. It’s not great but it will float.
3/21/13
I am indebted to the members who added their knowledge. A few facts come to light.
1. The factory filled the canoe first and would thus have been putting those small bulkheads on the side of a finished canoe. Obviously, using this method any canoe can have sponsons added after building and even using.
2. Getting the ends smooth is visually critical and I should have spent an extra day or two glueing and repairing the point where the sponson planking joins the solid cedar block.
3. To finish the end it seems the inside canvas flap, the side against the canoe, should be cut flush to the end of the wood block and the top flap pulled over and run about a half inch past the underside, the end of the block. This end is finished with bedding compound or otherwise to achieve a smooth transition.
4. Lastly, yes, I laboriously put in copper tacks. Seems everyone else is using stainless steel staples available at Ace Hardware stores. Save lots of time.
3/30/2013 I just finished filling the weave on the sponson canoe. It became a much more difficult process than it should have been. I make a few observations.
1. Sponsons give us angles not normally found on the standard canoe. The top sponson deck meets the hull at about 100 degrees. The bottom is the width of the lower planking edge. There will be gaps between the hull and the sponson and depending on their size, common canvas filler may not fill the gap and bedding compound or a thinkened mixture of filler may be needed. The last thing we want is water seeping down between the sponson and canoe canvas.
2. The ends create the greatest challenge. Our standard fillers are “weave fillers” not putty or bedding compound. They will not build up enough to hide the end. One must take special care when stretching the canvas on the end. The underside, nearest the hull, should be cut flush to the cedar block end. The cedar block itself should be sanded to a point, it should be fair to the hull by itself. The top flap of the canvas will stretch over the end and extend about a ½ inch beyond. Even with this, and glue may be used to hold everything tight in place, there will be an edge to finish. This end, or edge, may necessitate using bedding compound to make it fair or, as I did, mix your own thick, very thick, canvas filler, (lots of silica) and apply it with a trowel. An auto body squeegee works great. Some artistry is needed to sculpt the end.
3. You will have to do the top of the sponson with the canoe upright, and then turn it over to do the bottom. Sealing the cracks, filing the weave, and building the ends left me with an overnight job. The next day, when you turn the canoe over, you have a dry edge to work off to finish the bottom. All of this created more work than expected for me. As usual, the second canoe will be easier.
Frustration aside, this is all very humbling but with perseverance, it can be done and done well.
This is a 1937 16' Old Town HW. It had been fiber glassed and rebuilt before I got it. it was in overall good shape, sponsons excellent in that they had not been removed for the fiberglass job, only covered over. Thus, I was dealing with a factory original.
I removed each sponson carefully saving all the screws and buttons. LABEL the sponsons and their solid end pieces as well as the gunwales when they come of. All screws were collected and labeled as well. Care at this point saves much work later.
I sanded and glued splits, but otherwise had little repair to do on the sponsons. I put a coat of sanding sealer on after sanding.
After I had canvassed the hull of the canoe and applied a mildew treatment I set about the sponsons. I first re-drilled out each hole in the ribs where the screws were to go through. Obviously using the original holes. This made it easy to get the original holes in the sponson. I set up the wood sponson for a trial prior to stretching any sponson canvas. I made sure I could match original holes throughout and gave me the chance to ponder the fit of the end pieces. The factory must have put the solid end pieces on first judging from the screws under the sponson planking but I opted not to try that.
When I was satisfied I could match the holes okay I cut a 60” piece of canvas in half, 30” wide. The total sponson length was 13ft and I cut my canvas 14 ft. This was even more than needed since 13’ 4” would have sufficed. I had to guess how the canvas would be stretched to the hull and still pull over the sponson planking with minimal trouble. I was glad I had cut a wide piece of canvas. Tacking the canvass at the ends with four or five staples (they were to come out soon). I went the length of the hull and put one tack in each rib and gauged the tacks to be below the sponson top. Remember, the sponson has narrow freeboard in the center and more at the ends. It does not really follow the upsweep at the ends of the canoe. With the canvass held in place I began the sponson frame installation.
I think it important to realize at this point that we are essentially “sistering” (“scabbing”, “doubling” etc) a wide beam on the side of the canoe. This process has the potential to change the shape of the canoe if the thwarts and seats are not firmly in place. I placed the first screw in the center rib then went to the end and put one screw in just part way, only enough to hold the position . Then working side to side I put in the remaining crews in each rib, using a larger screw when the old screw would not hold. A fair amount of creativity is needed to set the end pieces since they are solid and likely split. However, with tack, brads, and screws, the ends get set in place and it is time to stretch the canvas.
I started from the middle, and it is the bottom which is pulled up first and tacked to the upper and outer face of the sponson. ( You noticed this when you pulled the old canvas off, right?) This is identical to doing the canoe hull canvas. I used the staple gun to hold canvas stretched at the ends to get a smooth fit down the side since the staples pull easily. After the bottom is pulled up and tacked it is cut off exactly at the top edge of the sponson. The ends take creative work again since the edge must eventually feather out. Again, the staple gun gives the chance to trial and error.
Now the top canvas is pulled over and tacked to the face, outer edge where is just covers the previous row of tacks. My gunwale is ¾” wide at the inner face on the canoe sponson so any tacks within ¾” of the top will be covered. After the top flap is tacked it is cut off in preparation for filling.
I was pleased with the job done and credit most of the good fortune to carefully finding and using the original holes. Granted, some ribs in the canoe hull were replaced but even those I carefully measured and set new holes to match the old holes. Let’s face it, the “ribs”, actually “d” shaped gussets or forms, are all that hold the whole thing together. Avoiding damaging them is essential in my view.
I’ll get more pictures from the other side. Filling will be a challenge and will require several coats to built up and hide the transition points. More later.
3,19,2013. After three days of stretching canvas the arthritis in my hands tells me I am done.
The sponsons took four hours each and I spread it over two days to rest my hands.
The photos show the canvas tacked in place. Then the sponson fastened over the canvas. Next the bottom stretched up and tacked. Then the top pulled over and tacked. I also have ends shown for they are most difficult. To get alignment on the ends I re-used tack holes but failed to find the original screw holes so I may have the wrong curve at the end. Again there is a joy in feeling the original screws sink back into their original holes.
I diverse to describe what I surmise on the original build. The factory would have placed the ends on the canoe first. Then the gussets, or minor bulkheads if you call the “D” shaped 7/8th thick frames. These pieces were fastened on then a gunwale set into a prepared notch. The sponson had extra wood where a rowing oar socket would sit. After all this, it was planked by narrow strips of cedar and sanded.
So while the factory built it piecemeal I have dealt with it as a whole. I still feel fortunate to get it back on without distortion. The ends had been so badly chewed up by the fiberglass job that they never did settle in and hide the transition from planking to solid. I could have spent an extra day gluing, filling, and sanding this area. Instead, I expect to spend a great deal of time putting on the filler and several coats to get the smooth transition.
Photos were taken before I painted on mildew prohibitor. It will shrink dry the small ripples out.
This was my first sponson job so any suggestions or comments are welcome. It’s not great but it will float.
3/21/13
I am indebted to the members who added their knowledge. A few facts come to light.
1. The factory filled the canoe first and would thus have been putting those small bulkheads on the side of a finished canoe. Obviously, using this method any canoe can have sponsons added after building and even using.
2. Getting the ends smooth is visually critical and I should have spent an extra day or two glueing and repairing the point where the sponson planking joins the solid cedar block.
3. To finish the end it seems the inside canvas flap, the side against the canoe, should be cut flush to the end of the wood block and the top flap pulled over and run about a half inch past the underside, the end of the block. This end is finished with bedding compound or otherwise to achieve a smooth transition.
4. Lastly, yes, I laboriously put in copper tacks. Seems everyone else is using stainless steel staples available at Ace Hardware stores. Save lots of time.
3/30/2013 I just finished filling the weave on the sponson canoe. It became a much more difficult process than it should have been. I make a few observations.
1. Sponsons give us angles not normally found on the standard canoe. The top sponson deck meets the hull at about 100 degrees. The bottom is the width of the lower planking edge. There will be gaps between the hull and the sponson and depending on their size, common canvas filler may not fill the gap and bedding compound or a thinkened mixture of filler may be needed. The last thing we want is water seeping down between the sponson and canoe canvas.
2. The ends create the greatest challenge. Our standard fillers are “weave fillers” not putty or bedding compound. They will not build up enough to hide the end. One must take special care when stretching the canvas on the end. The underside, nearest the hull, should be cut flush to the cedar block end. The cedar block itself should be sanded to a point, it should be fair to the hull by itself. The top flap of the canvas will stretch over the end and extend about a ½ inch beyond. Even with this, and glue may be used to hold everything tight in place, there will be an edge to finish. This end, or edge, may necessitate using bedding compound to make it fair or, as I did, mix your own thick, very thick, canvas filler, (lots of silica) and apply it with a trowel. An auto body squeegee works great. Some artistry is needed to sculpt the end.
3. You will have to do the top of the sponson with the canoe upright, and then turn it over to do the bottom. Sealing the cracks, filing the weave, and building the ends left me with an overnight job. The next day, when you turn the canoe over, you have a dry edge to work off to finish the bottom. All of this created more work than expected for me. As usual, the second canoe will be easier.
Frustration aside, this is all very humbling but with perseverance, it can be done and done well.