Canvas stretching

IthacaBill

WCHA Member #7902
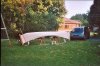
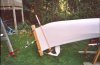
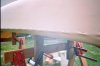
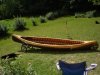
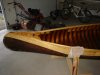
Could anyone out there post some pics of their canvas stretching contraptions...I am ready to start canvassing upside down (after alot of debates and research.) I could use some help with the method, as well. I already have a come-along, some stretching pliers, tacks, staples, some eye bolts, wood, canvas and filler. I'm just having trouble picturing it all come together. Where should I start tacking the canvas in place? It seems like you would start in the middle of one side and work your way to the ends, then do the other side? What about trasitioning to the ends? Any advice and especially pics of this process would be appreciated. By the way, she's a restored (to my best ability) 1915 Kenebec. New planking, decks and rails. Put the last coat of varnish on last weekend!
My wife and I were glad to meet some of you at the assembly ( our first) too bad we missed the demonstration at the tent!
Thanks,
Bill & Ann
 
Kenebec pics

Sorry, forgot to include some pics in my canvas stretching thread....
 

Attachments

  • sep 026.jpg
    sep 026.jpg
    147.5 KB · Views: 733
  • sep 019.jpg
    sep 019.jpg
    148.1 KB · Views: 774
Thanks for the info

Thanks for the info, guys. I bought some 3/8" x 2" eye bolts with lead anchors. I am going to hammer drill them into the concrete floor about 20' apart. Will that be strong enough? I have no idea the amount of pressure exerted by stretching canvas. Do you think they'll hold?
A question about the canvas clamping device... Can you just C-clamp or bolt the canvas between two boards, or do you really need the dowel? I also have some wire rope to attach the come along to the clamp, where is the best location (top, side, front of clamp?)
My canvas is from Northwoods, and is treated. Is there anything else I need to put on it (moisten w/ water or linseed oil) prior to stretching?
Does anyone out there have some good photos of the canvassing process?
Cheers,
Bill
 
My clamps consist of a pair of 2x4's that I have run a dado lengthwise on both. I then glued a stick in the dado on one on the 2x4's. the piece is slightly smaller than the dimension of the dado. The 2x4's fit together like a puzzle and hold canvas quite well. My anchors are in the posts of my pole barn. Eye Bolts. The clamps get bolted together top and bottom with the canvas in between. I attach to my come-along by means of a bridle to each clamp. If I did not have the dado/groove I could run the canvas beyond the 2x4 and around a dowel and back in the 2x4 and then clamp it. Anything to keep the canvas from slipping out of the clamps. hope this gives you some ideas. Dave.
 
Oh, and another thing, I am not sure 20' apart and pulling from the floor is going to work if your canoe is 18'. Good amount of downward pressure but would it stretch lengthwise well enough? My anchors are 24' apart and pull downward a few degrees. your knees will ache for a couple days if you are squatting low to attach the gunnels. Get a low chair on wheels?
 
Anchor Bolts

Thanks Dave. My canoe is 16'. How much room do I need between the clamp and anchor?How far from the stem (tip and tail of canoe) to the anchor? Do you use what "the Book" refers to as clothespins in conjunction w/ the clamps?
 
Dave,

I think I must of copied your clamp design, sounds just like mine. :)

I also use the 2ed set of clamps, the "cloths pins", when put in just next to the stem, they allow you to remove the other clamps and pulling equipment.

I haven't measured it but it "seams" like I pull down at about a 30 degree angle.

Dan
 
Clothes pins

I clamp the ends of two boards and slip them over the canvas at the ends of the canoe. The last canoe, Steve Lapey and I clamped two paddles together and used them as a clothes pin.
 
Bill, maybe I stole the clamp design idea from Dan L. I don't have any recollection, your honor. I don't use clothes pins. I staple one side then the other and work my way out to about where the seam starts and then I remove the clamps. I'll bet the clothes pins work well tho. I know Gil canvasses without any clamps when he has to. I did a rowboat with no stretcher and it came out perfect. I did have to pull and adjust staples more than with a stretcher. One thing is for sure: canvassing is a mystery until you do it once. then you say, "that wasn't near as bad as I thought it would be." As far as the amount of room needed. My barn is 24' across. By the time I get the canoe set up and drape the canvas and put the clamps on and take up the slack it seems about right for a 16'-18' canoe. So you may need to grow a tree about 24' from the bumper on your truck. Or you could move the truck if you have enough gas. (wink/grin). Use your tallest horses so you can crawl under easy to the other side. With clothes pins you can walk around with no strings attached, so that's a plus.
 
Here are a few pictures of my only canvassing experience, done outdoors for lack of room. I used plain 2x4s for clamps and had no slippage problems - putting the concave faces on the inside may have helped. Horses were standard, with clamped-on boosters of 2x4s and plywood, shaped to match the canoe and padded with foam pipe insulation (idea courtesy of Dan Lindberg). My clothespins were just scraps of planking clamped between 2 sticks to keep the canvas close to the hull near the ends as in "the book", not the tension-holding clothespin-clamps Dan and Dave are talking about.

Using an old rock climbing rope at the van end was not a good idea. It stretched quite a bit and I had a lot of horse-kicking to do as the canoe wanted to move left as tension increased. It eventually got to the point where I ran out of room at the come along. In Chris Merigold's article, there is a mysterious statement along the lines of: "you will know when there is enough tension". I decided that was what he meant!

I stapled from the middle to about 1' from the end on one side, then the other side, and then repeated for the other end. One staple per rib, using a tinsmith's vise grips and a 4 or 5" length of 3/4" dowel on the inwale (as a fulcrum) for tensioning.

The canvas pulled back on the last staples near the ends when I released the tension to move the canoe back indoors. Clothespin-clamps next time...

Finishing off the stems involved a fair bit of trial and error (stapling and unstapling), trying to balance the tension so that the canvas would stay close to the planking even in the hollow area near the end.

Take your time and have fun. The process may be intimidating but is actually quite enjoyable.

Martin
 

Attachments

  • Scan0001.jpg
    Scan0001.jpg
    95.2 KB · Views: 617
  • Scan0002.jpg
    Scan0002.jpg
    91.7 KB · Views: 571
  • Scan0003.jpg
    Scan0003.jpg
    70.9 KB · Views: 596
Any comments on the down angle shown in Martin's pics? I've never done it, but there is one in my future. My general plan is to pull the ends more or less straight out. I would worry aout distorting the hull while the canvas is under external tension, then having the hull straighten out after the canvas is tacked and trimmed. Am I worrying too much? I have seen an upright canvas job where the builder was standing in the upright hull supported only by the canvas at the ends.
 
Looks about right.

As for "anchors", the last 2 I've done I just used the bumber hitch on the minivan on 1 end and pulled on the side of the boat trailer on the other (16 ft alum runabout). It really doesn't take much. I use chains to eliminate stretch other then the canvas.

Dan
 
Mission Accomplished!!!

:) Just wanted to thank everyone for their advice and input...I am grateful for your help. I wound up putting 2 bolts into my garage floor, about 25' apart, a come along on one end, a heavy duty tow strap on the other. I built 2 saw horses about 42" tall with upsidedown carpet tacked into the top brace to keep the upside down canoe from slipping. The clamps were simple 2x1/2x37" hardwood with eye bolts into the center of each. I ran the canvas through the pieces of wood and stapled it along one outside edge, then clamped the pieces together with a bolt at each end, then 2 C clamps in between. This system worked great!
I started putting 1/2 inch stainless steel staples along one sheerwater (top) working from the middle to the ends, then the other side. Stretching here was done with welders/ canvas streching vice grips and an old piece of inwale to prevent damaging the inwales while cranking on the canvas. Conquering the ends is my next task, then filling!
I'll post pictures soon, for those who might need some help their first time. I know I was intimidated, but now that I've done it, it's no big deal. In fact I had fun doing it!
Thanks again all.
Cheers,
Bill
 
Bill,

Are stainless steel staples difficult to find? Where did you get them?

Just wondering,
Paul
 
Good morning guys. Very often, I visit the forum and we can agree on the fact that most people seem to take care of details when they restore a traditional wood and canvas canoe. But at the end of the job,why do they use staples? Because it is faster!! Bye for now. Sandpiper
 
Staples for canvas

After reading the ART OF THE CANOE (Stemlock and Sussex's book about Joe Seliga), I noticed that Joe used a staple gun to secure his canvas along the sides/gunwales/rib tops. I admire Joe, and figured if staples were good enough for him, they're good enough for me. Also, if you notice, he's working alone, as am I. If you stretch the canvas with one hand, how would you place a tack AND hammer at the same time w/ the other? Another reason I used staples, is that when I removed my old canvas, I saw that is what my Grandfather used when he restored the canoe back in the late 60's.
Mule- you can buy rust proof/stainless steel staples (or ones that are an alloy of nickel, I believe) at Lowe's or Home Depot or whatever home improvement-hardware place is close by. Just make sure to read the box. I used 1/2 staples along the sheerwater, but regular brass canoe tacks for the stems. After the first fold I applied a thin coat of canvas filler as a seal before tacking the second fold. Rollin uses bedding compound under the first flap.
Cheers,
Bill
P.S. I'll try to post pics this weekend
 
Sandpiper, your rapid fire pithy replies bring me to chuckle!

IthacaBill, my old racine seemed to have bedding compound or filler or some other schmegma applied to the stems before the canvas was tacked on. I think I might do the same, after pulling nails from the stem, the holes worry me. Might be good to smear some sort of snot (perhaps bedding compound) over them.

Thanks for the staple shopping tips! I'll use them for the sheer and tacks for the stems like you did. Makes good sense.

Sorry for the grody terminology. I'm a mechanical engineer - brain damaged by training.

Cheers,
Paul
 
Back
Top