Canvas stretching - weighted method

Baconweasel

Curious about Wooden Canoes
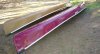
Last summer, a passer-by (a neighbour walking past my open garage while I was working) told me about a canvas stretching method he had used in the past.

Essentially, with the folded canvas suspended between two fixed points, he slipped the canoe into the canvas and then weighted the canoe using bladders of water, and then dampened the canvas to allow it to stretch better, adding more weight daily over a few days.

Has anyone heard of or tried this? Thoughts and opinions appreciated.
 
Hi;....Novel idea ... it sounds great!....My question is what happens when you stretch the canvas from each end...???? It would appear that you would need to continually add more "bladders" to compensate for the canoe wanting to rise up as the canvas is stretched front and back...Wonder what would happen!....I would think the way described in Jerry Stelmoks or Rollin Thurlows books whereby you use a plank on the floor of the canoe and then wedge three uprights in place and then do the front and rear stretch procedure would be easier and there would be no need to remove "bladders which could break when you remove them....Just a thought, but then I am not very proficient at it yet...I am having my own problems trying to stretch canvas over a transom on a wood and canvas boat...:)

"Life is not determined by how many strokes of the paddle it takes to get there-but rather in the JOY of the journey>" (Blue Viking)
 
Hi Baconweasel

I use the "weighted" method except that I use sand bags instead of water bladders and I don't wet the canvas. In my opinion, wetting the canvas is unnecessary. Using weights instead of braces from the ceiling has the anvantage that you can move the weights around. I find that it is advantageous, when doing the end quarters of a canoe, to shift the weight toward that end so that the end is pressed further into the canvas.

Doug Long
Longwood Canoes
 
Thanks!

Thanks for the feedback. The sandbag method is probably a little easier. Nice to hear that it's useful.
 
Man... only in Ottawa would you have perfect strangers stopping in to share new ways to stretch canvas.

Here in Chicago, I'd be surprised if 8 out of 10 people walking past my garage could guess whether I was working on a canoe or kayak! And the other 2 would just shrug and ask why I don't just junk the thing and buy a plastic one.
 
try this.

"...I am having my own problems trying to stretch canvas over a transom on a wood and canvas boat..."

Don't be afraid to pull a few staples and readjust. several times if needed. I canvassed a rowboat and used no stretchers, only tugging, pulling, stretching by hand. I had to pull a few staples and readjust but it all came out smooth and tight. Some transoms are different than others. I had the luxury of stapling onto the transom itself. Then it gets covered by trim.
 
Canvas stretching methods!

Thanks for posting that Dave.....I am about to start stretching canvas on a 15" w/c square stern boat that I have...On my transom there is a small cut-out around the end of the transom where I imagine you would tuck and bed the canvas at that point...the original was just bedded and painted over, but I was wondering if you would suggest a trim piece around the edge to cover that!.(As an insurace against it tearing loose or getting rubbed against.)
Thanks
 
If you can take some pictures as you do the transom and post them when done, I would be very interested. I have a wood and canvas rowboat that will be recanvased someday (after replacing several ribs, a few planks, and probably the transom -- fortunately, someone else removed the fiberglass before I got the boat), and have been considereing various ways of dealing with the transom/canvas interface.
 
Cautionary tale regarding sandbags

An aside about using the right-side-up-with-sandbag-weights canvas stretching method described by several of you. I have used this method for several years with satisfactory results, but recently ran into a snag, so to say. I was just about done fastening the canvas on a 16' Old Town and while finishing up the final end I was feeling underneath to make sure all wrinkles were stretched out and noticed a 3-inch diameter lump under the canvas. I was mystified (and horrified!) by this unfairness that had not been there before I dropped the canoe into its canvas envelope. On investigation I found that a sandbag had leaked, and sand had run into the bottom of the boat, and a good slug of it had seeped through planking cracks onto the loose canvas below! My heart sank as I envisioned pulling lots of staples and essentially starting over with the stretching process. Fortunately it proved possible to suck the sand back out through the cracks the way it had come in, using a shop vac, and I proceeded to button it up. Hopefully any residual sand (which can't be felt or seen from the outside) will do no harm. I am now considering more durable "containment vessels" for the sand.
 
Alternative to sand bags

Some of the Norumbega members have assisted Steve Lapey in his new canoe this winter and spring. When it came time to canvas, Steve employed the right-side-up method. He put in a few carpeting remnants followed by a number of cinder blocks. Worked like a charm.
 
Just getting ready to re-canvas...

I have a '46/47 Chestnut, 17'6'' or so, and it needs to be re-canvassed. I've been reading and trying to figure out the best way to do it, but I seem to have trouble envisioning stretching the canvas about the ends... and around the rest of the craft as well, in all honesty. Is there a special trick to accomplish this feat without cutting the canvas? I'm going to try and get a book on the whole procedure, but would like to know which is would be the most helpful.
Please and thank you.
 
Knehdn,

I rented this video:
http://www.woodenboatstore.com/prodinfo.asp?number=350-R45S

It's over 3 hours long, and on tape 2 Alex extensively covers, step by step, the canvassing of a canoe. It's exactly what you're working for, if you don't have someone else step in and show you in person. It's really cool, and note that I linked to the rental version. You can also opt to buy it.
 
Photos.

knehdn:

If all goes as planned, I will be canvasing this weekend. I'll take lots of pictures and post them somewhere where you can find them.
 
Canvas Complete

Well, with the able assistance of fellow Norumbega member Steve Lapey, Pa's Guide got new skin. Many thanks Steve!

I learned a few things today. 1. My garage is not long enough to canvas an 18 foot canoe Right Side Up. :rolleyes:

So after spending awhile working through various rigging scenarios, we settled on the Upside Down Method.:p

Just to throw in something here. Once we got the rig squared away - which didn't take long and mostly involved me running around looking for various tools etc., Steve and I canvased this canoe in maybe a little more than 1 hour....Okay you dacron affectionados...beat that with your steam iron!.. :D ;) (dig=kidding).

knehdn - As promised there are some canvasing photos here:

http://community.webshots.com/album/548825755BQjPZI

But I maxed out my webshots account:mad: , so there isn't much detail. Post or email if you have questions.:cool:

Fitz

PS: We experimented with a new skin material today. Something from the rare jungle "kevlar" tree. We found it tough to work with but light.....:cool:

Kidding:D - We are racing these tomorrow at the Run of the Charles. Son Brendan washed them up and he was very impressed because he can "portage" them alone at age 7.:rolleyes:

I promise to bring him around to his senses!!!:)
 

Attachments

  • Kevlar.jpg
    Kevlar.jpg
    25.9 KB · Views: 310
Last edited:
Back
Top