Beginning my first restoration of a gifted Old Town Canoe #110905

CanoeNewbie

New Member
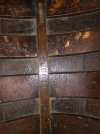
Beginning restoration of this gifted canoe. Seems to be in pretty good condition beside new canvasing, broken seat, and light sanding/varnishing. Found this forum and will be eagerly researching and asking questions about the process!! Believe this is a mid 1930s canoe based upon the rudimentary research I have already performed
 

Attachments

  • IMG_5814.jpeg
    IMG_5814.jpeg
    451 KB · Views: 143
Welcome and congratulations, the Old Town canoe with serial number 110905 is a 15 foot long, AA (or top) grade, fifty pound model with red Western cedar planking, open mahogany gunwales, mahogany decks, mahogany thwarts, mahogany seats, and a keel. It was built between December, 1931 and April, 1932. The original exterior canvas covering was painted dark green. It shipped on April 11th, 1932 to Pittsburgh, Pennsylvania. A scan showing this build record can be found below.

This scan and several hundred thousand more were created with substantial grants from the Wooden Canoe Heritage Association (WCHA) and others. A description of the project to preserve these records is available at http://www.wcha.org/catalogs/old-town/records/ if you want more details. I hope that you will donate, join, or renew your membership to the WCHA so that services like this can continue. See https://www.woodencanoe.org/about to learn more about the WCHA and https://www.woodencanoe.org/shop to donate or renew.

It is also possible that you could have another number or manufacturer if this description doesn't match the canoe. Feel free to reply here if you have any other questions. Good luck with the project,

Benson


OTC-110905.gif
 
Your new varnish will only be as good as the old stuff underneath. I recommend stripping the old varnish and starting new.
With new canvas coming soon. Now is the only time that you’ll be able to do that.
 
  • Like
Reactions: MGC
I agree with Todd. More pictures so everyone can see the condition and offer appropriate advice.
Doing canvas and varnish at the same time is good, because a stripper like Citristrip uses a water rinse, and with the canvas off the water can drain through the hull. A lot easier that way.
This canoe is only 8 years shy of 100, so a full rehab may be the way to go.
Whatever you decide, there is lots of good info on these forums!
 
I'd also lean towards a strip before canvasing. You can see there is quite a build up of old varnish and also some signs that it has flaked down to the bare wood. I don't think sanding will suffice.
You will lose that nice patina, but the wood will look stunning with fresh varnish on it and it will be properly protected for many more years of service.
Strip, TSP, Teak-Nu, Epifanes.........
 
And plan now for a trip to the Adks for the WCHA Assembly the third week in July. You will see beautiful canoes and lots of people to offer advice on your project. There are no short cuts to getting it correctly restored. Dismantle, remove seats and replace thwarts with temporary ones, Strip, repair the broken and rotted stuff, sand, sand some more, sand some more, varnish, sand, varnish, sand.....canvas, filler, sand, primer, sand, paint etc. You get the idea.
Good luck with your project and have fun.
Jim
 
Hello everybody. Sorry for the lack of response and updates. Unfortunately life and family took precedent and placed the restoration project further down my "To Do" list. Now that life has stabilized, I can begin buying the supplies and tools necessary to tackle this project. I have attached some pictures of the canoe in its current condition. I know I have a broken outwale, a broken seat (both frame and cane), a break where the thwart attaches to the inwale, and a hole in the canvas. The rest of the canoe appears to be in decent shape, no rot detected thus far.

I am a fairly decent woodworker, but still would welcome any and all suggestions in fixing the broken gunnels and fixing/replacing the broken seat.

I have been watching tons of Youtube videos on stretching new canvas over the hull and keel. I am not sure if I have the space to set up a come-along to properly stretch the canvas as they do in the videos. Does anyone have any alternative suggestions, or may know of a restorer in the North Carolina area?
tempImageZDSQQe.jpg
tempImageBDLIvf.jpg
tempImage0IheIX.jpg
tempImageAQ8SkC.jpg
tempImageJPrVy6.jpg
tempImageFopRf5.jpg
tempImageNxw8Bh.jpg
tempImageC04UZs.jpg
tempImage48ltKT.jpg
 
Other then read the books and suggests made here,
if it were me, being that it is a AA grade with all that nice mahogany,
I would try to save as much of it as I could, using minimal replacement wood and careful scarf joints.
And you won't really know how much to replace until it's stripped.
Good luck and have fun,
Dan
 
You can get creative with a stretching rig.
I’ve done it between trees, trucks, a post and a picnic table with people sitting on it for weight, etc.
I would advise stretching in low humidity. I’ve had issues with canvas becoming loose after stretching in high humidity outside.
Your canoe will swell ever so slightly in higher humidity and if you canvas it at that point tha canvas can become loose when the canoe shrinks.
 
Now that I have experience with Dacron, I feel like I can offer an opinion. Canvas is far more forgiving and, in many ways, easier to deal with, and especially on an old canoe. Dacron is super fussy and shows every imperfection of the hull. Since I do not like to fare heavily and prefer to leave the wood as is, I prefer canvas. Not to say I don't like Dacron. It is light, goes on fairly quickly and it is a faster process than traditional canvas and filler. I just think it is better suited for a nice smooth new hull.
I'm with Dan on the wood. I prefer original wood with a properly spliced repair. The old Mahagony is worth saving.
And Dave is correct about creative stretching. I go diagonally corner to corner in my garage with smaller canoes, but a 20 has to go between the hitch on my truck and a tree.
 
Thank you for all the great info!!! 2 questions that have popped into my head as I read all your replies

1) some of you have talked about splicing the breaks in the outwale and inwale, and I assume the break in the seat. If I mitre the ends at 45 degrees and butt the joints, then the gunnels will be too short. So should I then buy mahogany and splice a small piece of mahogany where those breaks are? And do something similar to the seat, and then shape the wood?

2) can someone take a picture of their setup for the canvas? I picture in my head building a 2 piece wooden clamp with an Eye bolt. I can then attach a heavy duty ratchet strap to the eye bolt, then attach the other end to my vehicle. Then use the ratchet to stretch the canvas.
 
There will be other opinions. I'm a bit of a crude woodworker, but my engineering background forces me to do all kinds of crazy mental gymnastics when I splice something. For a rail that supports a thwart, I want my spliced piece to be quite long and I also want the angles to be very shallow. On one I did recently, I added a piece that was about 30 inches long to fix a break. My splices were about 4 inches long, each. The piece I spliced in was cut to match the shape of the original rail and then I formed it before I cut the tapers. I made a small form to bend the piece before I installed it. You can take a line off of the other rail to make your form, assuming it is true. Remember that whatever shape it dries to will probably spring back a bit. Take that into consideration when you make the form. Over-bend it. I suppose you could make the piece more simply with a table saw and a belt sander?
When I cut the tapers, I did the cut on the boat and cut the original and new piece at the same time. I used a hand saw to make the cuts. I left the splice a bit long (like about one tenth) and then massage it to fit before gluing it in place. I snuck a few small dowels in place from the outside to help hold the position while it cured. I used G-Flex, but I suppose a lot of people might use TB3 for that same repair. I like the G-Flex because of the strength of the bond, but also because it has such a slow cure time. If I decide to get fussy once all of my pieces and clamps are in place it allows me to fiddle.
The break near the deck is a bit easier repair. You can splice in a shorter piece there since the deck gets screwed in place. That will hold things together without all of the load on the rail that a thwart delivers. I would still use a nice long taper there.
For the seat, I would probably replace that board, but a splice would save the original wood, which is gorgeous!

My stretching set up is pretty hokey. Eyebolts, two by 4's, a come along. I may have some pictures.....Your question introduces an opportunity to discuss the other way that canvasing is done. There are a lot of folks doing the job on sawhorses, upside down. I haven't tried that....
1756070598767.jpeg

1756070753500.jpeg
 
Last edited:
There is a way to stretch the canvas without a come a long. I no longer us the come a long. The Quiet Adventure Symposium i E. Lansing has been having canvassing demos that way for years. First by Gil and now by me. Canvassing is one of the easier things to do actually, it just seems difficutlt if you've not done it before.
 
Back
Top