Paul Scheuer
LOVES Wooden Canoes
Hi. I am re-activating my repair efforts on my Morris after a long period of other stuff. What I'm doing now are small sub projects that I can do with limited shop space.
The boat has been identified as a Morris, but I can't prove that with documentation or name plate.
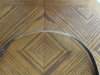
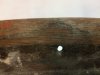
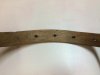
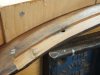
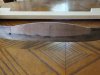
My current project is the repair of both forward and aft deck coamings that have a small section broken off and lost from the top of each. I think I can post pics. (I'll see). The break in the 1/4 in. mahogany is not exactly horizontal since it followed the grain. (pic 1)
The repair sequence on the fwd coaming has been as follows:
The general plan was to laminate mahogany to replace the missing wood.
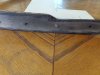
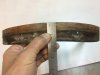
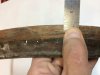
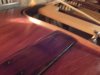
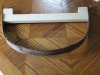
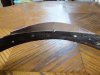
I cut a 3/32" rabbet in the forward face to allow for additional glue surface at what is apparently a stress point.
The rabbet was about 3/4" wide. (pics 2 & 3)
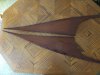
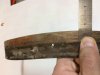
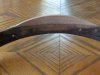
I oriented the forward lamination with the grain perpendicular to the joint, using four sections approx. 2-1/2" wide.
The center and aft lamination have the grain oriented horizontally. I used two layers so I wouldn't have to steam.
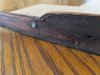
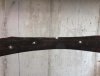
Where I stand today is that I have the new wood in place with only a rough trimming. (pics 5 & 6) (SEE POST BELOW)
I need to arrive at a final shape for the top edge of the added wood.
The question will be what the original shape of the top edge should be..
The residual bedding material/varnish showing on the removed coaming appears to show that the front surface of the top edge of the coaming was exposed above the deck by 7/32" (9.5 mm) at the "tails". The narrower dimension at the tails extends aft of the tails of the deck (pic 9), and was even with the top of the inwales. (pics 8 & 10). The "as removed" coamings show that the bottom edges were slightly exposed below the inwales and deck-frame knees. (SEE POST BELOW)
The deck battens are just under 7/32".
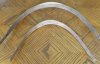
What I need to know is; does the top edge of the coaming follow the athwartship arc of the deck and how far above the deck batten does it extend. From what remains of the coamings, it appears that the top and bottom edges are not parallel.
I had previously replaced the deck-frame knees, so I don't have the screw holes, except for the two aft-most on both tails, to help me align the pieces. I did keep the removed knees, if I need them.
The boat has been identified as a Morris, but I can't prove that with documentation or name plate.
My current project is the repair of both forward and aft deck coamings that have a small section broken off and lost from the top of each. I think I can post pics. (I'll see). The break in the 1/4 in. mahogany is not exactly horizontal since it followed the grain. (pic 1)
The repair sequence on the fwd coaming has been as follows:
The general plan was to laminate mahogany to replace the missing wood.
I cut a 3/32" rabbet in the forward face to allow for additional glue surface at what is apparently a stress point.
The rabbet was about 3/4" wide. (pics 2 & 3)
I oriented the forward lamination with the grain perpendicular to the joint, using four sections approx. 2-1/2" wide.
The center and aft lamination have the grain oriented horizontally. I used two layers so I wouldn't have to steam.
Where I stand today is that I have the new wood in place with only a rough trimming. (pics 5 & 6) (SEE POST BELOW)
I need to arrive at a final shape for the top edge of the added wood.
The question will be what the original shape of the top edge should be..
The residual bedding material/varnish showing on the removed coaming appears to show that the front surface of the top edge of the coaming was exposed above the deck by 7/32" (9.5 mm) at the "tails". The narrower dimension at the tails extends aft of the tails of the deck (pic 9), and was even with the top of the inwales. (pics 8 & 10). The "as removed" coamings show that the bottom edges were slightly exposed below the inwales and deck-frame knees. (SEE POST BELOW)
The deck battens are just under 7/32".
What I need to know is; does the top edge of the coaming follow the athwartship arc of the deck and how far above the deck batten does it extend. From what remains of the coamings, it appears that the top and bottom edges are not parallel.
I had previously replaced the deck-frame knees, so I don't have the screw holes, except for the two aft-most on both tails, to help me align the pieces. I did keep the removed knees, if I need them.
Attachments
-
 1 FWD Coaming Break aft view.jpg73.5 KB · Views: 313
 -
 2 FWD Coaming rabbit Close.jpg76.3 KB · Views: 311
 -
 3 FWD Coaming Rabbit Full View.jpg119.4 KB · Views: 314
 -
 4 FWD Coaming FWD Lamination.jpg103.5 KB · Views: 311
 -
 5 FWD Coaming All Lamination Aft View.jpg107.3 KB · Views: 311
 -
 6 FWD Coaming All Lamination 2 Fwd View.jpg94 KB · Views: 300
Last edited: