An English Birchbark Canoe

The pictures on the river are eerie!
If anyone saw you paddling this ancient canoe at the crack of dawn, they must have thought they somehow slipped back in time...
 
Over the last couple of weeks transatlantic communication lines between Henri and myself have been busy the principal topic of conversation being resin/gum.

Henri uses a pine resin based gum and offered to get some to me here in the UK from New Hampshire. Sadly UPS and USPS shipping rules along with UK import regulations thwarted that plan so we were looking for a Plan B or C. The gum was used where the bark had been stitched, gores cut in the sides and at the stems. In his building process Henri tapes and seals the joints both on the inside (between the bark and the sheathing) and the outside. A disadvantage of traditional gums is that during hot weather they soften and run off and when cold can go brittle. Some have moved away from traditional gum to more modern tars, caulks and sealants which are far more durable with greater longevity.

So I thought I would go down both routes. Firstly, using a syringe usually used to administer childs medicine, I applied a fine 2mm bead of highly flexible and waterproof roofing shingle adhesive along the gore cuts which were visible. this was pushed into the gap to fill and bridge it. It is a material which both stretches but also compresses. Using a flat blade fitted to my solering iron I found that I could soften the original gum, manipulate it and smooth it back into place. I tidied up the stems and then eased the traditional gum back into place over a gores and the bead which was now dry. I have only done one so far as wished to experiment with the process.

This is the flat blade on the soldering iron
IMG_1408.jpeg


This is the gum on the stems which I have flattened out with the warm iron. Note it is lighter in colour.

IMG_1407.jpeg


This is a gore cut to which a bead was applied and the original resin heated and eased over. Note that it is all much darker i colour.
IMG_1412 2.jpeg


In some areas on the gores there has been a greater loss of the original gum which I will need to supplement. I found some pitch pine glue for sale on a bushcrafting site here in the UK so ordered a sample; it arrived in hard ,very dark blocks. I have also found online some pine resin which I have ordered. Henri has confirmed that it is just like what he used.
Whilst the pitch pine is already mixed and tempered and just needs to be reactivated by heat, the pine resin will need to be mixed with some fat and tempered. Henri has said that he will let me have his mixture ratio. I suspect I will end up using a bit of both. On the stems and where applied thinly, the original gum is a mid to dark brown whilst whre it is thicker on the gores it is closer to black.

Below is the pine resin which I have ordered.

IMG_4288.jpg

All of the work which I am proposing is a "bolt and braces" exercise. It will not only add to the watertightness of these details but will also keep the aesthetics correct.

It's now just a waiting game for the resin to arrive and the weather and garage to warm up a bit!

Nick
 
Last edited:
The resin arrived.
IMG_1444.jpeg


I ordered 250g (9oz) which cost me £30. Henri asked me to het a sample up so that he could see what colour it would turn out, I heated it in a white tin mug so that the colour would be accurate. It went a nice mellow toffee colour and when it cooled I chiselled it out of the mug.


IMG_1449.jpeg


IMG_1451.jpeg

Hopefully Henri can now work out the rest of the ingredients and quantities for me. I have two other birchbark canoe owners here in the UK watching with interest what I achieve so that they can follow suit ................or not!


Nick
 
IT"S NOT ROCKET SCIENCE! : Now that the resin had arrived I had an hour long chat with Henri about how to mix the gum and what ingredients were needed along with the method. Mixed with the resin could be either vegetable shortening (Trex) or rendered pork fat (lard) Some I know have used bees wax. So I had all three but went for the lard.
IMG_1457.jpeg

I measured out half of the resin and put in in an old pan (this is important if you wish to save your marriage). Then I slowly heated it on a warm stove constantly stirring. I had already shaved down some pitch pine resin from some blocks as I would add this to give me a darker brown colour.
IMG_1458.jpeg

Here's the powder in the pan
IMG_1459.jpeg

Slowly it starts to melt like caramel
IMG_1461.jpeg

Until you get this..
IMG_1464.jpeg

I cut the lard up into small blocks first adding 12.5g to 125g of resin. I stirred it through and then took a bit of the mixture on a spoon and dropped it into cold water. It set but was still quite brittle. So I put the sample piece back in the pan, remelted it and added another 12.5 g of fat. Mixed through and repeated the exercise. This time the gum when tempered satyed quite pliable. I then added 5g more resin powder and tried again. This time the gum set to the state that it would just take a fingernail. Working on the basis that the kitchen is 21 degrees C I was happy with that. It will harden better on the canoe outside. If its still too soft or too hard I will simply add more resin or more lard.

IMG_1466.jpeg


I gave it a blast of heat and poured it into a tin mug ready for use. 250g of resin will give me about a mug full of gum but Henri and I don't think that my canoe will need that much.

The tempering bowl
IMG_1463.jpeg


The finished gum all coloured and the reason why you don't use the best pan! Angelika is out so I will hide the evidence in the garage but there's no quick way of getting rid of the smell in the kitchen!
IMG_1467.jpeg

So I ended up using 130g of resin, 25g of pork fat lard and a bit of ground pitch pine gum to colour. I will make another batch of a lighter shade as Henri used some on the bark to fill minor imperfections and these areas are far lighter in colour than the gores and stem areas. When the weather warms up I can go and remelt what I have made, apply and smoothe it. If it's too cold Henri says that it will set too quickly and you end up doing only an inch or so at a time. Cold and temperatures are all relative; what's cold in the UK may be a barmy temperature in Greenville New Hampshire!

I can confirm that no bears were harmed in this lastest escapade!

Nick
 
The big golden thing in the sky arrived in the UK today so that gave an opportunity to get on with the birchbark as the temperature reached a barmy 17 C ( 62F in old money) which would make it easier to apply the gum which I had made up previously. I was going to hit the gores and the stems today.

Firstly I dropped the canoe down from the rafters and got all the gear ready on a table outside just in case of a flare up! I used Angelikas best non stick pan , a wooden spoon and heated it up on a camping stove.

P2250004.jpeg


My gum was still quite light in colour so I added some more pitch pine resin to it to darken it down. I kept some back as I will use a lighter shade for small areas on the bark.
P2250005.jpeg

This is what the gores looked like before I started.
P2250002.jpeg

This is an area on the bark where the reserved, light gum will be added.
P2250001.jpeg

I heated the gum up and got it nice and runny before taking it off the heat and letting it cool until it would run off the spoon like treacle and starting at the top of each gore I ran it into the joint. Of course at one point I splashed myself and it's remarkable how quickly hot gum can remove skin and flesh! There is also a delayed reaction between eye and brain when you are watching your flesh sizzle and do nothing about it...ho hum.
P2250006.jpeg

Henri had suggested spitting on my thumb and rubbing the gum into the gores; I opted not to burn myself further so used a leather iron. I heated this up and then took the power off and let it cool slightly before applying it to the new and old gum which melted nicely into each other and with some pressure, a smooth finish was achieved.
IMG_1507.jpeg

IMG_1506.jpeg

Uing the iron has at least enabled me to maintain my thumb and finger prints which I suspect many birchbark canoe builders now lack.

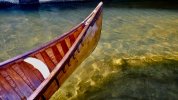
Here are the smoothed and finished gores
P2250007.jpeg

I then moved onto the stems. The front was generally good so I just smoothed that with some heat whilst at the stern I dribbled some gum down, mixed it with the original and got a good coverage over the cloth which Henri had used.
P2250010.jpeg


So after a couple of hours the gores and stems were done. I then went over and melted and spread some of the lighter bark patches; I will add some more light coloured gum to those and the areas over the next day or so as the temperature is predicted to stay at similar levels.
P2250011.jpeg

Once I have finished the gum I will replace the missing root bindings at the prows. I am not happy with the cane I tried so am going down the road of using some leather cord which I found and which should look good and do the job.

IMG_1509.jpeg

IMG_1510.jpeg

This is the leather cord which I found.
IMG_1511.jpeg


That's all for now. I'm off to make friends with the pot of Sudocrem...........You plonker Nick!
IMG_1508.jpeg
 
Back
Top