Nymph Canoe

Fitz

Wooden Canoes are in the Blood
In Memoriam
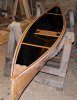
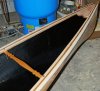
Introducing my winter project: Nick Schade's Nymph Canoe featured in WoodenBoat Number 199 and 200 in Nov./Dec. 2007 and Jan./Feb 2008. It is a small, lightweight, double paddle canoe. I'm building it for my mother to use during the summer in Maine.

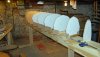
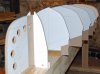
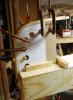
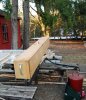
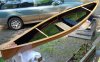
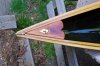
I saw Nick's version at the WoodenBoat Show two years ago and got the urge to try it. His is a 10 ft. version. I decided to stretch mine to 12 feet, which Nick suggests is doable, and see how it goes. Eventually, the cats let me loft it up and here is my progress. I still have to add the stem forms and line everything up. Then I have to decide what wood to build it with.

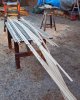
I have not built a stripper before, so this should be fun. I'll keep you posted.
 

Attachments

  • CatImpedingProgress.jpg
    CatImpedingProgress.jpg
    433.9 KB · Views: 698
  • NymphForm.jpg
    NymphForm.jpg
    372.6 KB · Views: 741
Progress Report

The form is all done and aligned. The strips are milled. The stems are bent and glued. I used northern white cedar to laminate the inner stems and bent them with hot water. I will likely bend solid ash stems for the outer stems.

I should be doing up the hull soon.

Fitz
 

Attachments

  • FormFinished.jpg
    FormFinished.jpg
    411 KB · Views: 708
  • Strips.jpg
    Strips.jpg
    300.5 KB · Views: 656
  • StemBent2.jpg
    StemBent2.jpg
    372.2 KB · Views: 661
Looking great! Keep us posted on the build. One of these days I'm gonna build a canoe that doesn't take an armada of friends to paddle.....looks like a really cool design.
 
Nymph

Fitz,

What kind of arrangement did you make to remove the forms from the strongback after you finish stripping the canoe?

Norm
 
Form Removal

Very good question!!

I have thought of this though. The tumblehome is gonna hang up. The only way to do it is to remove/unscrew each station (this will be a chore) and flip it off the strong back. I have used masking tape along the edge of each station so the glue will stick less. From what I know, I may need a rubber mallet to remove the stations from the hull.
 
Nymph

When Todd Bradshaw and I were building strippers, we bolted the forms all the way through the strongback, instead of screwing them down to the strongback. When we were done stripping, sanding, and glassing, we could flip it over and unbolt the strongback easily.

You're right, then you need some gentle taps from a rubber mallet to free each of the forms from the strips. But if you've masked the forms well, the glue should not stick to the forms and they pop right out. It's an anti-magical moment, going from the beauty of the sanded and finished exterior to the horrors of the unfinished interior.

Norm
 
Access

Thanks Norm. I am going to take one more look at the forms and make sure I have access to remove them when the hull is stripped up. The box beam is hollow, so I may be able to get in there and bolt the forms on for easier access.

Fitz.
 
Access

Bolts are a lot easier than trying to remove screws that are upside down, underneath a strongback, and that you can't see. And, of course, one or five of those screws will strip...

Thanks for posting the link to the John McPhee interview. He's one of the best literary journalists of all time. I know him and I've written about him quite a lot in my career as a college professor. As you see in the interview, talking to McPhee is about the same as reading him. His voice in print is the same as his voice in person.

Norm
 
Very good question!!

I have thought of this though. The tumblehome is gonna hang up. The only way to do it is to remove/unscrew each station (this will be a chore) and flip it off the strong back. I have used masking tape along the edge of each station so the glue will stick less. From what I know, I may need a rubber mallet to remove the stations from the hull.

May I humbly suggest using "packing tape" rather than masking tape?
Glue might stick pretty well to the masking tape, especially where it manages to get through staple holes (if you're using them).
 
Tape

Rob:

I kinda used the terms "masking tape" generically. It is actually the green 3M high tack tape. I have seen other folks use it on the form and I plan to use it elsewhere in the project, so it is what I had on hand.

Cheers,

Fitz
 
May I humbly suggest using "packing tape" rather than masking tape?
Glue might stick pretty well to the masking tape, especially where it manages to get through staple holes (if you're using them).

We've discovered that we like to use the fiberglass-reinforced packing tape. Masking tape is OK, but tears when staples are removed and can lead to the boat sticking to the forms a bit when you're 'glassing. Plain packing tape suffers from the same issue. The stuff with the lines of fiberglass running through it seems to be much better.

Lay it carefully to avoid wrinkles!
 
Stripping

Well, after a hiatus of sorts, I got a few strips on today. The tumblehome area is cherry, the rest of the canoe will be Atlantic white cedar.
 

Attachments

  • Stripping2.jpg
    Stripping2.jpg
    417 KB · Views: 599
Gaining some.

Status:

2269319650054321892S600x600Q85.jpg


I may make a spring deadline yet.

Fitz.
 
I dunno why I deal with this

messy epoxy stuff, (makes leaded filler look like a cake walk), but it is working out okay.

This is "hybrid" kevlar/carbon fiber going on the inside. Now, if it could only generate its own solar power....:D

I'm a bit worried that this canoe might just be a tad bit too racy for Grandma...:eek:
 

Attachments

  • KevlarGlass.jpg
    KevlarGlass.jpg
    423 KB · Views: 619
Steam Bent Stem Strips

I decided to laminate the outer stems with ash strips. The strips are only 1/8 inch thick, but I didn't think I could coax them to take the shape of the stem without a little steam. Once they dry for awhile, I'll glue them up.
 

Attachments

  • SteamBentStemStrips2.jpg
    SteamBentStemStrips2.jpg
    379.5 KB · Views: 607
  • SteamBox.jpg
    SteamBox.jpg
    398.1 KB · Views: 590
  • SteambentStemStrips.jpg
    SteambentStemStrips.jpg
    350.7 KB · Views: 571
Getting There.

I gotta mount the seat in the bottom somehow and then do the sanding/varnish repeat process for the entire boat, but it is getting there. Launch just in time for Mother's Day??:cool:
 

Attachments

  • CanoeNearDone.jpg
    CanoeNearDone.jpg
    468.1 KB · Views: 702
  • BowEdit.jpg
    BowEdit.jpg
    343.5 KB · Views: 611
I'm calling this one done. I may get a chance on Monday to give it a Test Paddle.
 

Attachments

  • NymphCanoeFinished6.jpg
    NymphCanoeFinished6.jpg
    339.2 KB · Views: 1,132
  • NymphCanoeFinished.jpg
    NymphCanoeFinished.jpg
    412.8 KB · Views: 676
  • NymphCanoeFinished5.jpg
    NymphCanoeFinished5.jpg
    405.7 KB · Views: 759
  • NymphCanoeFinished8.jpg
    NymphCanoeFinished8.jpg
    329.7 KB · Views: 614
Last edited:
Nice! Really Nice. Very pretty boat. Let us know how it paddles and post a picture of it on the water.
 
Weight

Thanks Jim.

I forgot to mention, it is a little on the heavy side. With all the hardwood trim, brass, extra unnecessary epoxy this 12 footer weighs in at 30.6 pounds on the bathroom scale.

I wasn't and I'm not really concerned about weight, but I was thinking it may be closer to 25 pounds.

Fitz.
 
Back
Top