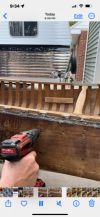
HI Folks, I'm currently on a restoration project that requires inner & outer outwale replacement. Inner outwale replacement requires removing some planking. How hard can that be? I soon discovered. After 30 minutes, I had 20 tackes removed using a tack puller. I was being careful, but still had more damage than I wanted. I checked out previous forum comments regarding the topic. With a little adjustment I came up with something that worked well for me. I used a 1/4" plug cutter, which fits perfectly over the brass tacks. Just a brief pulse of the drill provided just enough depth where the tack puller could grab the tack head. I ground the tack puller forks down to a sharp edge. This worked so well that I removed all the necessary planks on the entire canoe in 1-1/2 hours. Yes, there is a divot, but there's less damage, and the divot can be filled with fairing compound and sanded smooth prior to canvassing. Hope this helps.
You are using an out of date browser. It may not display this or other websites correctly.
You should upgrade or use an alternative browser.
You should upgrade or use an alternative browser.
Tack Removal
- Thread starter Carlton
- Start date

Worth Gretter
LOVES Wooden Canoes
Looks like a good method. But I have a different question. I see you have seat risers, and I am planning on using them in my restoration. In your case, are they attached to the ribs with screws from the outside, through the planking and ribs? If so, before or after canvas?
Thanks.
-Worth
Thanks.
-Worth
Michael Grace
Lifetime Member
Worth - on canoes I've restored that have wooden cleats to support the seats (original to each canoe), the cleats are attached with screws from the outside through planking and ribs and into the cleat. On cedar-canvas canoes, the risers are screwed into place before canvasing. Hope this helps.
Worth Gretter
LOVES Wooden Canoes
Michael-
That's what I thought. But I wondered because a recent thread had other options. So I am trying to consider all possibilities.
-Worth
 forums.wcha.org
That's what I thought. But I wondered because a recent thread had other options. So I am trying to consider all possibilities.
-Worth
Canvas Repair
Glen, I normally I take great care in all projects I do but this one got away from me. Thanks for your response and well wishes. Mike, Hopefully I will be able to hone my Wood/Canvas skills whether it be building new, restoring old or repairing. I have one in the wings that I will do a few...
Michael Grace
Lifetime Member
This method just makes sense on cedar-canvas because you're not drilling through the canvas and relying only on the head of the screw to seal up the hole. Regarding direction of the screw, specially with hardwood cleats, the holding power of screws will be significantly greater if the screws go from the outside of the hull, through planking and ribs, and then into the cleat (rather than the other direction). A variety of historic builders used this technique, so it is tried and true.
Michael Grace
Lifetime Member
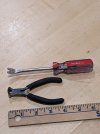
Sorry for the tangent, Carlton. Another tool that will cause less damage to your planking is a mini pry bar. Here's one example:
Grinding the ends to make them thinner helps even more so that with care tacks can be removed without significant damage to planking. Sometimes tacks are set very deep and some damage is unavoidable.
Grinding the ends to make them thinner helps even more so that with care tacks can be removed without significant damage to planking. Sometimes tacks are set very deep and some damage is unavoidable.
Worth Gretter
LOVES Wooden Canoes
I have been using a sharpened tack remover to dig into the wood just enough to then grab the tack head with a mini end cutter, or "nipper". This one is only about 3 inches long and has rounded ends so I can rock it side-to-side to see which way the tack will pull easier, depending on which way it turned when it was clinched originally.
To add one cent: No substitute for the sharpened puller. And I found even more helpful to get the thinnest putty knife to keep under the puller as the plank protector. It provides complete wide area for the puller to go where it is best to pull and does not rock on the round back end of a pry bar which can leave a nice valley in the plank if the tack resists.
Have fun.
Have fun.
Worth Gretter
LOVES Wooden Canoes
I like the putty blade idea!
MGC
Scrapmaker
I have been happy with one of these Vaughn style pullers. Rollin sells them. I have ground both ends down for finer entry. It does minimal damage to the planking. I always put a putty knife blade under it to protect the planking.
If the canoe has been glassed there will probably be resin filling the planking around the tack heads. I pick that out with a sharp but crappy old knife before trying to remove the tacks.
If a rib is being replaced there is really no reason to be cautious with the tack removal. In that case I use an old 3/8 wood auger bit on the inside to snap the ends of the tacks of. They pull out without any trouble when the clinch is gone.
Andre Cloutier
Firestarter. Wicked Firestarter.
What Mike said above. Have used one of these for over a decade. Best out there imho

Worth Gretter
LOVES Wooden Canoes
MGC
Scrapmaker
Exactly that one.....What Mike said above. Have used one of these for over a decade. Best out there imho
View attachment 54286
With a bit of judicious massaging.
Michael Grace
Lifetime Member
Hi Mike - I've seen this tool recommended in the past but haven't tried it because the ends look so bulky. The little mini-pry bars have flattened ends that are thin, and I grind them even thinner. This makes it very easy to get under the head of the tack. It's almost like a knife blade. How do you get the head of the Vaughn-style puller under a tack head? Always interesting to learn about new tools and techniques.
Rod Tait (Orca Boats)
Designer/Builder
I take it you are trying to save the planking and re-install. I just rip the old planking off, pull the tacks with a bit if a twist so as not to damage the ribs inside and then put new planking on.
MGC
Scrapmaker
The end is indeed "bulky". Hence the need to "massage" it a bit. I have a skate sharpener in my shop that is essentially an industrial grinder turned vertical. I used the carborundum wheel to alter the head of the tool so that it is narrower and thinner. Unlike other available tools, this modified tool can be carefully shoved just under the head of the tack. This works especially well if the tacks are not deeply bedded, but also extremely well for tacks that received a Walter Walker whack. I have a shop full of other tools that I've tried but none work as well as this one.Hi Mike - I've seen this tool recommended in the past but haven't tried it because the ends look so bulky. The little mini-pry bars have flattened ends that are thin, and I grind them even thinner. This makes it very easy to get under the head of the tack. It's almost like a knife blade. How do you get the head of the Vaughn-style puller under a tack head? Always interesting to learn about new tools and techniques.
Hmm....yes, almost always on old boats. I hate putting new wood in to replace the old if the old is good and can be saved. No amount of skilled/judicious staining or blending will hide replacement wood. I only use fresh wood as a last resort. I save all bits of old planking that I remove and reuse these when I need an old piece to blend. There isn't much that I throw away.I take it you are trying to save the planking and re-install. I just rip the old planking off, pull the tacks with a bit if a twist so as not to damage the ribs inside and then put new planking on.
Newer canoes I don't worry too much about but anything 100 plus years old, I go out of my way to save as much as possible.
Keep in mind, I do this as a hobby. If something that could be done in an hour takes me a week so that I can satisfy my anal tendencies, it's going to take a week, possibly two. I get pleasure from making as much of my work vanish as I possibly can. When I get done with a boat, I don't want anyone to be able to see what I did to it. It does not always work that way, but that's the end game.
Last edited:
Rob Stevens
Wooden Canoes are in the Blood

Michael Grace
Lifetime Member
I use and enjoy those too, Rob, but the one I use most is the little mini pry bar. I grind its end even thinner than it comes, and do the same with the upholsterer's tack pullers. The very flat ends are great for getting under the heads of tacks. The mini pry bar's two different ends (like the Vaughn) gives you two different fulcrums, which helps. I'd love to see what a ground-down Vaughn's end looks like. After using a flat tool for so long it's hard to imagine how that end gets under the head of a tack. By the way, I also use the putty knife or another thin piece of metal as a backer between the tool and planking - makes a big difference.
If anyone reading this hasn't dealt with this issue and wonders why so much attention is paid to such a seemingly simple task as pulling old tacks, just try it and you'll understand. Getting tacks out without too much damage to planking takes some skill and good tools. But with practice, the tedious chore of tack removal can become surprisingly efficient.
By the way, I'm with Mike - I try to save everything possible when doing a restoration, and parts that must come out hopefully come out as intact as possible so they can be used as needed in other restorations. These are canoes that are either nice historic examples or they are someone's family heirlooms. There is rarely any ripping out and replacement, but that approach makes sense on utilitarian canoes that just need to get back out there. Maybe I spend too much time (in some eyes), but like you, Mike, I want to see as little evidence of repair and replacement as possible. I'm working on a 1922 17' Carleton, a fairly standard CS-grade sponson canoe that iis a very well-used family heirloom. The bow sailing seat was literally in about 12 pieces with a hunk of pine plus iron nails and screws barely holding it all together. Perhaps I should have just built a new seat frame, but I thought "Why not try?" and proceeded to piece it all back into a proper, functional seat. It turned out even better than expected, it retains lots of historic character, and the owner is extremely pleased.
MGC
Scrapmaker
I'd love to see what a ground-down Vaughn's end looks like. After using a flat tool for so long it's hard to imagine how that end gets under the head of a tack. By the way, I also use the putty knife or another thin piece of metal as a backer between the tool and planking - makes a big difference.
Michael, I am currently in Idaho with my fingers crossed that I will have an opportunity to send an arrow flying else I'd run down into my shop and snap a picture of that tool. I will when I get back to New York towards the end of the month.I try to save everything possible when doing a restoration, and parts that must come out hopefully come out as intact as possible so they can be used as needed in other restorations.
Of all the scraps that I have saved, the one "collection" that seems to keep growing and not getting re-used are old, damaged seats. They end up as patterns as I often end up making new ones. Every now and then they contribute a piece of weathered wood. Saving a wrecked seat is ambitious but I completely understand. That Rushton Ontario with replacement Essex seats makes me want to cry. Of course, that is only one of the most obvious problems with that boat....polyurethane is nasty stuff.
Rod Tait (Orca Boats)
Designer/Builder
I do try to save planking as well, but as a business, time is money. I can not justify spending twice as long to fix something when I could have replaced it for less than half the price. Labor is always the most expensive part of any project. Heck, I have told many people I can build a new one for less than some of the old boats I have repaired.Keep in mind, I do this as a hobby. If something that could be done in an hour takes me a week so that I can satisfy my anal tendencies, it's going to take a week, possibly two.