Morris rib replacement

ticonderoga

"Just one more"
I am at the stage of replacing some ribs in my closed gunwale Morris and have a few questions about the process as it is different from the open gunwale construction I am used to with my Old Towns.
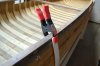
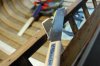
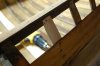
The inner gunwale has "pockets" cut in them to accept the rib tops. This to me requires that each rib is cut to exact length to fit the depth of the "pocket" and tapered exactly to fit the width of the "pocket". Is this correct?
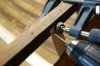
On other rib replacements that I have done, I cut the length and taper roughly, steam and bend them over the outside of the hull, let dry for 2-3 days and then tack into place and trim tops. Should I do it this way or steam, bend and install all at once to get proper placement in each "pocket" and maintain the shape of the hull?
This is my first Morris renovation and I want to get it right. Thanks for any imput/advise.
 
Rushtons are similar and I am in the same predicament somewhat with my Indian Girl. I spent a couple hours today making 14 ribs. Lucky for me the inwales are toast and so I removed them which makes my installations easier. the new inwales are temporarily clamped to the outside for the time being and I am going to install the ribs one at a time. What I'd suggest is that you do one at a time and tip it in not unlike fitting a rib into a birch bark canoe. Steam it and Bend it right in and fasten it. I wouldn't bother trying to bend them to the outside and wait for them to dry and then tilt/tip them in but you could. Just don't do them all the same time or you'll christen your canoe "The Lumpy" that's my .02 Maybe others with more experience in this will chime in.
 
The problem is getting the exact length and proper taper. Here's a straightforward method that works and doesn't require much more effort than what you've done for open gunwale canoes.

Measure carefully from the center, and then taper the rib close to what you think should be. Then bend over the outside as you've done before. Let it set and then tip it in, letting ends of the rib run up past the gunwale. You'll probably have to loosen up the sheer planks on each side by pulling some tack in that area so the rib has space to run up between the gunwale and planking. Now that you've got it inside, you can mark the perfect length to fit the pockets. Then take it out, trim it (and maybe trim up the taper too), then install it for good. Works very well and you'll get it right with no guessing. Always worked for me anyway.

Hubert
 
How many ribs do you have to do? I have a Morris with at least three ribs needing replacement (many more needing rib end restoration). I'd appreciate it if you let us know which way works best for you -- and would you post pictures of the process?

Greg
 
How many ribs do you have to do? I have a Morris with at least three ribs needing replacement (many more needing rib end restoration). I'd appreciate it if you let us know which way works best for you -- and would you post pictures of the process?

Greg

I have 8 ribs to replace and I cut them close to length (+1/2") and to correct taper today.Deer season is still open here, so it will be a week or so before there is any more progress. I will keep you up to date with which method works for me and will include photo's.
 
Well I have successfully installed new ribs into my Morris after just a little bit of trial and error! Here is the method that worked for me.
-measure length of each rib to be replaced using a string on the outside of the hull to the top of the gunwale and add 3/4". Taper the rib on both sides for last 15" and round off all edges. Mark off the center of the rib perpendicular to the long edges on the inside face. Bend the rib on the outside of the hull on opposite end of hull, one rib closer to the stem and let dry for 2 days. ( photo 1 )
* the sheer planks need to be removed to install new ribs.
-press new rib into proper location and be sure the center line is even with the adjacent keel screw holes. While keeping the rib centered, press down on one end of the rib and clamp into place once it is seated against the planking. Now do the other side and clamp. You may have to go back and forth a few times to get it perfect.
-now mark off the exact length and width of the rib top on one end. Release one clamp and shape the rib to fit the pocket. Reinstall the rib into the pocket and clamp into place. Repeat this for the other end. ( photo 2,3 ).
-once you are happy with the fit, predrill holes in the rib for attachment into the gunwale using 7/8" ring nails. ( photo 4 ). I then tacked in the top two rows of planking to prevent the rib from slippig down and coming away from the planking as I worked on the other end.
-complete the other end of the rib and tack in entire rib. It took about 25 minutes to do each rib. ( photo 5 ) DSC_0046.jpgDSC_0046.jpgDSC_0044.jpgDSC_0044.jpg
 
I'll try again with the photos.
 

Attachments

  • DSC_0044.jpg
    DSC_0044.jpg
    64.8 KB · Views: 231
  • DSC_0046.jpg
    DSC_0046.jpg
    64.4 KB · Views: 230
  • DSC_0048.jpg
    DSC_0048.jpg
    58.2 KB · Views: 239
  • DSC_0050.jpg
    DSC_0050.jpg
    58.6 KB · Views: 233
  • DSC_0052.jpg
    DSC_0052.jpg
    49.6 KB · Views: 235
Back
Top