Starting My Build Wee Too

Pantry3cow

Curious about Wooden Canoes
well on Friday I started to build my first canoe. Is a solo canoe I picked from Laughing Loon. I chose this canoe because of the weight it carries for a single paddlerand the fact my garage is only 19'. After asking questions here and there I've now started.
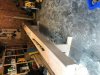
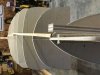
Day one was building the strong back I followed the instructions in Canoecraft and it took the better part of a day. I was taking my time and following the instructions. I found some 3/4" birch plywood at a price cheaper then 3/4 plywood and used it. I made a modification as I'm in the garage I made the two main boxes 7' long and the internal box 4 '. It is level on all areas and both directions. I did have to use leveling feet to make it so but as in the book this was to be an important step. I then marked the floor around the feet just in case it moved. I was pretty happy with the result and happy that I was able to get it level.
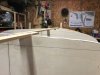
 

Attachments

  • IMG_0922.JPG
    IMG_0922.JPG
    3.9 MB · Views: 469
Ok now on to building the molds. Following the instructions I've traced out each mold onto some 1/2 plywood and that went well. I read that these were different then in canoecraft as they were to have a block screwed to the back of the mold before it was attached to the strongback allowing for the rocker. I got them cut and was able to sand them making 2 pcs as one buy screwing them together that worked well till the dog got in the way. As you can see on station 4 I have a few uneven edges. I followed the instructions and was worried that they were different then in the other info I've read re the molds and mounting. I was able to get them all straight on the strongback though my photo shows they are off I have since adjusted them and I do have a straight line. What if I'm out an 1/8' I wonder. Once I got the molds on I was feeling like, well this is work but there was a sense of satisfaction in that it looked like the plans and the books. I was able to see the shape of my canoe. I was worried about mold 5 and those uneven spots. I cut some strips and put them on as you could see and they seem to be unnoticeable at this point. Perhaps this will change once I use cove and bead strips. knowing they are there perhaps I could compensate for them when I get to real stripping.
I then cut a bunch more strips and put them on the shear line starting in the middle and then proceeded outward. I could now see the shape of the boat more. It did not look good to me so I took a break to look at some photos and read a little. When I returned I removed the strips and re did them by letting the strip fall were it would and it looks like a more gentle curve that looks much better. I guess I will have to cut in strips later on the bow and stern. As I cut ( on my table saw) about 20 strips I figured lets tack these on to see what we come up with. I was happy with what I saw In the shape of the boat. I can see some challenges coming my way. I can't wait to continue the search for lumber for the strips. It was suggested to me to use 3/16 x 5/8 strips. With that I'm nervous. I'd like to go 1/4 and use narrower strips on the bilge area or tougher bends but I will make that choice after I find some lumber.
 

Attachments

  • IMG_0956.JPG
    IMG_0956.JPG
    154.7 KB · Views: 491
  • IMG_0957small.JPG
    IMG_0957small.JPG
    47 KB · Views: 453
  • IMG_0945small.JPG
    IMG_0945small.JPG
    2 MB · Views: 480
  • IMG_0951small.JPG
    IMG_0951small.JPG
    2.3 MB · Views: 466
You're off to a good start.

The strongback - :) I glued mine to the floor to prevent it from being moved.

As for the stripping method, I'd recommend looking at pics of a bunch of other strippers and take note of the different patterns and which you like.

You want to be better than 1/8" on the alignment of the stations, both in horizontal, vertical and squareness.
That's why the blocks between the stations and strongback. They allow you to fine adjust the stations within the slop of the fasteners.

Dan
 
Back
Top