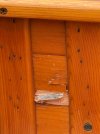
That's a bit of a mess but luckily, it is not structural and it is located where it will not see any contact. The rub rail also protects it a bit.
If that were a canvas covered hull, at your next opportunity to canvas, you would remove that section of planking. A rule of thumb is to attach to adjoining ribs, but here, with a glassed hull, you can simply opt to deal with that one divot.
You have options. First and most obvious is to simply trim out the damaged wood from the inside, and lay a small cedar patch over the damage from the inside. Blend it, stain it, bond it in place with a good epoxy. I would use G-Flex. To position the piece while it sets, I would push on it from the inside with a brace cut for purpose that would reach across to the other side of the hull. Wedge it in carefully. Once that piece is set in place, tilt the boat on its side so that you can carefully lay in some thinned G-Flex epoxy to fill the pocket that remains and possibly clean up the jagged edges of torn cloth. That's kind of a meh way to get that sorted out without too much effort....not pretty, but functional.
What I would do, and I will confess, I tend to be too anal at times and I have worked with glass canoes more than most folks, is to very carefully remove the planking on the damaged area from the inside. I would remove rib to rib and from the top of that plank to just a bit below the top of that rub rail. The I would trim the loose and roughed edges of the cloth. I would strive to leave the cloth and resin that is present and only take the wood away from behind it. Once this is done, you can make a replacement cedar insert to fit back between the ribs. I am not sure what thickness planking AT builds their hulls with? Old Town used thinner planking, presumably they also do. Whatever the case, I would use my verniers on a bit of the wood I removed to make sure that my replacement bit is the right thickness. You will need to decide how much effort you want to make with your replacement piece to attempt a color match. The next step is to bond in the patch. Now you are dealing with attaching it to the area that you excavated so I would have the hull on it's side and quasi generously use resin where your patch will land. Try to avoid runs and make sure that you catch the loose edges of glass in your repair. It might be good to try and put some glass fiber in there, but this starts to get really messy. As before, put pressure on the piece to position and hold it.
Once this is done, it's down to carefully sanding and polishing on the outside. With any kind of luck, the repair will not stand out too much.
Or, slap a piece of duct tape over the hole and call it a day.....It's not structural or in a place where it will be immersed.
These glassed hulls are very hard to repair neatly. All of this effort is about that, neatly. If cosmetics are not important, you could fill the hole with loose glass fiber and lay a piece of glass cloth over the area and call it a day.