Rib tip repair

Dave Wermuth

Who hid my paddle?
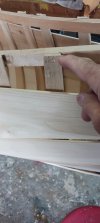
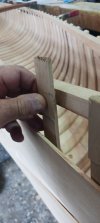
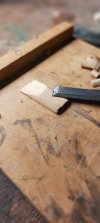
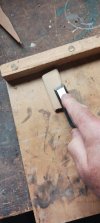
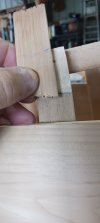
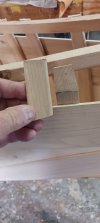
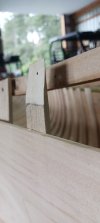
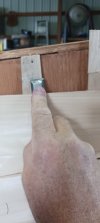
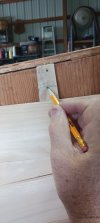
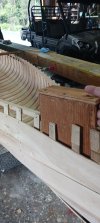
greetings, I am building another new canoe. Except I erred and I ended up with a few rib tips that are a bit short. So, I thought I'd try to create a tutorial of the way I splice rib tips. I don't measure. I use a chisel to pare the angle.. I then pare the replacement tip the same exact distance of the mating surface. because the thickness is the same, and the distance is the same, the angle will match. I use a bench jack on my bench to hold the tip as I pare the angle.. On the canoe I use a backer board/plywood behind the rib for support. I slice the angle by hand. I don't need a mallet. The chisel must be sharp. It takes a couple minutes to do one tip splice. I'll try to add photos. Hope this helps for anyone who may be facing this for the first time. I'll add a follow up post if the pictures need more explanation.
 

Attachments

  • 20240817_121109.jpg
    20240817_121109.jpg
    77.1 KB · Views: 86
  • 20240817_122111.jpg
    20240817_122111.jpg
    71.2 KB · Views: 89
  • 20240817_122015.jpg
    20240817_122015.jpg
    85.7 KB · Views: 70
  • 20240817_121903.jpg
    20240817_121903.jpg
    100.1 KB · Views: 67
  • 20240817_121821.jpg
    20240817_121821.jpg
    71.1 KB · Views: 67
  • 20240817_121738.jpg
    20240817_121738.jpg
    73.6 KB · Views: 67
  • 20240817_121643.jpg
    20240817_121643.jpg
    61.2 KB · Views: 68
  • 20240817_121351.jpg
    20240817_121351.jpg
    61.6 KB · Views: 65
  • 20240817_121337.jpg
    20240817_121337.jpg
    87.1 KB · Views: 74
  • 20240817_121238.jpg
    20240817_121238.jpg
    132.8 KB · Views: 84
Clarification. I actually use two hands to push the chisel, but I needed a hand to hold the camera and only have two hands at last count.
 
That's really interesting, Dave. I particularly like the "I don't measure" part. :) What are you using to hold the pieces together? (Glue etc.) It looks like they're long enough to get some solid tacks through both the planking and the gunwale at the splice. Am I seeing that right?

What's a bench jack?

Thanks for showing this to us.
 
I may have used the wrong words. To describe it: they usually are made in pairs. I used ply wood for the base. At one end I fastened a 3/4" lip and on the other end I put another lip on the opposite side. The lip in front goes against the front of your bench. the lip away from you holds the workpiece in place so you can push the chisel against it and the workpiece doesn't go anywhere. I tried google and failed. jpegs ending in 903 and 904 sort of show part of the thing.
 
As I was walking to the mailbox I passed the pond and for some reason, at that point realized I was using the wrong word. BENCH HOOK is what I meant to say and I see SAMB has also picked up on that. Since my health issues I find that my brain is not firing on all cylinders, which is why I'm trying to downsize the collection. Roy Underhill had a great episode on bench hooks.
 
My method.

I use a belt sander (3"x21") to create the longest scarf surface I can from the outside of the rib. This necessitates removal of the top (or two) strakes of planking in order to access the rib tip. In some cases where I didn't remove more than the top bit of planking I had to scarf on the inside of the canoe but this is less desirable since the entire replacement wood is visible once work is done.

This recent restoration of a Chestnut Bobs Special required many rib tip repairs, not all of which are shown here.
tempImagejxpaTD.png


Next, I made a tapering jig for my table saw which allowed me to mass produce lots of tip repair pieces from square edge rib stock. I tapered each end of a rib stock piece, then square cut them off at the miter saw, then tapered each end of the stock again, repeat, etc. until I had about thirty tip replacements. They were then glued, clamped, and when cured, shaped easily with chisel and sander to the desired taper, edge radii, and smooth scarf surface. Once inwales were made and fastened the tips were cut off flush with the inwale top.

tempImageDkSiFl.png
 
Back
Top