Rib Bending

Tom Widney

LOVES Wooden Canoes
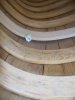
After steaming and bending new ribs for a 61 OT Guide Ther is about a 1/4
in.gap between the rib and the planking at the turn of the bildge. The rib lies just forward of the front seat. and was bent one rib forward of the replacement location' My question is is this to big of a gap to just siumply clinch into the placking it seems as the tension will distort the hull shape.
Am I doing something wrong on the initial bending of the ribs or do others have a fit problem as well and simply force the rib to the planking with the tacks?

Maybe I need to be more careful about twisting the rib as it is being bent?

Any insight into this issue would be most helpful.
Tom
 

Attachments

  • rib 2 (3).jpg
    rib 2 (3).jpg
    37.3 KB · Views: 264
If the rib has not been ring nailed to the inwale why not remove it and reshape it perhaps by dipping the curve into boiling water? If the rib was already nailed to the inwale, I'd be reluctant to tack it in place as hull distortion would appear likely. It doesn't seem to take much in the way of non fairness of the rib profiles to put a lump or hollow in the hull (DAMHIKT.) In any event, removal of the rib would seem to be the best choice. That said, another possibility would be to remove at least one of the nails from the inwale and try to force the rib down so it seats into a fair curve and renail to the inwale. This might be aided by a generous application of boiling hot water to the offending section of rib.
 
Rib

Tom:

Did you bend the rib over the hull, making sure the rib is flat against the hull, let it dry a bit, and install?

I suspect you just need to push it into the hull a bit more. This can usually be accomplished by hand. You could also put a board across the top of the ends of the rib and put a C-clamp on each side and add a bit of downward pressure, but don't over do it. DAMHIKT :p
 
Problem Solved

Fitz,

You hit the nail dead on,

I was letting the rib dry on the out side of the hull for two days insread of installing it on the inside of the hull directly after the initial bending on the outside.

I also made sure that I pulled and twisted the rib on the initial bend and then relaxed and repeated the bend twice more before spring clamping the ends to the gunnel . We then flipped the canoe, reinstaled the prebent rib and reclamped on the inside of the hull. The result was a near perfect fit of the rib to the planking.

Thanks guys,

I'll try to save the other rejects with the boiling water til I can get them straight enough to fit in the steam box.
Tom
 
Place the steamed rib around the outside of the hull at the location whose outside beam exactly matches the inside beam where the rib will be placed. Allow to dry overnight. The next day, install the rib, and it will usually go in almost perfectly. Gil
 
The rib not meeting the hull in the bilge does mean you needed to bend a bit tighter, meaning another rib away from where you bent it. Depending on where the rib is, sometimes you do need to go more than 1 rib away especially where the canoe doesnt taper as much in the center. This falls into what Gil is saying as well. Dont be afraid to shove it back into the steam box and rebend it.
 
The key words being:

"outside beam exactly matches the inside beam"

be very fussy about your measurements and your ribs will likely fit.

Dan
 
Back
Top