You are using an out of date browser. It may not display this or other websites correctly.
You should upgrade or use an alternative browser.
You should upgrade or use an alternative browser.
Not really a Micmac canoe
- Thread starter pumpkin
- Start date
pklonowski
Unrepentant Canoeist
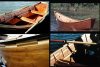
There's that one strip that has kinda funny-looking grain... 
But seriously, this will be one beautiful canoe!
Make sure you follow instructions for 'glassing it, and it'll be outstanding!
But seriously, this will be one beautiful canoe!
Make sure you follow instructions for 'glassing it, and it'll be outstanding!
pklonowski
Unrepentant Canoeist
It'll be beautiful. The 5 or 10 thousandths of an inch won't matter.
And yes, it will be messy between now and then. Spread some plastic sheets all around the work area, so you catch all that drips off. On old shop apron will keep most of it off your clothes, but wear old shoes, and don't wear them into the house...
And yes, it will be messy between now and then. Spread some plastic sheets all around the work area, so you catch all that drips off. On old shop apron will keep most of it off your clothes, but wear old shoes, and don't wear them into the house...
Matthew,
There are plenty of lurkers watching what you are doing. Though I am not a strip builder it looks good to me!")
Denis
There are plenty of lurkers watching what you are doing. Though I am not a strip builder it looks good to me!
Denis
pklonowski
Unrepentant Canoeist
Gag reflex?!?!?!? NOT!!! I trust you were joking!?!?!? I certainly was, about the funny-looking grain on that one strip... That's "Character Marks"!
What kind of wood will you use to trim it out, or is that still up for discussion? I have ready access to a lot of wood species & figure in my area, and could send a "care package" to your distant outpost. Well, gunnel stock might be difficult, but decks, seat parts, & thwarts...
As for that one spot, I think the best thing to do is cut out the bubble & sand it out flush; you could maybe put a 'glass band-aid (patch) on it, but it sounds small enough to just epoxy the spot, and since it's on the edge, the gunnel will cover it... I promise I won't tell anyone! Todd, Max, & others may have more & better input on this, if they're lurking.
Have you thought about putting a sail rig on it?
What kind of wood will you use to trim it out, or is that still up for discussion? I have ready access to a lot of wood species & figure in my area, and could send a "care package" to your distant outpost. Well, gunnel stock might be difficult, but decks, seat parts, & thwarts...
As for that one spot, I think the best thing to do is cut out the bubble & sand it out flush; you could maybe put a 'glass band-aid (patch) on it, but it sounds small enough to just epoxy the spot, and since it's on the edge, the gunnel will cover it... I promise I won't tell anyone!
Todd, Max, & others may have more & better input on this, if they're lurking. Have you thought about putting a sail rig on it?
Dan Lindberg
Ex Wood Hoarder
Mat,
Your canoe is looking very nice. I like the way you layed up the strips. The flat/wild grain looks great.
The starved areas, yes, you got it, even when curied, just drill a couple small holes and inject resin from a syringe. (the second hole is to let the air out.)
Be sure to block sand the outside to get the surface flat.
Dan
btw, you are making fast progress, I don't have access on the weekends, so there is always a lot to get caught up on on monday.
Dan Lindberg
Ex Wood Hoarder
Yes, I usualy do my building in the winter, once summer comes it's time to be North. (Ely area)
Because of that, it usually takes me about a year to build a stripper or restore a w/c.
The block sand is to get rid of the "orange peal" that the resin often cures to, in addition to making the surface fair. Once you varnish it, the outside surface should look like "glass".
And keep the pics coming.
Dan
pklonowski
Unrepentant Canoeist
Lookin' good!
When I first built my stripper, I decided to get the 'glass on the inside right after getting it on the outside, and then worked on finishing (sanding) after that. After I cracked it up, and while I was repairing it, we had a seasonal change, and the changes in relative humidity seemed to change the shape of the hull, making it want to sit wider or narrower than expected. I don't know how much this can affect things, but my boat (a solo) got almost 2" wider during a storm, than when it was nice & dry. Of course, final width is determined by thwart length, but you risk stressing the outer glass if you pull it in too much. Just a thought.... Hopefully someone with greater knowledge than I will shed some light on these observations.
Be patient, work carefully. It'll be beautiful, and well worth all that sanding horror!
Dan Lindberg
Ex Wood Hoarder
Matt,
She's look'en good, by the time you finish with the ROS and block sand the varnish between coats, she'll look flat.
Dan
She's look'en good, by the time you finish with the ROS and block sand the varnish between coats, she'll look flat.
Dan
pklonowski
Unrepentant Canoeist
Paint? HHhhmmm.... How about aluminum...
<duck and run>
<duck and run>
pklonowski
Unrepentant Canoeist
Flames would be okay, maybe you could paint tires on the sides, and put a spoiler on the back, too!?!?!?!?
I think the wild grain strip will not be very noticeable once it's done. You'll know it's there, but you'll be awfully lonely in the "worried about it" group...
Relax, enjoy the process, and if you can get your wife to help with the sanding, you're a way better man than I.
I think the wild grain strip will not be very noticeable once it's done. You'll know it's there, but you'll be awfully lonely in the "worried about it" group...
Relax, enjoy the process, and if you can get your wife to help with the sanding, you're a way better man than I.
Dan Lindberg
Ex Wood Hoarder
Matt,
It's still looking good.
Just be thankfull she encouraged you to get another sander. I was luckly to get my wife down to help hold a strip or flip the canoe, much less sand.
As for the sanding, I tended to "back off" a bit on the inside, as was going to get a "mat" surface anyway.
Ddan
It's still looking good.
Just be thankfull she encouraged you to get another sander. I was luckly to get my wife down to help hold a strip or flip the canoe, much less sand.
As for the sanding, I tended to "back off" a bit on the inside, as was going to get a "mat" surface anyway.
Ddan
pklonowski
Unrepentant Canoeist
Wow, you let her use the new sander???
Too funny all around!
Too funny all around!
Dan Lindberg
Ex Wood Hoarder
Matt,
Just in case,
by mat finish, I mean don't completely fill the weave on the inside, and don't sand it smooth, so that you have a "mat" finish to that it is not as slippery when getting in/out of the canoe. This is a pretty standard practice on strippers.
Dan
Just in case,
by mat finish, I mean don't completely fill the weave on the inside, and don't sand it smooth, so that you have a "mat" finish to that it is not as slippery when getting in/out of the canoe. This is a pretty standard practice on strippers.
Dan
pklonowski
Unrepentant Canoeist
Make sure there are no "starved areas" -- wet the entire thing out (looks like you did well). When you squeegee, leave the weave visible, same as you most likely did on the outside. Then just don't put any more coats on it.
Others probably know better than I do...
Dang, she's gonna be pretty...
Others probably know better than I do...
Dang, she's gonna be pretty...
pklonowski
Unrepentant Canoeist
Excellent! You've crossed the threshold into the realization (acceptance?) that this will be a beautiful boat! Once I hit that milestone, I found myself putting more time than expected into the final stages. Just sqeezing in 15 minutes when you wouldn't have bothered, or staying at it an extra ten minutes longer than you thought you'd have, adds up quickly.
I've got no shortage of those "sanding ridges" inside my boat as well. Even the second time I 'glassed it, I ended up with a lot of them. I think it's just gravity, pulling the resin down from the sides, but that's purely speculative. If that's true, you must have to squeegee with much more force than I used, though I thought I did it pretty firmly. Not sure how people get all of them out, and I have seen strippers without these "floater" spots. Remember that well over 99% of the people who will see this boat will have no clue that there is anything amiss!
I've got no shortage of those "sanding ridges" inside my boat as well. Even the second time I 'glassed it, I ended up with a lot of them. I think it's just gravity, pulling the resin down from the sides, but that's purely speculative. If that's true, you must have to squeegee with much more force than I used, though I thought I did it pretty firmly. Not sure how people get all of them out, and I have seen strippers without these "floater" spots. Remember that well over 99% of the people who will see this boat will have no clue that there is anything amiss!
Todd Bradshaw
Sailmaker
Most slightly funky spots on the inside are created by tension on the fabric, actually pulling it away from the sides. Squeegeeing (or rolling) from the center bottom outward and up the sides is often the cause. This is, of course, the most logical way to do it, but tight spots and bubbles in the glass should be fixed by pushing cloth the other direction, moving excess cloth toward the bad spot to eliminate the tension and allow the glass to lay back down.
High pressure on the squeegee will usually create more problems than it solves. In addition to increasing tension on the cloth, it tends to make the resin foam by introducing a lot of bubbles. There is a fine line between getting the cloth down tight to the surface and the excess resin out of it and pushing too hard and causing problems. I found that my favorite squeegee for inside glassing was just a piece of ethafoam, sawed from a scrap foam block and about 3/8"-1/2" thick. It provides enough pressure for a good resin-to-cloth ratio and with a light touch at the end of the operation, you can "comb" the surface to a very uniform texture. At that point, filler coats on the inside become optional. The combed weave gives pretty nice footing with nothing more than a couple coats of varnish to protect it from UV and you save the excess weight of additional resin coats. Some folks don't like having the weave visible on the inside and fill it. Personally, it never bothered me enough to justify the increase in weight, so I just used a neatly-combed surface, instead.
High pressure on the squeegee will usually create more problems than it solves. In addition to increasing tension on the cloth, it tends to make the resin foam by introducing a lot of bubbles. There is a fine line between getting the cloth down tight to the surface and the excess resin out of it and pushing too hard and causing problems. I found that my favorite squeegee for inside glassing was just a piece of ethafoam, sawed from a scrap foam block and about 3/8"-1/2" thick. It provides enough pressure for a good resin-to-cloth ratio and with a light touch at the end of the operation, you can "comb" the surface to a very uniform texture. At that point, filler coats on the inside become optional. The combed weave gives pretty nice footing with nothing more than a couple coats of varnish to protect it from UV and you save the excess weight of additional resin coats. Some folks don't like having the weave visible on the inside and fill it. Personally, it never bothered me enough to justify the increase in weight, so I just used a neatly-combed surface, instead.
Attachments
pklonowski
Unrepentant Canoeist
Todd has forgotten more about building these boats than I'll ever know, so whenever he posts something, I pay attention. (This is also true of most people on this forum.....) And I still need to bring my boat up to Madison to have him decide what kind of sail rig to put on it...
I put the second layer of glass on after the first layer had set up, waited about 2 hours. It was still tacky, so the challenge was getting the 2nd layer to lie flat before pouring any resin onto it. Of course, with the first layer having plenty of "floater" spots, and then the 2nd layer getting more, it got ugly... but then again, 99% of the people who see this boat don't know anything's amiss.
But you can still be happy with the work you've done on this boat. The boards may have been pulled from the burn pile, but they have a new lease on "life" now that you've turned your hand with them. You did a great job -- the fruit of your labors is a beautiful boat -- enjoy it!
I'm looking forward to pictures of this boat on the water. It's probably closer than you think
Todd Bradshaw
Sailmaker
The theoretical drawback to glassing layers individually is a bit of weight gain, but I think your resin and individual work style have to be the determining factors. Some resins, and also some working temperatures and even some batch sizes (resin is usually thickening as you are applying it) favor double-layers in one application and others do not. If it means getting more control or fewer trapped bubbles to have to mess with, the small weight gain involved in two applications may be worth living with.
The drift boat was kind of a strange project. There really was no good reason not to just build it from plywood, but I dislike the rotary-cut look of varnished plywood and decided to strip it for cosmetic reasons. The sides, bottom and transom were stripped as oversized flat panels (talk about easy strongback set-up). The inside surface was disk-sanded smooth and fiberglassed with 7.5 oz. cloth. Then they were flipped over and the outside wood sanded smooth. Then the panels were cut out. The little side-stiffener ribs were glued to the inside and nailed to the side panels with small bronze ring nails from the outside surface. The sides were bent to shape and seamed at the stem and at the transom corners. Then the bottom panel was bent on and also seamed to the side panels on the inside. This gave me a boat that was all wood on the outside. The joints were cleaned up and the outside was glassed as a whole, just like you would do on a canoe except it had a seam down the middle due to cloth width availability. Bias strips of glass were applied over the stem, chines and transom joints for a bit more durability and then it got about six filler coats. I apply filler coats just as fast as I can roll without making bubbles and never look back. The final sanding with the big disk takes care of any drips and leaves me a flat surface that's ready to varnish. This was the first boat we ever spray-varnished and we didn't really have a clue about spraying. It went on OK, but left some orange peel on what had been a perfectly smooth fiberglassed surface. I decided that I didn't mind the orange peel enough to sand it out. All in all, it was a terribly bass-ackwards way to make a hard-chined, flat-paneled boat, but it was pretty and I was young and had a lot more disposable energy back then. I used it for a couple seasons and then sold it during one of those periods when I had a lot more boats than money to live on.
The drift boat was kind of a strange project. There really was no good reason not to just build it from plywood, but I dislike the rotary-cut look of varnished plywood and decided to strip it for cosmetic reasons. The sides, bottom and transom were stripped as oversized flat panels (talk about easy strongback set-up). The inside surface was disk-sanded smooth and fiberglassed with 7.5 oz. cloth. Then they were flipped over and the outside wood sanded smooth. Then the panels were cut out. The little side-stiffener ribs were glued to the inside and nailed to the side panels with small bronze ring nails from the outside surface. The sides were bent to shape and seamed at the stem and at the transom corners. Then the bottom panel was bent on and also seamed to the side panels on the inside. This gave me a boat that was all wood on the outside. The joints were cleaned up and the outside was glassed as a whole, just like you would do on a canoe except it had a seam down the middle due to cloth width availability. Bias strips of glass were applied over the stem, chines and transom joints for a bit more durability and then it got about six filler coats. I apply filler coats just as fast as I can roll without making bubbles and never look back. The final sanding with the big disk takes care of any drips and leaves me a flat surface that's ready to varnish. This was the first boat we ever spray-varnished and we didn't really have a clue about spraying. It went on OK, but left some orange peel on what had been a perfectly smooth fiberglassed surface. I decided that I didn't mind the orange peel enough to sand it out. All in all, it was a terribly bass-ackwards way to make a hard-chined, flat-paneled boat, but it was pretty and I was young and had a lot more disposable energy back then. I used it for a couple seasons and then sold it during one of those periods when I had a lot more boats than money to live on.
Todd Bradshaw
Sailmaker
I just prototyped the panels in cardboard about 2' long until I got the shape to look like I wanted and then transferred those shapes to the strip panels. It was a fun boat. Not great on flat. slow water because of the rocker, but pretty nice in rivers where you did all your maneuvering at speeds slower than the current by rowing upstream as you drifted downstream, back-ferrying, etc.
Similar threads
- Replies
- 7
- Views
- 7K
- Replies
- 10
- Views
- 4K
- Replies
- 2
- Views
- 3K