You are using an out of date browser. It may not display this or other websites correctly.
You should upgrade or use an alternative browser.
You should upgrade or use an alternative browser.
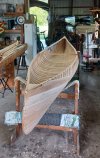
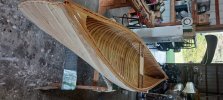
new canoe build here.
- Thread starter Dave Wermuth
- Start date
OP
OP
Dave Wermuth
Who hid my paddle?
OP
OP
Dave Wermuth
Who hid my paddle?
patrick corry
solo canoeist
Lovely! Clearly the ‘sliver’ planks were no problem. No thwarts in this canoe? What is the fastener at the tip of the stem?
OP
OP
Dave Wermuth
Who hid my paddle?
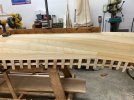
I'm undecided on thwarts. I may put one behind the seat. The seat will get lowered somewhat. The fastener is new to me. It's a cup washer. Covered by stem band eventually
OP
OP
Dave Wermuth
Who hid my paddle?
I may remove the cup washers when the time comes. But I also have a cup washer at the end of the outwales and they will stay so the piece had less chance to split. Weight is zero.
patrick corry
solo canoeist
I find the intersection of inwales, outwales, and stem band troublesome. There's a lot to hold together here and I find it difficult to decide where to put screws close to the tips of the outwales to hold securely but not split the delicate pieces here, including the tapered outwales, inwales, stem tip, narrow deck tip, etc. -. Maybe a stem cap like on some Maine canoes which will hide the fasteners and provide wear protection... but generally I don't like them aesthetically.
Michael Grace
Lifetime Member
Hi Patrick.
You may already know all this but in case someone is getting started, the trick here (and everywhere else screws are used, whether in delicate wood pieces or robust ones) is to prepare properly by drilling a correctly-sized pilot hole for the threads, a hole the depth of the shank that matches the shank diameter, and an appropriate countersink of the proper angle. The pilot hole for the threads of a given screw size should be a little larger in diameter for hardwoods and smaller for softwoods. There are charts that provide all the bit sizes, but after doing this for a while you just get a feel for what is needed for a given-size screw.
You can use standard drill bits twist or brad point (a good set of brad point bits is a wonderful thing to have!), and there are fluted countersinks that you chuck in a drill, and others that have a handle for manual use. I use both kinds of countersinks and interchange them randomly, it seems. Both are great. Or you can buy a set of all-in one bits like the ones below from Fuller. These are particularly nice because the pilot bit is tapered to give the screw increasingly strong grip with increasing depth:

 www.woodenboatstore.com
You may already know all this but in case someone is getting started, the trick here (and everywhere else screws are used, whether in delicate wood pieces or robust ones) is to prepare properly by drilling a correctly-sized pilot hole for the threads, a hole the depth of the shank that matches the shank diameter, and an appropriate countersink of the proper angle. The pilot hole for the threads of a given screw size should be a little larger in diameter for hardwoods and smaller for softwoods. There are charts that provide all the bit sizes, but after doing this for a while you just get a feel for what is needed for a given-size screw.
You can use standard drill bits twist or brad point (a good set of brad point bits is a wonderful thing to have!), and there are fluted countersinks that you chuck in a drill, and others that have a handle for manual use. I use both kinds of countersinks and interchange them randomly, it seems. Both are great. Or you can buy a set of all-in one bits like the ones below from Fuller. These are particularly nice because the pilot bit is tapered to give the screw increasingly strong grip with increasing depth:
Boxed Set: Taper Drills/Countersinks
Boxed set contains screw sizes #6, #8, #10, #12 and #14. Includes two plug cutters (sizes 3/8" and 1/2"), matching stop collars to control depth, and hex keys.
www.woodenboatstore.com
Last edited:
Worth Gretter
LOVES Wooden Canoes
I had the same concern, which is why I made brackets for strengthen this joint.not split the delicate pieces here, including the tapered outwales, inwales, stem tip, narrow deck tip, etc.
https://forums.wcha.org/threads/stem-joint-to-deck-and-inwales.19047/
shelldrake
LOVES Wooden Canoes
I built an Atkinson Traveler a few years ago and have no idea how many hours were involved. I wish I'd kept track as I quite often get asked how long it took.@Benson Gray Love those comparative images of plank variations. Is the thought that it changes based on available wood more that really being about engineering the build? Thanks for sharing.
Question for @Dave Wermuth and others, how long or ( I understand its variable ) roughly what block of time does it take to build a boat from scratch, assuming one has already set up all the jigs and bits and steamers and workstations and has all supplies on hand? Part of me, that grows every day... wants to set up a workshop and repair and build as a semi retirement thing not to make bank but break even at least and do something enjoyable.
Thanks in advance.
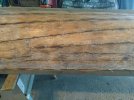
Here is the goring pattern for that boat.
Attachments
patrick corry
solo canoeist
Thank you Michael. I do use tapered drills & countersink combinations. I even downsized from a #8 to a #6x1.25" screw at the ends of the outwales. Seen here:set of all-in one bits like the ones below from Fuller.
Since the outwales extend past the stem, the last screw is only 2" from the outside curve of the stem. In the next view, prior to installing the brass stem band which passes between the outwale ends and onto the deck, the issue is that a screw from each side into that narrow & 'busy' area is fraught with danger: read... split wood! I even thought about drilling a hole through all members including the stem head, then installing a rivet and rove to pull it all together. The trouble there is that a rivet would be difficult to remove when it's time for re-canvassing.
Next time I think I'll let the deck pass over the stem head, though it's hidden from view by the stem band:
MGC
Scrapmaker
I'm not sure the tips are a major problem. The inside rails are well secured to the decks and the outside rails to the inside rails. Screws through the end of the outside rails will pass well into the decks and then depending on your choice into the far inside rails. The same is true from the opposite side. I have never seen a need to place a screw so close to the ends of the rails that splitting has been a major concern.
On a Traveller the copper end cap also somewhat ties the outside rails tips together.
It is only logical to pre-drill and properly size the pilot drills to match the screw selection. As an engineer with machinist experience I will confess...I cannot eyeball these. I use the screw and drill charts and measure everything with my verniers. I think that these tender areas need to be carefully drilled with the correct drill in order to avoid removing too much or too little wood.
And, beeswax or Irish Spring on the screws so that they elegantly shape their threads.
Michael Grace
Lifetime Member
Agreed about waxing the screw threads. I always do so - doesn't prevent splitting but it does help prevent broken screws. As for splitting, you are correct, Patrick, that splitting can easily happen especially in the more delicate areas. But that's because people don't drill and countersink properly, or because they drive screws past the depth of the countersink, in which case the screw head acts as a wedge. I always take pilot holes and countersinks seriously and have never split a pice of wood.
You are wise to decrease screw size near the ends. As long as you have a screw large enough to have holding power, smaller screws can do the trick and even look better as the gunwales decrease in dimensions.
One suggestion (some people will really chastise about this; mine is just a suggestion): align your screw heads so that slots are all parallel. This is a minor task that can make an important difference in the final appearance of the canoe. It's one of those small extra details that really matter.
MGC
Scrapmaker
Howie always gets angry with me when I suggest clocking the screws, but I can't help myself. I love looking down the rail of a nicely finished boat and seeing all of the screw slots lined up. Also on decks or coaming. So Michael, yes, that is worth mentioning if you want to step over to the dark side. ")
Bees wax or a bit of soap will help you to make those last tiny tweaks without compromising the wood or screwhead.
On old guns, one of the first things I look for are clean screws that have not been buggered up by using the wrong screwdriver. The brass and silbronze we use on canoes is also easily damaged if you select the wrong tool. One flathead screwdriver will not work on every screw. Those square drive folks were on to something.
Rob Stevens
Wooden Canoes are in the Blood
And "square drive" (Robertson) screws are less obvious when not clocked.
MGC
Scrapmaker
But ( to my eye) not as appealing......I don't know what it is? They are superior in many ways, but not attractive.And "square drive" (Robertson) screws are less obvious when not clocked.
Dan Lindberg
Ex Wood Hoarder
You guys sucked me in.
I HATE square drive fasteners, they round out so easy, and then they have to be drilled out.
For NON canoe works, I stick to Torx, so much better.
For canoe work, the usual straight bronze when possible.
And I agree about aligning the screw heads so that slots are all parallel - and I'll go farther, parallel to the rails, not verticle.
Dan
MGC
Scrapmaker
Agree...and also not vertizontal.You guys sucked me in.
I'll go farther, parallel to the rails, not verticle.
Dan
I go parallel for stem band screws including over the deck as well. My real problem is with the very old screws that don't have equal material beside a given slot.. On the gunnel try putting a fat side down beside another with the skinny side down. One restless night right there. And same goes for the vertizontal , 10 o'clock next to a 2 o,clock ? right.
" Huston, we, ahm..........
Dave
" Huston, we, ahm..........
Dave
Michael Grace
Lifetime Member
Following up and in strong agreement... Slotted screws only, with slots aligned horizontal on gunwales, vertical on stem bands, etc. In other words, align slots parallel to the lines of the structure. In long decks where deck panels are fastened with screws, for example, align slots with gunwale. I hate seeing square-drive and Phillips screws in old wooden boats, except where originality requires. The Willits brothers began using Phillips at one point and Penn Yan used Frearson, so I use those as appropriate.
Some people frequently denigrate slotted screws because (especially in brass) slots can be buggered up, and in any metal, screwdriver tips can jump out and damage wood. Careful, thoughtful installation is the key, along with good screwdrivers. I use a nice set of parallel-tip screwdrivers (not wedge-shaped like most screwdrivers). These things seem almost magical. It's amazing that even in screwdrivers, a really good set is very well worth the investment. And with hand screwdrivers, you have control, you can feel what you're doing. It is tempting to use a drill/driver, but this is a good way to end up with damaged wood adjacent to the screw.
About making brackets for the stem/deck/gunwale junction, to me this is unnecessary and potentially harmful over-engineering. I prefer the cleanliness of original construction, and countless canoes have survived well the way they were built. I see lots of rot in the ends of poorly-cared-for old canoes, but not traumatic damage caused or allowed by the usual, simple original joinery of these parts. So the simpler, original joinery works just fine. More junk up in the ends of a canoe may trap more moisture, causing/accelerating rot.
Last edited: