Moving to the Dark Side?

Fitz

Wooden Canoes are in the Blood
In Memoriam
The Stitch and Glue Section on the forum doesn't see a lot of activity, so I thought I would post my Top Secret Project.

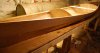
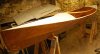
This is a 13 ft Chesapeake Light Craft Mill Creek Kayak. No, I am not moving to the Dark Side. This is a kit I bought in 2002. My intent was to build it for my loving wife.

She has long since given up on ever seeing it completed. But alas, the long forgotten project is secretly taking shape in the basement.

The goal is to surprise her with it, but she's probably already on to me. Afterall, she's no dummy.

Cheers,

Fitz
 

Attachments

  • KayakEdit1.jpg
    KayakEdit1.jpg
    157.5 KB · Views: 764
  • KayakEdit2.jpg
    KayakEdit2.jpg
    175.9 KB · Views: 746
*WHEW!*

For a moment there, I thougth you were posting about fiberglass (*GASP!*) or even Kevlar! (*DOUBLE GASP!*)
 
Progress

Getting there. Lots of goop in my future.

Fitz
 

Attachments

  • KayakEdit3.jpg
    KayakEdit3.jpg
    275.9 KB · Views: 665
  • KayakEdit4.jpg
    KayakEdit4.jpg
    489.5 KB · Views: 703
another barb wire boat

lookin sharp ( pun intended)
Hey if Dan can do it so can you. If you dont want to wear out your ROS, try using cabinet scrapers to take down high spots while its still green, it works pretty well. And remember to go pee before you start mixing and spreading....;)
 
How did you think that you could possibly hide something like this, in the BASEMENT!?

Good for you for doing this for her.
 
Hey Fitz

dON'T YOU KNOW KAYAKS ARE A PASSING FAD? Oops, caps lock.
How about an update anyway.

when I began to scratch the canoe building itch I figured I'd start with stitch and glue and then graduate to stripper and then graduate to W/C.

As it turned out, I went straight to W/c. But I may graduate some day to Bark. Ya never know. Well, I never know.
 
Basement

Yah, Doug. I think she is wise to me. She knows something is going on in the basement......

Update. I'm cleaning up the hull in preparation for (gawd forbid) - Fiberglass.

This is basically my first attempt at spreading goop, so if there are good pointers out there feel free to throw them my way. I know less is more.

Yah Dave, the Kayak is a fad. Now my daughter wants one too!! Good ol' son Brendan wants the 15 foot Robertson canoe. We'll work on that one together.
 
Goop

Man, I don't know what people like about this goop stuff. I find myself praying after each and every application for a cure!

Okay, I have used epoxy before and I swore this would never happen to me because I have heard the horror stories, but the second coat of epoxy on my hull is still sticky after about 12 hours. My worst fear may be reality. My hardener pump was sputtering a little this morning, but the relative volume really appeared to be okay. In hindsight, I think I was nearing the bottom of the hardener container. Anyway, I'm afraid my ratio may be slightly off and preventing a cure. (MAS epoxy for reference).

This second weave-filling coat is thin. What do I do if it remains tacky?

The project has gone really well before this hiccup. I'm really hoping for a cure! Thanks in advance for any assistance.

I hope the little missus appreciates this!! I think it is affecting my blood pressure :eek: .


Fitz
 
I feel for you!

I should have offered this before. I gave up on pumps years ago, I always measure out by weight. Set a cup on a scale, zero it, then add the ingredients.

I hate sputtering pumps.
 
uh oh..

Fitz my friend, turn the heat lamps on and pray - maybe its cool and humid and slowed the cure, but assuming you mixed thoroughly and the ratio was off, you're scuppered. Get the rags,acetone and mask and wipe it all off, it wont affect the coat underneath if its cured. Dont worry, you wont do it twice. I didnt.
 
I've had batches of epoxy take forever to set up... fortunately, only on small projects. Keep the heat on in the room with the boat, and stay away from it. It may take an extra day or two or three to stop being tacky, and it'll probably still be curing for at least a week or two, depending on how inaccurate the pump became.... wait at least two weeks before you try to sand it, and if the paper gets gummed up, wait another week before you try again. Waiting the extra time is difficult, but it's way better than having to remove it & start over. Let it go -- take a vacation -- you've earned it!
 
Good News

Well, it appears the epoxy is curing okay afterall. It set up last night and is no longer sticky or tacky. It may have been a tad cooler in the space yesterday that may have slowed things up.

I'll keep you posted.

Fitz
 
Update

Well, the hull is all glassed, and the cockpit varnished. I painted the areas beyond the bulkheads white. My intent is to have a couple of hatches in the decks to make these areas accessible for stowing gear.

Decks go on next.

I think the drooping nose is an optical illusion.:eek: :D
 

Attachments

  • BeforeDecksEdit.jpg
    BeforeDecksEdit.jpg
    253.2 KB · Views: 665
Rice Paper "decals" under glass.

So, I'm building a kayak, (I guess I prefer "decked canoe"), for Mrs. Fitz. I wanted to add some decorations to the deck and folks mention using an image printed on rice paper under the glass. The rice paper reportedly gets wetted out and disappears leaving the image.

A local stationary place sold me a Japanese sketch pad as "rice paper". The paper is very thin, but I'm wondering if it is thin enough.

I'm experimenting. The decals below are my test run. The one on the left was epoxied face down in case of running colors. The one on the right was epoxied face up. No problem with running colors, but as you can see the paper does not completely wet out or disappear. It will probably work, but will require me to neatly trim the image.

Any experience out there? Should I look for thinner paper?

Here is a picture of the project too.

Thanks in advance.

Fitz
 

Attachments

  • decalEdit.jpg
    decalEdit.jpg
    253.4 KB · Views: 644
  • deckeEdit2.jpg
    deckeEdit2.jpg
    108.8 KB · Views: 622
Hi Fitz,

I'd try leaving less "carrier film" on the applique. By that I mean trim it closer to the actual image. Use a #11 xacto blade and cut to the edge of the image. Decals for the models I build sometimes have the same problem. The carrier film shows so it needs trimmed.
 
Update

I have been busy with other things, but the kayak is now sanded and ready for paint and varnish. The hull is going to get Sea Green, the decks are going to be varnished. I washed the dust off, so the kayak is wet in the photos.
 

Attachments

  • SandedEdit2.jpg
    SandedEdit2.jpg
    864.6 KB · Views: 608
  • SandedEdit.jpg
    SandedEdit.jpg
    847 KB · Views: 574
Decked Canoe

Mrs. Fitz ought to be a happy camper! Nice work. See you this Saturday on the Nashua??

Ed
 
Propulsion

So, the kayak project is nearing completion - you know the routine, sand, paint, varnish, sand, paint, varnish.... Saturday launching is a goal.....but wait!!!!

How does one propel a kayak???

So, given the economy or lack thereof, I got a 2x4 and came up with a Propulsion System.

It still needs some finish, but it was made to order and should propel just fine.

The interesting thing to note is that with these Greenland blades, a sliding stroke makes the kayak paddle act much like a canoe paddle. Very intriguing to me.

If you don't count labor :)-)), I got enough wood for two paddles for $7, I used dregs of varnish and paint for the finishing, so probably beats a Prius in terms of economical propulsion.
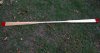
Pictures of launch day soon.

Fitz.
 

Attachments

  • GreenlandPaddle.jpg
    GreenlandPaddle.jpg
    907.5 KB · Views: 588
  • GreenlandPaddle2.jpg
    GreenlandPaddle2.jpg
    732.4 KB · Views: 578
Last edited:
Launching

The kids had today off from school, and it was a fine Indian Summer type of day, so the kayak project was officially launched.

(Many jealous plastic kayakers admired the boat!:cool: )
 

Attachments

  • YakLaunch1`.jpg
    YakLaunch1`.jpg
    764 KB · Views: 592
  • YakLaunch2.jpg
    YakLaunch2.jpg
    709.9 KB · Views: 557
  • YakLaunch3.jpg
    YakLaunch3.jpg
    600.7 KB · Views: 575
Back
Top