Installing new Inwale with a knot/hairline crack

babinke

Curious about Wooden Canoes
Im about to install my second inwale on my 15ft Huron and I noticed that there is a decent knot about 10 inchs from the end. Where the knot is there is a small hairline crack starting and I was wondering what I could do to reinforce it while I install it. Its not an area that will have alot of tension on it so im going to install it as is so I dont have to make a scarf... Had a hard time finding a 16+ foot length of ash.

Any suggestions?

Thanks
Keith
 
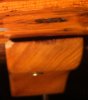
A picture would indeed help. If the crack is right at the knot, it may be very difficult to stabilize, because of the resin/pitch in the knot.

I have had some luck stabilizing small hairline cracks using cyanoacrylate adhesives (such as Hot Stuff).

CA is usually available in 3 consistencies -- thin, medium, and thick.

I have been successful with the kind of crack that can be opened up a bit by bending the wood one way, then closed when bending the wood the other way. I open the crack just a hair and squirt in thin CA; if it disappears immediately, I squirt in medium. I then close the crack -- CA should squeeze out -- and clamp it closed. I usually follow with a squirt of accelerator to make sure the CA kicks. Then sand off the CA on the surface. If the cracked wood will not be seriously stressed, this has resulted in a virtually invisible repair. Sometimes thin epoxy can be used instead of CA with this method.

If a crack cannot be closed and is very small, and is in a place where the weakness resulting from the crack will not matter, it can sometimes be filled with epoxy. Using a slow setting epoxy, fill the crack (push in with a splinter or razor knife blade), watch for a while to see if additional filling is needed because the epoxy works into the crack by capillary action or gravity (this is why slow epoxy is used -- such sinking in can take a bit of time). When the epoxy is cured, it can be scraped or sanded even with the surface of the wood. The repair will be more or less visible, depending on its size and location, but it will prevent dirt or other material from getting into an open crack and making it worse.

A photo of your crack would help determine either of these techniques might be appropriate.
 
I open the crack a bit last night and injected some Gorilla glue in it and clamped blocks on all 4 sides to keep the crack closed... I couldnt even break the blocks off the inwale with my hands... had to hit them with a hammer somewhat hard actually.. that stuff seems to hold pretty good... I attached a picture of the knot and crack.. Might steam a couple feet down the inwale and bend it before the knot... For the other inwale all I did was clamp it to the outwale for a couple days and I was able to fit it in... photo.JPG
 
I have used Gorilla glue a few times, and don't use it any more. I found it messy to work with, in part because as it cures, it foams up and expands in unexpected ways, and I can't see that it does anything that other glues don't do as well or better.

A number of woodworking magazines have tested it along with other glues such as Titebond II and III, epoxy, and CA, and usually found it to be weaker than those other glues. That said, the couple of times I have used it have not resulted in a join failure -- the wood stayed stuck together.

I found it's gap-filling ability (the main reason I tried it) unsatisfactory -- it looks and is foamy rather than solid (epoxy in such use is much more attractive), and the expanded overfill does not cleaned up as well as the squeeze out from other adhesives.

I keep epoxy, CA, Titebond, and liquid hide glue on hand. I see no reason to also keep a polyurethane glue such as Gorilla around -- in my opinion the other adhesives do what I want as well or better.
 
I agree with Greg. I used Gorilla glue once and will not use it again. I see no advantage over Titebond II or III or epoxy. The stuff is a foamy mess. As far as your inwale goes, just judging by the picture, I don't see any glue saving that knot joint unless there is very little bend at that point. If the inwale has to bend up in that area I see a scarf joint in your future. Good luck with your project - post some more pictures, we like pictures.

Jim
 
I have a similar glue question (at the risk of creating some thread topic drift). The mast step pulled out of my sailing canoe and bigger screws have not solved the problem. I would like to make one more attempt with glue before I resort to bolting it through the canvas to the keel and bang plate. My assumption is that I should first remove as much of the old glue, varnish, etc. from the ash step and to tops of the white cedar ribs to expose as much raw wood as I can. There are some significant gaps in the old screw holes as well as between the flat bottom of the mast stem and the tops of the rounded ribs. Which glue(s) would be recommended in this case? Thanks,

Benson
 
Last edited:
Hi Benson,

The same picture rule applies to you.

I will assume the mast step screws were ripped from their holes in the ribs. You would want to remove old glue that's in the way, but I would think more along the line of drilling the holes bigger and gluing dowels into the holes for a completely new hole for the screw. The tidebond would be fine to glue the dowels into the holes, but epoxy may not compress as much when you screw down the mast step and then apply pressure to the step and screws while under sail.

You might consider gluing a thin slice of hardwood veneer over the section of the rib the step goes over and then drill your new holes with the dowels in them.

Just thoughts,

Paul
 
Benson,

If it were my canoe, I'd be tempted not to glue, as it makes later refinishing/repairs easier. I would probably remove the bang plate, then drill through to the outside of the keel (start with a small pilot drill to be sure you are exiting in the middle of the keel). Countersink the keel, then bolt in the mast step with the nuts inboard.

If you are going to glue, you are correct that you need to clean to bare wood. I would use good two-part epoxy (not the 5 minute kind) like West or System Three for its gap filling properties. Other waterproof glues (Resorcinol, Titebond III, Gorilla) want tight fitting joints and lots of clamp pressure. Titebond II has no reason to exist, as far as I can tell.
 
The pictures attached below aren't pretty but they should give an idea of the problem. I was hoping for a simple solution but Paul's suggestion about dowels with new wood or Dan's about bolts through the keel are both better alternatives. The odd part of this is that I've used many sailing canoes over the years and this is the only one that has ever had a problem with a mast step. Oh well,

Benson
 

Attachments

  • Step-1.jpg
    Step-1.jpg
    134.6 KB · Views: 214
  • Step-2.jpg
    Step-2.jpg
    100.8 KB · Views: 206
  • Step-3.jpg
    Step-3.jpg
    182.8 KB · Views: 204
  • Step-4.jpg
    Step-4.jpg
    158 KB · Views: 202
  • Step-5.jpg
    Step-5.jpg
    165.8 KB · Views: 219
I installed a '60's vintage OT mast step in my old Guide, and it included nuts in the step and machine bolts that went through the keel. I was apprehensive about drilling holes, but the bedded keel and conical head on the machine bolt seat well in the keel and prevent leaks. You can install your step in 15 mins. with a drill and screw driver. You might remove the bang plate and reinstall over the screw heads.
 
Glue: I've used Gorilla Glue many times with great success. As with all glues, they should be used as a thin coating with high clamping pressure, and there should be little "squeeze-out". With Gorilla Glue, there should be little "foam-out". If there's a lot of foam coming out of the glue area, then far too much glue was used. In any case, the dried material cleans up very easily with a sharp chisel.

Cracked outwale: That looks like a serious crack. Feel free to give that gunwale a try, but it sure would have been better to avoid such a significant defect. A good glue joint between two pieces with longitudinal grain should be stronger than the wood itself, but glued end-grain like you have may allow failure again in the future. Worth a try for now, though, if you want to get on the water soon.

Benson's mast step: Agreed with others - drill out holes and use plug cutter to make a cross-grain plugs to glue in place, and maybe through-bolt. I think you were saying that the step doesn't sit flat on all ribs. The pic of the bottom of the step makes it look like there's lumpy glue or something on it - could this be the reason? If that's not the problem, maybe the bottom could be shaped to better match the floor of the canoe. If it's really not sitting down well, maybe the screws just didn't get enough purchase in the ribs/planking/keel.
 
maybe the screws just didn't get enough purchase in the ribs/planking/keel.

I took another look at it today and think that part of the problem may be due to the screws being too short. This canoe was built with unusually thin planking and ribs so there wasn't much wood to hold a short screw. I decided to use longer screws that would go well into the keel. There was also a keel screw under the base of the mast so I was able to remove it, drill a hole in the base of the step to line up with this hole, and add another long screw there as shown in the picture below. Hopefully this will resolve the issue and I appreciate all of the good suggestions. Thanks,

Benson
 

Attachments

  • Step-6.jpg
    Step-6.jpg
    165.8 KB · Views: 198
Back
Top