Still trying to find a filler that is easier to sand.
Earlier, I tried three non-waterproof fillers with varnish applied before and after. All survived 24 hour immersion in water but two cracked later. One held up OK but I still had concerns about long term durability.
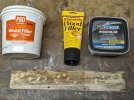
I had previously used (on fiberglass boats) System 3 epoxy with phenolic microballoons but felt it was much too hard for this canoe project.
Following Todd’s suggestion, I bought some West System Microlight 410 and mixed it with the System 3 epoxy I had on hand – still too hard.
Next I contacted support at Gougeon Brothers (makers of West System epoxy) and they suggested their Glex 650 epoxy might let me make a mix with more filler in less epoxy. I took their suggestion and bought some Gflex 650 to use with the 410 filler I already had.
It worked well, but was still stronger than I needed, and quite hard to sand. I just don’t need great strength for filling nail holes, hammer dings, and other low spots on the cedar planks of my canoe, especially since the planks will be covered with canvas (or Dacron in my case), filler, and paint.
So I wondered if there was a way to mix more filler into the epoxy (without making it too thick to spread) by adding some other kind of liquid. The common solvents such as water, alcohol, acetone, etc came to mind.
I tried 3 small experiments in paper cups using these solvents:
1) water,
2) 91% Isopropyl Alcohol, and
3) Kleen Strip lacquer thinner QML170, which contains Acetone, Ethyl Acetate, Methanol, Petroleum Distillates, and Toluene.
In each case I mixed the epoxy, added filler, added the new liquid, and then added more filler. I used an amount of the new liquid that was about equal to the total amount of mixed epoxy (before filler).
Water failed completely — would not mix with the epoxy.
Alcohol mixed with the epoxy and allowed me to stir in additional filler, but the mix was not smooth and did not adhere well to the cedar test plank.
Lacquer thinner seemed to work. It mixed smoothly and adhered to the cedar. However, the test hole in the cedar was small so it was hard to evaluate if sanding was really easier or not. I tried a larger test which worked well, and then started using this filler on the canoe. Sanding was definitely easier, and the cured filler was hard enough, i.e. comparable to cedar.
After using this recipe multiple times, I can point out two issues due to using solvent. First, the filler mix will begin to thicken in the pot. This may seem like the epoxy reaching its pot life, but it is actually the solvent evaporating. I simply add a little more solvent to get back a nice spreadable consistency. Second, the bigger issue is that the filler shrinks when dry, unlike pure epoxy. I deal with this by filling too high and sanding more later, or else filling a second time.
Finally, I understand that this is an unusual issue — most people want their epoxy to be stronger, not weaker! But in this case, weaker is better.