Fairing--planking Or Canvas Or Both?

Ken Preston

Curious about Wooden Canoes
I did significant repairs (not really "restoration" to a 1960's era Chestnut 16'. Looking for least reasonable weight I canvased with 7 oz. Dacron. It was gorgeous until I put the 1st coat of paint on, then wrinkled something terrible. After trying remedies, I've removed it and am ready to go forward with cotton canvas. A lot of the planking is cupped to one degree or another, but is sound and the tacks are tight to ribs (after re-clenching or replacing). I don't mind seeing that cupping if it persists on the finished canvas, but I'd be interested in reducing it a little in places. So. . .I have Bondo and I have epoxy and micro balloons. While I wait for the canvas to arrive, should I fair the worst of my cupping on the planking, or wait until I have filled canvas and see what still needs fairing. I do not want to thin out the planking at all by sanding. This is to be strictly a using canoe. . .not a museum piece. It was originally apparently a utility grade boat, with cross-grain wood everywhere it would work and pretty rough workmanship over all. Still lovely. . .
 
6D2FF3E6-ED82-4588-A6AE-339FADA25706.jpeg
Flat sawn planks are prone to cupping sometimes. You mentioned clinching or replacing tacks. Have you tried putting new tacks in where the cupping is? Sometimes it helps to put a warm wet towel on the plank to aid in pulling it down. Sometimes I run over the plank and towel with a hot iron.
In my experience that helps pull the cupping down unless there is crap under the plank.
I use Total Fair fairing compound rather than thickend epoxy or Bondo. It’s available at Jamestown Distributors.
 
Hello Dave, Other than when I was heat shrinking the dacron I didn't try using an iron. . .but that was a lot of ironing. I have not added more tacks at each plank-to-rib crossing (3 tacks each), but that's worth a try. . .hot towel, iron and new tacks. I suppose I replaced 100 tacks or more and tightened many more than that when I was doing wood repairs.
So, when you are using fairing putty, do you apply to the wooden hull and then cover it, or do you canvas the hull and then fair whatever still needs it? Or both??
Thanks very much,
Ken
 
Fair and sand before canvassing on the planking. Be careful not to get fairing Compound between the plank gaps because it will squeeze through and show up on the inside.
 
Dandy fine, I'll see if I can't fair out the worst of the cupping (while I wait for the canvas. . .). Thanks much!
 
dont goop up the outside of the hull until you have tried to fair it. Get a sanding belt for a larger machine, typically 6" wide and 8-10 ft overall. cut in half, screw wood handles from scrap to both ends and secure the boat to workstands. trick a helper into working the other side as you alternately pull back and forth over the hull moving from end to end. 80 grit works great.
 
Thanks Andre, I hadn't thought of that, though I've used a very similar technique to sand round dinghy masts. . .so you'd think I might have thought of it. However, I'm really worried about removing wood from that poor thin (old) planking. The humps I'm wanting to go away must be close to a sixteenth above grade, maybe more. . .an awful lot of wood to remove, Yes?
80 grit! My favorite sandpaper!
 
I'm with Andre on this...I would much rather take some of the wood off than add glop to the hull. A 1/16th isn't too much to take off. Andres trick with the belt is one I've not tried...but it sounds like a plan. Note that he tricks a helper into doing this as his wife now refuses to.
I use a foot long sanding block and try to take off the peaks where I can and if there are not tacks too close to the plank edges I'll use a finger plane..
Wit a lot of cupping I'd think about replacing some planking. It's not a hard job to do and better (in my opinion) than a bondo hull.
I do occasionally use faring compound in those odd spots where there isn't much of a choice...my reluctance to use it is that it hardens like iron and is harder to sand than the wood...watch out wood when you sand out the faring compound!
Finally, how fussy do we need to be...a taught filled canvas hides quite a few imperfections...you don't need to be too fussy for it to look really good...if it looked good with dacron it will look even better with canvas...
And finally, your paint choice can also help to hide imperfection...
 
Another option is to automate this process as shown below but you will still need a friend to help. I suspect that the Occupational Safety and Health Administration would not approve of this today.

Benson


canoe.jpg
 
Last edited:
works great for smoothing building forms, and for the boats that come off it. if the tack heads are properly below the surface, there's no worries about them. MGC is spot on, the filler becomes harder than cedar making sanding a challenge. It also wont move like the cedar during alternating cycles of wet and dry. Ask Rob Stevens about the long sanding paper, he maintains a great rhythm in addition to making a handy outfeed table.
 
If you do decide to use any fairing compound, do it properly. Forget Bondo, it is junk (mostly polyester resin, which doesn't work well on wooden boats, mixed with talc). Use either a good epoxy-based, premixed marine fairing compound, or mix your own with epoxy resin and microballoon-based fillers. How hard or soft it is and how much the filler sands like cedar (or does not) depends on the mixture used and is very adjustable if mixing your own. There is no reason to assume that your filler will be harder than the wood, unless you make it that way.

Good fairing fillers usually contain a lot of filler powder and a very small amount of resin. You want to do a bit of testing before you start putting it on the boat, and while you do, keep very accurate track of just how much resin and how much filler the mix contains. You want to be sure that it will not sag, run or puddle-out throughout the entire hardening process and you want to be able to accurately duplicate that mixture ratio through any number of small batches while working. If it does sag or pool, add more filler powder to the mixture ratio and try another test. The mix is right when there is no sagging at all, and you will likely be surprised at how filler-rich the proper mixture will be.

Once you have your ratio figured out, the best way to apply it to a hull is with a notched trowel or spreader, and you will likely have to make it yourself. A flat rectangle of stiff metal or plastic maybe 4" tall and 6"-8" long works well. Here is the trick.... into the bottom edge you cut square notches, typically maybe 1/8"- 3/16" deep, 1/8" wide and spaced about 1/4" apart, for the full length of that edge. It ends up looking like some sort of coarse saw-toothed edge (real, triangular saw teeth don't seem to work well from experiments I tried).

You spread the filler over the surface using the notched edge and enough pressure that as a result, you are basically combing a very neat series of parallel square ridges over the area with uniform (pretty much bare) spaces between them. We then let them harden, and since we used the right mix ratio, the ridges stay crisp and don't sag. Then we get out the longboard or long sanding gizmo and start sanding the tops of the ridges down. Usually you work diagonally when longboarding a hull for the fairest finished surface. You sand a lot off - very nearly down to the wood in the high spots, because you are fairing the shape, not trying to add skin thickness.

Since you are only sanding ridges, not solid fill, there is a lot less sanding needed to get the filled areas trued-in and fair, so you save a lot of work and effort. Once the ridge areas are fair, you mix up more filler, use a plain spreader riding along on the tops of the ridges and fill the spaces between the remaining ridges. Let that harden and give the whole area a quick final sanding. Some very large boats have had their entire hulls faired this way, but it also works well on smaller boats or portions of them. It can be a bit more work than just slathering a big blob of fill on and trying to sand it fair, but it's one of the best ways to generate filled spots which are truly fair and don't show through your final finish as obvious fills.
 
Hello Gentlemen, thanks very much for your thoughts!
MGC--All duly noted, especially the part about ". . .it looked good with the dacron. . ." Right, it certainly didn't have the offensive wrinkles until the finish paint, but some of the plank cupping was visible. I'm actually not really opposed to that, and of course, that's the default solution. I'm going for a working boat here, not a show boat. So I'm sure I'll be happy with the otherwise unwrinkled canvas with a few visible plank-cupping wrinkles. I don't like the idea of removing very much wood at all, particularly along the turn of the bilge where the worst of the cupping is (there's some on the flat bottom too, but it's purely longitudinal and out of sight when she's working. . .h'mm), and I'm not at all sure I can make much improvement with putty.
Benson--What a wonderful old photo!! What factory was that? OSHA would no doubt find something in their Industrial Standards to object to here, though if the non-working parts of the belt (and whatever drive belts) were guarded they actually might tolerate the cutting surface as is. The guarding could double as a dust collection system. I'm very curious about the abrasive and the belt itself. I could imagine a leather or maybe canvas belt armed with grit. . .but I can't imagine how you'd keep the grit bound on the belt. I guess if they could make canoes covered with canvas they could figure that one out too. My goodness. Marvelous! "We are not the smartest generation, nor the best looking. . .merely the most recent " (and that's changing fast!). (That's a quote, but I don't know who the original author was.)
Todd: Thanks very much for the detailed process. It makes perfect sense, and microballoons and epoxy are always on my workbench anyway, ready to go. I have a set of commercially made trowels (steel blades) for precisely that sort of application. . .for laying down the thinset grout for tile floors and counters. Not flexible though, made for flat sub floor substrate.
 
What a wonderful old photo!! What factory was that?

That is from the Old Town Canoe company and probably dates from the 1940s or 1950s. The Wooden Canoe journal issue number 157 from February, 2010 had an article about the move into a new factory building and the images below were on the back cover. The messages at http://www.wcha.org/forums/index.php?threads/5421/ also have more pictures like this.

Benson


OTC-Employees.jpg
 
Recently I made up a test batch of epoxy filler with micro-balloons. No matter how much I increased the proportion of micro-balloons, the cured filler was still too strong for my taste. I felt I would be unable to sand it smooth without damaging the adjacent planking on my canoe.

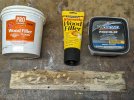
So I did another test, this one with three kinds of wood filler I had on hand (i.e. they have been in my basement for ever!). After they hardened, I soaked the test strip in water for a day. None of the fillers survived.

Then I read a suggestion on a woodworking website that wood filler could be made waterproof by varnishing the wood beforehand, applying the filler (and letting it dry and sanding it smooth), then applying another coat of varnish. I tried a test of this idea, and all three brands of filler survived 24 hours of immersion.

Here is a picture of the three wood fillers, and the test strip after completion of the test. The small round holes in the strip were made with a countersink, and the irregular ones are hammer blows.

Has anyone else tried this, or maybe has an opinion on it?
 

Attachments

  • 2024-02-02 13.32.08.jpg
    2024-02-02 13.32.08.jpg
    321.1 KB · Views: 81
Considering that many of those types of non-water-resistant fillers are basically just tinted drywall mud, and combined with the fact that varnish is vapor permeable to an extent and can't really be counted on to keep humidity out (especially just one coat) I don't think I would trust that approach on a boat. You might check out WEST System #410 Microlight filler powder, which sands easier than microballoon fillers. Maybe also switch to more sanding time using finer sandpaper to reduce potential damage to the wood.
 
Todd, I'm not expecting my canoe to ever be in the water for more than a few hours at a time, so I feel reasonably confident with the varnish and wood filler idea. That said, however, I am always open to a better way. I've had good luck with micro-balloons on fiberglass hulls, so if West System 410 is an improvement on that approach, I should try it.
I use System 3 epoxy but I'm a big fan of Gougeon Brothers (makers of West System products) because they are so generous with their advice. And their advice is always to do a test before you jump in all the way!
 
Still trying to find a filler that is easier to sand.

Earlier, I tried three non-waterproof fillers with varnish applied before and after. All survived 24 hour immersion in water but two cracked later. One held up OK but I still had concerns about long term durability.

I had previously used (on fiberglass boats) System 3 epoxy with phenolic microballoons but felt it was much too hard for this canoe project.

Following Todd’s suggestion, I bought some West System Microlight 410 and mixed it with the System 3 epoxy I had on hand – still too hard.

Next I contacted support at Gougeon Brothers (makers of West System epoxy) and they suggested their Glex 650 epoxy might let me make a mix with more filler in less epoxy. I took their suggestion and bought some Gflex 650 to use with the 410 filler I already had.

It worked well, but was still stronger than I needed, and quite hard to sand. I just don’t need great strength for filling nail holes, hammer dings, and other low spots on the cedar planks of my canoe, especially since the planks will be covered with canvas (or Dacron in my case), filler, and paint.

So I wondered if there was a way to mix more filler into the epoxy (without making it too thick to spread) by adding some other kind of liquid. The common solvents such as water, alcohol, acetone, etc came to mind.

I tried 3 small experiments in paper cups using these solvents:
1) water,
2) 91% Isopropyl Alcohol, and
3) Kleen Strip lacquer thinner QML170, which contains Acetone, Ethyl Acetate, Methanol, Petroleum Distillates, and Toluene.

In each case I mixed the epoxy, added filler, added the new liquid, and then added more filler. I used an amount of the new liquid that was about equal to the total amount of mixed epoxy (before filler).

Water failed completely — would not mix with the epoxy.

Alcohol mixed with the epoxy and allowed me to stir in additional filler, but the mix was not smooth and did not adhere well to the cedar test plank.

Lacquer thinner seemed to work. It mixed smoothly and adhered to the cedar. However, the test hole in the cedar was small so it was hard to evaluate if sanding was really easier or not. I tried a larger test which worked well, and then started using this filler on the canoe. Sanding was definitely easier, and the cured filler was hard enough, i.e. comparable to cedar.

After using this recipe multiple times, I can point out two issues due to using solvent. First, the filler mix will begin to thicken in the pot. This may seem like the epoxy reaching its pot life, but it is actually the solvent evaporating. I simply add a little more solvent to get back a nice spreadable consistency. Second, the bigger issue is that the filler shrinks when dry, unlike pure epoxy. I deal with this by filling too high and sanding more later, or else filling a second time.

Finally, I understand that this is an unusual issue — most people want their epoxy to be stronger, not weaker! But in this case, weaker is better.
 
I haven't used EZ-Fair, and can't try it now since I am almost done with fairing.
You know, I was expecting rib end replacement to be a nightmare but it was a piece of cake.
Fairing, on the other hand, is the new nightmare.
It is tedious to apply the filler, then wait for it to dry, then sand it (also tedious), then do it again -- until I can finally convince myself it is smooth enough, and then it probably won't be when I get the Dacron on....
 
Back
Top