Construction technique

Jbeals

James
I am still learning about my cedar strip row boat, with the aircraft nose.

Sitting under my upside down boat, showing my Nephew the construction ribs and strips. The overhead lights shine through the space between the strips.
He noticed regularly spaced vertical dark lines between the strips.
I thought they were dirt just hanging there.
So we looked closer and slid a knife between the strips.
Tink, the knife stopped. It was metal. We crawled out and stood up to get a better look. Even closeup observation showed that they were brads.
And they only go through from one to another strip. And after a good long look, seemed to be only at the side transition/curve to the bottom.
All of the wood has shrunk and separated from the next piece.
I am wondering how common this technique was and if it will help me ID the maker and year made?
Any conjecture is welcome
Thanks
James
 
In the June, 1940 Mechanix Illustrated, there is an article with plans telling how to build a 15 foot canoe called Gypsy. The audience for Mechanix Illustrated was, of course, DIYers. Quoting from the article:

“While canoes have always had a greater appeal than perhaps any other type of boat . . . the though of having to steam and bend in the fifty some odd ribs necessary in their construction discourages most men from attempting to build one. there are no bent ribs in this fifteen-footer: edge-nailed strip construction is used with plywood bulkhead moulds; the same type construction as is being so successfully used now aboard even large boats to give all the lightness, strength and grace associated with round-bilged boats without the trouble of steam bending.”

The article calls for cutting pre-milled ¼” x 1 1/2” lattice strips into two strips each ¼” x ¾”, or “f stock must be gotten out specially have strips slightly thicker, 3/8-in., to make for easier nailing.”

The article calls for nailing every 6 inches using very thin galvanized wire nails or brads.

I estimate that nearly 2000 nails would be needed, so I expect that only someone with a bad obsessive-compulsive order would successfully undertake such a task with such thin strips.

I understand that the technique is still sometimes used on somewhat larger boats, with thicker strips – an inch or more – which would make the nailing task a bit easier.

Edge-nailing strips is certainly not a common way to build a canoe – others here might know if any commercial builder used the technique, but I would guess that it is a technique primarily used by do-it-yourself home-builders.

I am curious – how thick are the strips on your boat, and what is the spacing between nails?
 
Thanks Greg,
Very interesting thoughts about edge nailing.

The strips vary in width from 3/4" to 2" and the thickness is 1/4".
The builder must have drilled before nailing.
I did some measurements and add them to an image on PhotoBucket.

http://tinyurl.com/39w5re3

The image shows the tension separating the strips and the brad edge nailed.
Edge nails are spaced 6" to 3" and are not systematic but are regular.
The image shows the tension separating the strips and the brad edge nailed.
Edge nails are spaced 6" to 3" and are not systematic but regular

The ribs are 4" apart all the way up to the bow.
Every other rib stops at the transition from floor to side.
Right at the tightest curve.

I would have extended the floor ribs another foot for strength.

http://tinyurl.com/3acczmg

Since the wood has shrunk I have some gaps especially on the transom.
i am wondering is filling with a thin strip of wood and glue is a good solution?
Because if I clamp and glue the 2 pieces as they are, it will stress the strips where they attach to the transom.

Thanks
James
 
Filling the gaps between strips, with wood or anything else, is usually not a good idea. They usually result from the wood drying out.

When the wood becomes wet again, it will swell and at least partially close the gap. If the gap has been filled, the swelling wood will push the strips apart again, and when it dries, you will again have a gap.

In this kind of construction (canvas-covered strips or planking) it is usual for there to be spaces between the strips/planks -- they cause no harm.

It is the canvas/filler/paint that keeps water out, not the planking. The strips/planking support the canvas and provide some longitudinal stiffness -- neither of these functions is enhanced by filling small gaps. Side-to-side or circumferential stiffness is provided by the ribs/frames, and again, small gaps between strips/planks is irrelevant. And the tautly-stretched canvas itself serves a major stiffening, structural role, a bit like monocoque or stressed-skin construction common in automobiles and airplanes.

So for a change, the easy way is also the right way -- leave the gaps alone.

As to the plank edge-nailing -- in the plans for the 15' Gypsy I mentioned earlier, there are only 3 bulkheads that serve both as building forms and then as frames for the canoe -- the front and rear bulkheads are spaced 4 1/2 feet from the center bulkhead, so that edge nailing is necessary both to give a fair shape to the hull and to keep edge-to-edge alignment of the strips.

In your boat, the edge nailing seems much less necessary, if needed at all -- at least on the bottom of the boat, given the many ribs and half-ribs are spaced only 4" apart (a common spacing for w/c canoes), though the ribs are not so wide as commonly used. On the sides and decks, the nails would be more needed, given the wider rib spacing. I would have thought it easier to make all the ribs full ribs, and then forgo the edge nailing -- but the builder of your boat clearly thought the edge-nailing the better way to go (probably a bit of a "belt and suspenders" guy). And given the unusual shape of your hull, I guess you can't complain about the method of construction.
 
So far tiring to reverse engineer and figure out how it was made is most of the fun!
Along those lines,
Is there a standard way to draw out plans from a boat?
It would be easier if I did not have to reinvent the wheel.
But may be more work than I have time for, now,
and maybe I could do that after i finish.?.
I saw a jig on a historical web site that seemed to mark points describing the curve of the hull.....
 
I have never tried to take the lines off a boat, but there are well-developed methods for doing so. Among other sources, I believe if you search the index of WoodenBoat magazine, you will find that some good information is available in their back issues.
 
Taking Lines Off Old Canoes

Over the weekend, going through the index of our journal, Wooden Canoe, I noticed that there is an article entitled "Taking Lines Off Old Canoes," by Charles Grosjean, in issue 45 (April 1991). Back issues are available through the WCHA bookstore -- I am not familiar with the article, but it might be worth getting the back issue.
 
Thanks for the reference.
I have some time off so I am making some good progress.
Built a support rack so I can get around and braced up the boat so she is very close to stright again.
I'll take pictures tomorrow.
James
 
Well that is an unusual boat!
The wood strip building with the edge nailing is a fairly common with larger boat construction but then they are usually glued together which is not the case, nor would it be advised, with your boat.
The large gap in the strips appears to be caused at lest one broken rib. Replacing the broken rib or ribs will allow the hull to go back to shape and close the gap. Maybe a bit of pressure might be required to close the gap after the broken rib is removed, but it should not be excessive.
The planking nails all look like they are very corroded and might not have much life left in them. It might be worth considering removing all the half ribs and replace them with new full length ribs that are a bit wider and stronger than the old full ribs. It would greatly strength the hull and you would not have to remove all the old full ribs.
 
Thanks Dan for the pdf, that is going to be very helpful.
And I like reading technical stuff.

Rollin, I am not sure I have the craft experince to replace ribs.
Your point is well taken. Since I have rased her up, she (Izzi) is really shaping up to her old self.
I have washed her several times getting most of the mud off and out.
This week I wash was a scurubed with TSP and I did the inside aft half.
And some of the outside. Affter a good rince, I use a vacume to pull the water out from between the strips and off surfaces. Much of the nail staining is gone and the wood is looking good. Thoughts of going bright floating through my head.
It is clear that sitting for years, squashed the hull, and now the boat is deeper and looks right.
When the wood is wet all the gaps are mostly closed.
The transom gap is closed now, even when dry.
Nails, well they are just standard finish nails! Some are like new and some are very corroded.
I bought some "Get ROT" but have not used it. Thinking that it would tighten up the naills. Wating until I get her clean and satble.

My Brother in law sugested that I should use a flexible epoxy and filler.
Smiths was his suggestion. And West System was not good, too ridged.

Any one have experience with Smith's filler and epoxy?
Thanks


Images have to wait till I get back to work, my wife's windows box is not up to the tasks.
 
Hello Mr. Greg,

I can see that you are the master but I am confused with one thing which is written in your post.


Is it true? I don't have much idea and still learning. Please give me the other option for this situation. Thanks :)

James here,
I was referring to the gap in the transom originally.
But the cedar strips really swell when they get wet.
The gaps between the cedar strips all most closed.
If I had packed the gaps it would have distorted the hull quite a bit.
As is, the hull is coming back to shape with wetting, cleaning (TSP) and drying with weight and spreaders.
I would guess if I had filled the strip gaps before wetting something would have broke during swelling.

I am just learning too, so if Greg will chime in that would be great.
Sorry to step on your question Greg.

best
James
 
James – your reply, with your pictures here and in your earlier post
( http://forums.wcha.org/showthread.php?t=6677 ) exemplify what I say below.

Robert – the expansion and contraction of wood can be complex – what follows is not the whole story, but if comprehensible, is a good part of the story.

Wood – all wood -- expands and contracts depending on its moisture content. This is commonly experienced in old houses with doors that swell and stick in the summer, returning to smooth operation in the dryer winter air of a heated house.

Canvas-covered wooden boats and canoes are generally built with seasoned lumber – dry wood. After construction, even when oiled and/or varnished and/or painted, the wood will get wet when the canoe is used, often very wet – and even if the canoe does not get tipped over and swamped, dripped into from paddles, splashed into when people get in and out, or rained into, they operate in a high humidity environment. Any and all of which leads to the planks on a canoe swelling, becoming wider, and squeezing each other as they are held in place by the ribs. (Wood expands much more across the grain than along the grain – so the ribs, which do not expand across the width of the canoe, hold the planks in place as they expand against each other.) Then, when the canoe is stored and dries out in the winter, the wood shrinks and the planks stop squeezing each other, returning to their as-built condition. However, if the planks were built tight, and if the swelling is great, and when the cycle repeats itself many times over the years, the squeezed wood will take a permanent compression set, and when it dries out, it will stay shrunk and small cracks will open between the planks. Often the cracks will close again when the wood is re-wet, but sometimes the compression set is great enough that small cracks will remain even after a re-wetting.

This is all of no moment in a canvas-covered canoe – it is the canvas, and not the wood, that keeps the water out. The strength and structure of the canoe are basically unaffected.

However, if cracks are filled while the boat is dry, one of two things will happen. Sometimes whatever was used to fill the cracks is simply squeezed out, if it is soft and flexible. Much more often, the filling material cannot be squeezed out, so the swelling wood, pressing against itself and the fill, simply undergoes more compressive setting, and when the wood dries out again, a wider crack is left, leaving the filling material loose.

Ordinary finishes may slow down the expansion and shrinking of wood from moisture, but they will not prevent it, even if only from air-borne water vapor (as with the old house’s swelling and shrinking doors). It is sometimes possible to encapsulate wood with epoxy and some other plastic-type materials, but doing so generally adds substantially to the weight of a canoe, and encapsulating works only as long as there is no break or crack or wear in the encapsulating material – not likely in a well-used canoe – and encapsulation is virtually impossible to do after a canoe is built.

Small cracks will not show through canvas at all, if the hull has been properly faired. Material getting between the canvas and the planking will show as lumps, and sometimes a crack between planks can be an avenue for sand, etc. to get where it ought not to be. That is why many w/c canoeists are a bit fussy about getting dirt in the canoe.

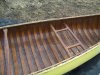
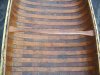
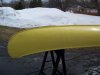
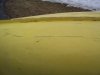
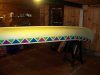
Attached are some pictures of my 1931 Old Town 50 pounder as I bought it, with (I believe) its original canvas. There are some cracks between a few of the planks, although not as severe as in James’s canoe or many other canoes, and there are also a few holes in the planks, but as you can see, the cracks between planks and even the holes were not visible on the outside, even with the old paint, which was crackled and scratched, even gouged in a couple of places, and with various bumps showing. It looks as though the interior may have had a new coat or two of varnish at some time in the past when the planking was tight, and you can see that the varnish has cracked at the plank joints. Newly painted, the bumps show on the outside, but again, the cracks between planks do not. This canoe has served me well the last two seasons in the condition shown, with a couple of coats of new paint.
 

Attachments

  • sm 100_2578.jpg
    sm 100_2578.jpg
    370.8 KB · Views: 228
  • sm 100_2591.jpg
    sm 100_2591.jpg
    300.7 KB · Views: 224
  • sm 100_2543.jpg
    sm 100_2543.jpg
    213.6 KB · Views: 216
  • sm 100_2560.jpg
    sm 100_2560.jpg
    171.3 KB · Views: 220
  • sm cr cpy 100_3508.JPG
    sm cr cpy 100_3508.JPG
    95.3 KB · Views: 220
  • small Copy of 100_3509.JPG
    small Copy of 100_3509.JPG
    97.9 KB · Views: 209
Back
Top