Chesnut #5163

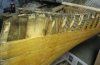
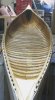
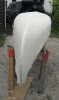
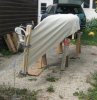
I bought myself a pressure washer and cleaned the gunk out of the hull today. I want to move forward on the repairs and have questions. How do I go about removing the planking without destroying it? For the broken ribs on the Huron we just used a punch from the inside and drove the tacks out a bit before pulling them and it worked dandy, but in this case we would like to save planking if possible.

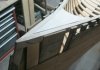
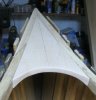
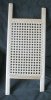
I need to do 15-18 rib tips not including all 4 cant ribs. I assume those can be done with the inwales in place since I have seen photo's implying such, so, can I begin rebuilding the inwale/stem joints before doing the rib tips?

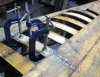
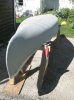
Found another cracked rib, so we will be repairing 5 from behind and replacing 3. So, to do a repair from behind I need to remove the planking and what, remove some material at the back and glue in a piece of good wood then shape that piece to match the rib? Thickened epoxy work best for that? How to go about making the divot for the new material to bed into?

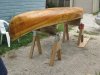
Almost forgot... there is alot of dark areas on the planking likely where the varnish wore off and it got wet, is there a way to clean that up other than just sanding it?

Thanks
Karin
 
Everyone seems to have their own method of pulling tacks. What you want to do is have some way of getting under the head of the tack and rolling it out so that it does not pull thru the plank. Chris Pearson gave me a pair of wire cutters with a slender long nose that work really good. You can get in under the head with the tips, wiggle a bit to determine which way to roll the tack and then take it out. I think you could possible grind down a pair of regular wire cutters to work the same way.

Darkend wood. You can try the 2 part wood bleach. It is usually one container of mild oxalic acid while the other container is weak hydrogen peroxide. Down here it is available in most high end paint stores. However, if the wood has gone moldy the bleach may not work. It doesn't work on blue stain which is a mold the can get in to logs before being cut or planks that were not dried out properly. I am not sure about other kinds of mold and what bleahes will do. Sometimes some of these "wood brighteners" (I think there is one called "Teak Nu) that the wooden boat people like to use work and sometimes they don't.

Rib reapair from behind. Demel tool with a router base and experiment with the depth set the cutter on scrap. I was able to cut a nice channel down into the rib. Then a "faired" the ends of the channel out with a flat chisel so that I could lay a piece in glue it and then level it down with "feathered" ends imitating flatsawn grain. Sorry never took any pics. Sort of standard type thing in wooden instrument repair when blending in a repair piece. You don't have to use white cedar here. You can get away with inlaying a thin piece of hard wood. Any good waterproof glue will work. Lots of tips and tricks out there so use those you feel most comfortable with. There is no one absolute correct way.
 
I picked up a little pair of cutters and they work well, I just need practice. I already had a dremel router base, just not a dremel, so off to the Depot and picked up just the unit itself for $50. I have hordes of bits that I use with my wood carving power tool so that wasn't necessary. After some initial work with the dremel I cleaned up the grooves with one of my flat gouges and glued up the first rib. The other 3 will get further work before getting glued up, I think they need to be deeper.

I'm certainly going to be getting experience with this boat, I count 24 rib tips needing replacement now plus the 4 cant ribs. I will include a couple of photo's and perhaps you all can help ascertain to what degree a rib tip needs to be corrupted to be replaced? The lightish spots on the ribs is wood that peels/flakes off with a fingernail, dry rot perhaps.

It is obvious this boat was propped on it's side for awhile as the ribs are only rotted on one side and the inwale on that side has a flat spot and doesn't match the other side.

It has been raining so much here of late I get to work on this alot.
 

Attachments

  • Rot.001.jpg
    Rot.001.jpg
    39.3 KB · Views: 471
  • Rot.002.jpg
    Rot.002.jpg
    24.2 KB · Views: 472
  • Rib Repair.001.jpg
    Rib Repair.001.jpg
    48.4 KB · Views: 501
Lopsided inwales are not unusual with Chestnuts even when not stored on one side. If you are using a hard wood splint in the ribs remember to drill holes thru the splint for the tacks as they will not punch thru hardwood.
 
Forward ho

Put the first coat of varnish on the interior this morning after getting the major repairs done... 27 rib tips including all 4 cant ribs, 4 behind the rib repairs, 3 new ribs, some bottom planking, inwale tips, stem tips and new decks.

I must say how much I like bending white cedar, it was amazing just how easily it went around the tight curves, however, the dust from it seems noxious to me.

The inwale/stem intersection was quite fiddly and I'm glad to have that over with and did actually learn something new in the process, I'm just glad the stem bands will hide my mess. Rib tips went well enough but aren't something I am very good at.

The acid wash of the wood didn't remove all the dark staining but did tone it down a little bit, just gives the finish more character.

The plan is to have canvas and filler on before it is too cold outside to work, then move on to working on the UFO which will get stripped of the stained interior possibly this weekend. The Chestnut paint will likely wait until spring, the UFO needs things I haven't learned how to do yet.
 

Attachments

  • Stern repair .004.jpg
    Stern repair .004.jpg
    33.6 KB · Views: 449
  • Stern Deck .001.jpg
    Stern Deck .001.jpg
    38.3 KB · Views: 495
  • First varnish coat.jpg
    First varnish coat.jpg
    77.5 KB · Views: 443
Looks REAL good. Stretch the canvas, treat it with preservative and get that filler into it. You'll be paddling by the fall!
 
Canvassed

Starting to get a chill in the air and it was windy as all heck today, but still managed to get the canvas on. We tried the upside down method this time with the anchor points being my two vehicles. The one end went well but the other was too high so at one point we released the tension and lowered the anchor point to around the rear axle, which was much better.

The stems were skinnier on this boat than the Huron and we used tacks instead of staples this go around and it worked quite well, we are getting the hang of wrapping the stems.

Tomorrow I will mix up home brew filler and get that part of it done then wait... it won't get wet this year but will be finished for next season and I have that other project for the winter.
 

Attachments

  • Canvas 4.jpg
    Canvas 4.jpg
    40.7 KB · Views: 433
  • Canvas 3.jpg
    Canvas 3.jpg
    58 KB · Views: 428
  • Good anchor point.jpg
    Good anchor point.jpg
    62.7 KB · Views: 432
  • Canvas 1.jpg
    Canvas 1.jpg
    85.7 KB · Views: 438
  • Ready for canvas.jpg
    Ready for canvas.jpg
    67.7 KB · Views: 422
Alrighty, mixed up a batch of filler from the recipe on the forums and then slathered on the coats. The odd part is, I put on 3 coats and still have enough mixed for 2 more if not more and I wonder why. The Huron, albeit being a larger hull, I ran out after 2 coats of filler which we bought from Douglas Ingram. So it makes me wonder if perhaps the canvas isn't taking the filler like the Huron did, or perhaps I did something wrong in mixing, or if I just got more filler out of this recipe than I had before. I mixed the filler an hour prior to putting the first coat on so there wasn't any settling of the silica.

It did smooth out nice enough but makes me wonder if I should add a coat or two tomorrow since I have enough to do so.

I suppose I will know how well I did in a month or so when, if, it cures, lol.
 

Attachments

  • Filled and polished.jpg
    Filled and polished.jpg
    72 KB · Views: 403
I know why, different canvas supplier, this came from a tent and awning company, the filler did not soak into the canvas. Took a scrap from the Huron build and tried the filler on it and it wet the back of that sample but has not wet the back of the new stuff. I'm hoping it isn't too serious and will still work, although I guess it doesn't have a good hold on the canvas.

This canvas also has a tighter weave to it. Going to put another coat on tomorrow then leave it and see what happens. Worst case is we recanvass again.
 
Last edited:
Still plodding along and maybe, just maybe it will see the water this year still, if it stays reasonably warm.

Painting is well along with just another coat or two to put on, the original alum stem bands are back on and today we began to tackle the outwales. We have done cherry again and although I would prefer one piece, well, that is pricey for us so these are again scarfed. The originals were but mine are better.

The quick upturn of the outwales near the ends was a bit of a test for us, but we managed it with alot of steam and some jigging on the boat. We have one side on and the other is soaking for it's turn sometime this coming week.

I built a new seat frame and just need to get caning supplies and a book so I can try that out. I wanted a custom seat but something more original looking albeit much larger butt area. The seat will hang from the original holes for the front seat and be paddled backwards.

Stembands.jpg

SteamingOutwales.jpg

Fittingfirstoutwale.jpg
 
Inspiration for my Playmate when I get to it this winter...
At least your had canvas and not FG!
BTW, love the paint strip under the gunnels! full pics when she's done?
 
Full pics outside when she is done, but I doubt I will have the seat done before the snow flies. I can get cane at Lee Valley but still need to find a book on how to cane and whatever tools are necessary.

I'm hoping to get the other outwale on this week and more paint on the weekend, that only leaves another coat of varnish, seat, yoke and of course, the new Chestnut deck decal.

The paint on this one is just Tremclad, the light colour is "Sand" and the dark is a custom mix green I made up, darker than usual. Taping out the stripes is pretty easy when you know what you are doing.

Speaking of FG, the hull in the background is the Canadian and I still have to spend the time removing the remaining glas on the hull of that one, at least the fellow we purchased it from had removed the bulk of the glas before hand.
 
Thanks Eastern, that looks like it might work, only the tieing off behind that isn't explained, but I will have plenty of time over the winter to figure it out.
 
I can get cane at Lee Valley but still need to find a book on how to cane and whatever tools are necessary.

Lee Valley carries the instructions for caning, and also has the pegs to make it easier...


Cliff
 
The odds of this canoe seeing water this year is slim considering we got about a foot of snow last weekend, but it has given me the time to finish the seat. It worked out well in the end although I had some hiccups along the way. I had made the actual frame a month before buying cane and a book and at one point thought I may need to remake the frame, but it all worked out in the end and I must say, it is so awesome it is almost a shame to actually use it.

I had the most difficulty with the 5th course, the first diagonal. I did it, looked at it, it was wrong, pulled it out and left it for a week. Sat down last saturday, did it again, looked at it and it was still wrong. Picked it up again monday, did half again and crap, it is still wrong. Took one little piece of cane and whilst studying the original seat, weaved that beside what I had just done and had the eureka moment. Pulled out the major portion and started again (4th time) and it worked perfectly that time. I was ill all week so taking it easy after work on Wednesday night I finished the 5th and started the 6th course. Finished that Friday night, again, on the couch with a cheesy movie playing in the back ground.

Today was doing the 7th course which turned out to be difficult, in the sense of getting cane back through the holes in the looping way to hold the binder down was a struggle at best. I had switched to 2.5mm cane for that purpose but still had some issues, but managed, although it could be tighter I'm sure... There was the point where the binder broke
3/4's way round the seat, which is why the loops hit every hole for a bit before going back to every other hole. I did every second hole based on what the book showed and the original seats.

I am really happy with how well it turned out and it is really cool that I learned something new again. So I just need to varnish it all now. Although the book says to leave the bottom untreated, that has to do with indoor chairs, not anything that can be wetted constantly. I would imagine the entire cane surfaces need to be varnished.

This seat has a much larger surface area than the original seats, which is why I built a new frame. More comfortable for my old butt.
 

Attachments

  • New Seat .001.jpg
    New Seat .001.jpg
    47.7 KB · Views: 420
  • New Seat .002.jpg
    New Seat .002.jpg
    55.5 KB · Views: 426
  • New Seat .003.jpg
    New Seat .003.jpg
    39 KB · Views: 405
Guess I'm a little late on this point but thought it was worth noting. Of the many Chestnut canoes I have restored the majority had oak inwales and outwales which were always scarfed. The ash and even fewer spruce were never scarfed. The majority of decks were either oak or maple. With a little luck one can find Chestnuts with birds eye maple decks and thwarts.
 
Last edited:
Back
Top