Canvas Repair

Glen,
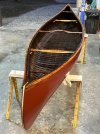
I normally I take great care in all projects I do but this one got away from me.
Thanks for your response and well wishes.
Mike,
Hopefully I will be able to hone my Wood/Canvas skills whether it be building new, restoring old or repairing. I have one in the wings that I will do a few things differently on. One thing is protect the new canvas from my knife wheeling escapades. I will also use the old school filler. I just finished putting mastic filler on this one and it pretty much looks like a big white turd! A gallon or two of thick primer should help:oops:
 
  • Haha
Reactions: MGC
As a sailmaker, there are some misconceptions being set forth about sailcloth, its stretch and the proper way to patch it if damaged. The proper way to patch a sail is using the same weight and weave of cloth, orienting it carefully to match the weave of the base fabric, removing the damaged area and sewing the patch on using the same types of double-stitched seams that are used for the rest of the seams in the sail. Anything else will make spots which do not set properly because they are too stiff or have stretch characteristics which won't match the base fabric.
 
  • Like
Reactions: MGC
As a sailmaker, there are some misconceptions being set forth about sailcloth, its stretch and the proper way to patch it if damaged. The proper way to patch a sail is using the same weight and weave of cloth, orienting it carefully to match the weave of the base fabric, removing the damaged area and sewing the patch on using the same types of double-stitched seams that are used for the rest of the seams in the sail. Anything else will make spots which do not set properly because they are too stiff or have stretch characteristics which won't match the base fabric.

If your comment is directed at me, I fully agree with what you say about sails. I was addressing the implicit concern that a 3 inch cut in a new and uninstalled sheet of canvas couldn't be structurally repaired satisfactorily. I approached that in two posts from two different directions. As to sails, I said:

There are many current articles and YouTube videos about how to repair tears and sew patches on sails.

These articles and videos generally agree with you say.

In a later post, I said:

Aside from sails, it's just common experience that one can sew patches on clothing or other fabrics that will be stronger than the fabric on which they are sewn

What I had in mind was the common practice of reinforcing or patching clothing with stronger materials than the original. Not sails.

My general point is that with the proper materials and patching and sewing techniques, one should be able to make small tears in fabrics equally strong as original, or even stronger. It stretch forces are involved, as with sails and somewhat differently with canoe canvas, then the choice of patching materials likely should match as closely as possible the tensile, compressive, shear and other characteristics of the original fabric.
 
Mike,
Hopefully I will be able to hone my Wood/Canvas skills whether it be building new, restoring old or repairing. I have one in the wings that I will do a few things differently on. One thing is protect the new canvas from my knife wheeling escapades. I will also use the old school filler. I just finished putting mastic filler on this one and it pretty much looks like a big white turd! A gallon or two of thick primer should help:oops:
Too funny. Don't get too carried away with that primer. High spots will always seem to stay higher than the low spots.
You have what it takes to succeed. A sense of humor and a sense of adventure are valuable tools for this hobby.
Another word of caution. If the canvas seems like it's longer than it needs to be, deal with it. A canvas that is just barely long enough is worse than one that seems like it's too long. Resist the urge to cut a foot or two off.
 
Well I thought I'd give you an update on the canoe and the trip to Sylvania Wilderness area. I finished the canoe and the patch held through the build and a couple of floats in my pond. I learned a lot on this build which is a good thing. But, I did not care for the way it floated or I should say the way it "fit" me. I could not get comfortable in it. I left the kneeling thwarts in which were original to the canoe. They were way too low for me to lean back on while kneeling let alone sit on. I was going to use it solo so I was sitting in the bow seat backwards and it put me too far back, there was to much "bow" out of the water to keep a straight track. It was fine when I loaded with the weight of my gear but most of my paddling was going to be with a day pack and fishing gear. So I took my trusty stripper instead. I was feeling kind of bad for not taking it anyway, all of my good adventures had been in the stripper. I think the PennYan will be a good one for my grand kids to learn in.
Sylvania Wilderness area was fantastic! Absolutely beautiful water, clear and clean as could be and great fishing. I went to Deer Island lake and caught more smallies then I ever had before, and good sized ones too. The portages were very mild and most of them were pretty short. The whole time I was there I only had to pick up others trash twice and it was tiny pieces of rappers. I had planned 6 days but heavy rains drove me out after 4. I'd do it again even if I only had 4 days to do it in.
Anyway, thanks to all of the input on the build and the trip in other posts. Great group here and I appreciate you all.
 

Attachments

  • IMG_0416.jpg
    IMG_0416.jpg
    116.4 KB · Views: 77
  • IMG_0420.PNG
    IMG_0420.PNG
    998.5 KB · Views: 89
  • IMG_0454.jpg
    IMG_0454.jpg
    206 KB · Views: 85
  • IMG_0462.jpg
    IMG_0462.jpg
    198.9 KB · Views: 75
  • IMG_0460.jpg
    IMG_0460.jpg
    98.9 KB · Views: 70
  • IMG_0397.jpg
    IMG_0397.jpg
    91.9 KB · Views: 79
Well even though the canoe didn't work our the way you wanted, it sure is beautiful!
I am especially interested in the way your kneeling thwarts are mounted on risers. The canoe I am restoring didn't have seats and I don't want kneeling thwarts, so I am thinking of seats on risers. Any advice on the risers?
And thanks for the great photos!
 
kneeling thwarts are mounted on risers
My Wm English Co. canoe also used risers mounted to three ribs at each location.
tempImagewhP7JC.png

The drawback to this is that the mounting screws are installed from the outside of the canvas. While the screws are unlikely to induce leakage (since they are above the waterline), they are unsightly to my eye.
 
I am surprised the screws are outside the canvas. I was assuming I would install the risers before canvas. I was thinking of making them 5 ribs long, in case I don't like the seat location and want to move it later.
 
You could certainly install prior to canvas.

Countersink the screws flush with the planking, but bear in mind that the relatively thin planking of most canoes will only allow a very shallow countersink- and therefore, a small diameter screw. On my English, the screws are round head and backed by a brass washer, thereby spreading the force against canvas and planking, and with no countersink to weaken the planking. Again, functional, but unsightly.
 
Great, thanks for the info. It is good to know there is more than one way to do this. So there is another option if my plan doesn't work well!
 
It occurs to me that you could also try paddling with a moveable temporary seat, perhaps a milk crate resting on a blanket so as not to mar the interior of your canoe. Then, once you have determined a suitable seat location, install inwale-hung seats per typical wood/canvas canoes. Frankly there is no one seat location that works for all purposes- solo, tandem, empty canoe, tripping load, etc- so seat position is an arbitrary thing at best. Were there no original seat bolt locations on your original inwales? A search of this forum may reveal typical seat locations for most w/c canoes, measured from centerline.
 
I have two fiberglass canoes 13" and 16", and one 17" Kevlar canoe (they are all "rescues"), so I measured the seat locations. As a percentage of length, the bow seats are at 30% and the stern seats at 20% of length, in all three cases.
It seems my wooden canoe had no seats originally, because the only holes in the inwale were for some seats added later and very badly done. They used salvaged seats that were too short on the sides, sitting on construction lumber, which was hanging from the inwales with big clunky steel bolts. Awful.
 
Worth,
The braces for the kneeling thwarts have nuts that go through he outside of the hull that has not yet been canvased and a bolt goes through the brace, ribs and planking into the nut. The inner rails are so narrow that I'm not sure they would support a seat.
I think the canoe will be good for tandem paddling. It may be a good one for my grand kids to learn in.
See my post about the canoe in my earlier post about starting the restoration on it. There you will see the nuts and the structure I am talking about.
1694200362789.png
 
Norm-
I read the old posts, including all the jokes about communing with whoever/whatever is in the glass after working hours!
Those nuts are a very clever solution, but I think I will be OK with screws because I plan for my seat risers to bridge 5 ribs. I am uncertain about seat position (there were none originally) and want to be able to change later if need be.
But even if I don't use your method, I am always interested in new tricks and techniques. Who know, might be useful down the road....
-Worth
 
Back
Top