JClearwater
Wooden Canoes are in the Blood
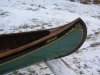
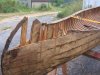
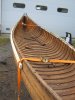
I have finally finished the Crandell I have been working on for two years. Attached are a few pictures. When the weather improves I’ll take some better ones. Frequently Crandells are stamped “H.E. Crandell, Worcester, Mass.” at the ends of the thwarts and on a metal tag tacked to the bow deck. This Crandell is completely unmarked with the exception of the serial number, 17 361, which is faintly stamped on both stems. Prior to starting work on it I brought it to the WCHA Assembly in 2007 and the general consensus was that it is a Crandell based on the deck shape, thwart shape, general form and dimension.
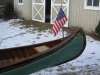
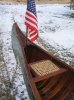
After stripping the purple and orange paint I replaced two ribs, the tips of twelve others, 8” of each stem, 14” of the ends of both inwales, both seat frames, and several feet of planking, mainly in the ends. Gunwale caps and side caps were replaced as well as the outside stems, canvas, varnish etc., etc. I deviated from convention in that I painted rather than varnished the outside stems and I did not bend the brass stem band over the top of the stem as is commonly seen. I saw no reason to cover up my perfect gunwale cap joint with the stem band. I also lowered the bow seat an inch because this canoe is very tender on center. The scroll work on the canoe was applied with an air brush rather than the conventional hand brushing. The air brushing was the only work I did not do myself.
The canoe is named “Adelaide” after my paternal grandmother. She, my grandfather, my father and his siblings spent my weekends camping and canoeing prior to WW2. I’m sure she would approve.
I wish to thank our former president Bill Conrad for the photos and dimensions of his marked Crandell which were helpful in recreating the correct seat frames.
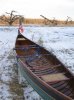
Prior to the addition of the scroll work I re-launched this canoe at Gilford Pinchot State Park on Columbus Day weekend with the Delaware Chapter. In the water this canoe is a rocket, it really moves. With a pair of competent paddlers it would give the high tech Kevlar carbon fiber crowd a run for their money.
Jim Clearwater
After stripping the purple and orange paint I replaced two ribs, the tips of twelve others, 8” of each stem, 14” of the ends of both inwales, both seat frames, and several feet of planking, mainly in the ends. Gunwale caps and side caps were replaced as well as the outside stems, canvas, varnish etc., etc. I deviated from convention in that I painted rather than varnished the outside stems and I did not bend the brass stem band over the top of the stem as is commonly seen. I saw no reason to cover up my perfect gunwale cap joint with the stem band. I also lowered the bow seat an inch because this canoe is very tender on center. The scroll work on the canoe was applied with an air brush rather than the conventional hand brushing. The air brushing was the only work I did not do myself.
The canoe is named “Adelaide” after my paternal grandmother. She, my grandfather, my father and his siblings spent my weekends camping and canoeing prior to WW2. I’m sure she would approve.
I wish to thank our former president Bill Conrad for the photos and dimensions of his marked Crandell which were helpful in recreating the correct seat frames.
Prior to the addition of the scroll work I re-launched this canoe at Gilford Pinchot State Park on Columbus Day weekend with the Delaware Chapter. In the water this canoe is a rocket, it really moves. With a pair of competent paddlers it would give the high tech Kevlar carbon fiber crowd a run for their money.
Jim Clearwater