Tacks show on inside of ribs and not sinking into planking

Tim Belcher

Apprentice
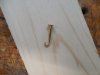
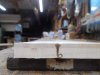
I've clinched and reclinched my tacks and even my best efforts show on the interior of the ribs. They are curved into the rib and sunk into the wood, but are still visible. Am I missing something or will they hopefully disappear when I oil and varnish it? I'm also having trouble sinking the heads to below the exterior planks. Any suggestions are welcome.
 
You will see some but not all clinched tacks on the ribs. Wouldn’t worry about it.
I’m not sure what’s happening with the heads not going below the plank, but one thing that may help is to grind a slight crown on the hammer face. I bought hammer from Rollin 25 years ago and it came with a crown.
Also, ya gotta hit them square, with a little pop in the stroke.
 
Thanks Dave. I did get my hammer from Rollin. Might pouring boiling water on the area soften the wood up and help get the tack to seat better at both ends?
 
Wiping it with a wet rag will get some of the hammer blossoms to disappear as the wood swells -which will may also raise the wood to alleviate your concern about tack ends being raised.
Also, a little gentle sanding with the grain.

If you wet the planking before setting the tacks, this may not be necessary.
I was taught to wet it on the outside (tack head), which also helps the plank bend slightly the opposite way.
 
Are you sure that the tacks are the correct length? I've seen cases where the tacks were too long and the clenched portions on the inside were very unsightly. Pictures may help,

Benson
 
Benson, I used 11/16 inch tacks from Jerry Stolmak on his recommendation. Here are two pictures of the inside. The close up shows a new rib on top and two old ones. The other gives you a sense of what it looks like. I've replaced 100 bf of planking, 7 ribs and 8 cant ribs, along with new decks, gunwales and splicing a new end on the stems. I think I'll try reclinching the worst ones with some hot water and perhaps use a countersink on one side or the other, or perhaps both if I can get a helper. Then fill in the holes on the inside with wood filler. I've come to terms with the limits of how beautiful this canoe will look, but I worry about a kid with bare feet getting in and worrying about visible tacks, even if they are sunk. Any thoughts?

IMG_1186.JPG
IMG_1187.JPG
 
Tim,
It’s difficult at best to hold the iron and clinch tacks toward the centerline of the canoe, which is where I see your new tacks are. It helps if you can get somebody to hold the iron while the other guy is driving tacks.
You don’t need to try to hold the iron at the extent of your reach and drive the tack.
If you are using cedar planks, I see no reason to wet them, however as stated before, if you wet with hot water after clinching, your hammer blossoms will
Also I noticed the finish washers are still on the ribs. Having the clinching iron on a washer while clinching will cause a problem.
 
  • Like
Reactions: MGC
What Dave said is the key, the clinching iron must be well placed to turn the tacks. Unless you have really long arms, it is very hard to reach to the center of the hull. A good helper and good communication can make all the difference. What I do to help streamline the process is to predrill a tiny hole through the planking. That allows me to start the tack and really give it a good solid wallop.
There is no need to wet the wood.....unless you literally steam a damp cloth over it, there would be next to zero penetration.
 
I assume you'll be stripping the old varnish off the interior and then reapplying new varnish. If you're diligent in cleaning with TSP during the stripping process you may well be rewarded with the old wood turning a wonderful amber color, and I bet you'll find these clenched tacks will blend in quite well.
 
  • Like
Reactions: MGC
These pictures are after I stripped all old varnish (and the exterior fiberglass) and replaced the cracked ribs and 100 bf of planking. I stained everything with red mahogany, which I realize is not a traditional option, but I like the color and it hides the differences in wood colors and other blemishes without having to use chemicals to bleach the wood. I've started burying the tips of the most visible tacks with a fine-point countersink, to bend them in more, and then reclinching again. It seems to help. The varnish should help hide the tacks as well, once I get to that point. I appreciate everyone's responses. Thanks as always.
 
I got better at curling them as I did more. I had to learn starting with the very bottom planks, so the hardest to reach. I eventually used a small pair of needle nose pliers to curl them as they protruded from the pre-drilled hole and then using the iron to clinch everything, and that worked well. Even then they are pretty noticeable.
 
Seems to me your tacks should curl against the iron. What does your iron look like? Is it polished smooth? Is it slightly curved so you get good contact?
 
Enlightening. Wow! It's making a scroll even though it doesn't have contact with a form containing the perimeter. It's hitting one point on the anvil, which is flat. The shape is determined by the tip and taper. Gotta try that on a bigger scale. Thank you very much, Rollin. I mean it. That's great.
 
Back
Top